

There’s a particular kind of magic that happens when you combine peanut butter and chocolate—it’s one of those flavor pairings so perfect, so universally beloved, that it transcends trends and generations. Add Snickers bars into the mix, and you’ve got a trifecta of deliciousness that’s basically irresistible. This No-Bake Peanut Butter Snickers Pie takes that magic and transforms it into a dessert that’s impressive enough for special occasions but easy enough that you can make it on a weeknight without breaking a sweat.
What I love most about this pie from a pastry perspective is how the textures work together. The graham cracker crust provides that essential buttery crunch. The filling is airy and mousse-like thanks to the whipped cream folded in, but it’s stabilized by cream cheese so it holds its shape beautifully when sliced. The chopped Snickers bars create surprise pockets of chewy caramel, crunchy peanuts, and chocolate throughout. And that chocolate drizzle on top? It’s not just decorative—it adds one more layer of chocolate flavor and creates a professional-looking finish that makes people think you spent hours on this pie.
The no-bake aspect is crucial here. In the summer, when turning on the oven feels like punishment, or during the holidays when oven space is at a premium, having a stunning dessert that requires nothing more than a refrigerator is invaluable. But beyond convenience, the no-bake method actually creates a better texture for this particular pie—the filling stays light and creamy rather than becoming dense and heavy from baking. It’s not lazy baking; it’s smart baking that plays to the strengths of the ingredients.
─────────
The Inspiration Behind This Recipe
I developed this recipe during a particularly hot summer when I was craving something sweet but couldn’t bear the thought of turning on the oven. I’d been experimenting with no-bake cheesecake techniques—how to create stable, sliceable fillings using cream cheese and whipped cream—and I started thinking about how peanut butter could fit into that framework. Peanut butter has natural oils and a thick consistency that provides structure, making it perfect for no-bake applications.
The Snickers addition came from pure candy bar love. Snickers have everything—chocolate, caramel, peanuts, nougat—all wrapped up in one convenient package. I realized that instead of trying to recreate all those elements separately, I could just chop up Snickers bars and fold them into the filling. It was one of those “why didn’t I think of this sooner?” moments that occasionally happen in recipe development.
What surprised me during testing was how well the Snickers bars held up in the filling. I was worried they might get soggy or dissolve into the cream cheese mixture, but they maintain their texture beautifully even after hours in the refrigerator. The caramel stays chewy, the peanuts stay crunchy, and the chocolate provides those little hits of sweetness throughout. It’s like a treasure hunt in every slice—you never know exactly where you’ll hit a piece of Snickers, and that element of surprise makes each bite exciting.
─────────
A Brief History of No-Bake Pies & Peanut Butter in Desserts
No-bake pies emerged in American home baking as refrigerators became common household appliances in the 1920s and 1930s. Before reliable refrigeration, most pies required baking both for food safety and to set the filling. Once refrigerators allowed for cold storage, creative bakers began developing pies that set through chilling rather than heat—custard pies thickened with gelatin, cream pies stabilized with whipped cream, and eventually cream cheese-based pies that became popular in the 1950s and beyond.
Peanut butter itself has an interesting dessert history. While peanut butter was invented in the late 1800s and promoted as a protein-rich food, it didn’t become a dessert staple until the mid-20th century. The combination of peanut butter and chocolate was popularized by Reese’s Peanut Butter Cups, introduced in 1928 by H.B. Reese. The pairing proved so successful that it spawned countless dessert variations—peanut butter cups, peanut butter cookies with chocolate chips, chocolate-peanut butter cakes, and eventually elaborate desserts like this pie.
Snickers bars themselves date back to 1930, created by the Mars company and named after the family’s favorite horse. The bar’s combination of nougat, caramel, peanuts, and milk chocolate became one of the world’s best-selling candy bars. Using candy bars as ingredients in homemade desserts became a trend in the 1980s and 1990s, with home bakers recognizing that chopping up commercial candies could provide complex flavors and textures without needing to make each component from scratch.
This No-Bake Peanut Butter Snickers Pie represents the convergence of all these trends—no-bake convenience, peanut butter-chocolate love affair, and candy bar inspiration—into one thoroughly modern, thoroughly American dessert.
─────────
Why This No-Bake Method Works Perfectly
Cream cheese provides structure and tang. When softened and beaten with peanut butter, cream cheese creates a stable base that can support additional ingredients without collapsing. The slight acidity in cream cheese also balances the sweetness and enhances the peanut butter flavor, preventing the pie from tasting one-dimensionally sweet. Cream cheese-based fillings are the backbone of most no-bake pies because they provide richness and structure without requiring heat to set.
Peanut butter adds body and flavor. Creamy peanut butter (not natural-style with separated oils) has emulsifiers and stabilizers that help it integrate smoothly into the cream cheese mixture. The oils in peanut butter also contribute to the filling’s richness and help create that silky, smooth texture. Peanut butter’s thickness means you can add it to whipped cream mixtures without deflating them as much as a more liquid ingredient would.
Whipped cream creates lightness. By folding whipped cream into the peanut butter-cream cheese mixture, you incorporate air bubbles that make the filling light and mousse-like rather than dense and heavy. This is crucial—without the whipped cream, you’d have a very thick, fudge-like filling that would be difficult to slice and potentially overwhelming to eat. The whipped cream transforms it into something that feels indulgent but not overly heavy.
Powdered sugar sweetens and stabilizes. Powdered sugar dissolves more easily than granulated sugar and contains cornstarch, which helps stabilize the whipped cream and prevents it from weeping. It also provides sweetness without any grittiness that granulated sugar might cause in a no-bake filling.
The graham cracker crust needs no baking. The combination of finely ground graham crackers and melted butter creates a crust that holds together through compression alone. When pressed firmly and chilled, the butter solidifies and acts as glue, holding the crumbs together. You can pre-bake the crust for extra stability if desired, but it’s not necessary for this pie.
Chopped Snickers bars maintain their texture. Candy bars are designed to be shelf-stable, which means they hold up remarkably well when incorporated into cold desserts. The chocolate won’t bloom, the caramel won’t weep, and the peanuts stay crunchy. This makes them ideal for mix-ins in no-bake applications where you want textural contrast.
Chilling time is non-negotiable. The pie needs at least 2 hours (preferably 4-6 or overnight) in the refrigerator to fully set. During this time, the butter in the crust solidifies, the cream cheese firms up, the whipped cream stabilizes, and all the flavors meld together. Cold temperature is what makes this pie sliceable rather than spoonable.
The chocolate drizzle adds professional polish. Melted chocolate not only looks impressive but also adds one more layer of chocolate flavor. The slight bitterness of semisweet chocolate balances the sweet filling and provides textural interest when it hardens slightly in the refrigerator.
─────────
Flavor Profile: What to Expect
Rich, creamy peanut butter flavor dominates in the most satisfying way. The peanut butter is prominent but not overwhelming—it’s balanced by the cream cheese’s tanginess and the whipped cream’s lightness. You get that characteristic roasted peanut taste with slight saltiness that makes peanut butter so addictive. It’s the kind of peanut butter flavor that peanut butter lovers dream about.
Sweet-salty balance is perfect throughout. The peanut butter and peanuts from the Snickers provide just enough saltiness to balance all the sweetness from the powdered sugar, candy bars, and chocolate. This balance is what prevents the pie from being cloying—every sweet note is tempered by a savory one.
Chocolate appears in multiple forms—from the candy bars, from the drizzle on top, and in little bursts throughout. The chocolate is sweet but not overpowering, and it complements the peanut butter in that classic combination that never gets old.
Chewy caramel creates those wonderful sticky-sweet moments when you hit a piece of Snickers. The caramel adds depth and another layer of sweetness that’s different from the straight sugar sweetness. It’s gooey and satisfying, the kind of texture that makes you slow down and savor.
Crunchy peanuts from both the peanut butter and the Snickers bars provide essential textural contrast to all that creaminess. Little pockets of crunch keep things interesting and prevent the pie from being one-dimensionally smooth.
Buttery graham cracker crust grounds everything with its familiar, honey-sweet flavor and sandy texture. The crust provides not just structure but also a comforting, nostalgic flavor that reminds you of other beloved desserts.
The overall experience is indulgent and crowd-pleasing. This tastes like a peanut butter cup and a Snickers bar had a baby, and that baby grew up to be the most delicious pie imaginable. It’s sweet, salty, creamy, crunchy, chocolatey, peanut buttery—everything you want in a dessert, all in one perfectly balanced slice.
─────────
Tips for Making the Best No-Bake Peanut Butter Snickers Pie
Crust Construction:
- Use finely ground graham cracker crumbs for the smoothest crust—pulse whole crackers in a food processor or buy pre-made crumbs. You’ll need about 1½ cups (one sleeve of crackers).
- The wet sand test: The crumb-butter mixture should hold together when squeezed in your fist but still be crumbly. Add more melted butter if it seems too dry.
- Press firmly and evenly into your pie dish, paying special attention to the corners where the bottom meets the sides. Use the bottom of a measuring cup or glass to pack it tightly.
- Pre-chill the crust for 15-20 minutes in the freezer before adding the filling—this helps it set and makes it sturdier.
- Optional pre-bake: For an even sturdier crust, bake at 350°F for 8-10 minutes and cool completely before filling.
Creating the Perfect Filling:
- Room temperature cream cheese is essential—it should be soft enough to beat smooth but not melty or greasy. Let it sit out for 30-60 minutes before using.
- Beat cream cheese thoroughly before adding peanut butter to eliminate any lumps. Scrape down the bowl frequently.
- Use regular creamy peanut butter, not natural-style with separated oils. Natural peanut butter will make the filling too loose and oily. Jif, Skippy, or similar brands work perfectly.
- Beat peanut butter mixture until completely smooth before folding in whipped cream—any lumps at this stage won’t smooth out later.
- Whip cream to soft peaks (not stiff peaks) for easier folding. If it’s too stiff, it’s harder to incorporate without deflating.
- Fold gently using a large spatula with sweeping motions from bottom to top. You want to maintain as much air as possible in the whipped cream while fully incorporating it into the peanut butter mixture.
Working with Snickers Bars:
- Chill Snickers bars before chopping for 15-20 minutes in the freezer—cold candy bars are much easier to chop cleanly without the caramel getting sticky and stringy.
- Use a sharp knife and wipe it clean between chops to prevent caramel buildup.
- Chop into roughly ½-inch pieces—you want substantial chunks that provide good textural contrast, not tiny bits that disappear into the filling.
- You’ll need about 4-5 full-size Snickers bars depending on how studded with candy you want your pie.
- Save some chopped pieces for garnishing the top if desired.
Chocolate Drizzle Technique:
- Use good quality chocolate chips—Ghirardelli or Guittard are excellent choices. The better the chocolate, the better it tastes and the more beautifully it sets.
- Melt in 20-second increments in the microwave, stirring between each interval. Don’t rush this—overheated chocolate seizes and becomes grainy.
- Let melted chocolate cool slightly (3-5 minutes) before drizzling—too-hot chocolate will be runny and difficult to control.
- Use a spoon or a piping bag to create the drizzle pattern. For professional-looking results, drizzle in parallel lines, then drag a toothpick perpendicular through them to create a feathered effect.
- Work quickly once you start drizzling—chocolate begins to set as it cools.
Assembly and Setting:
- Layer the filling thoughtfully—half the filling, then Snickers layer, then remaining filling. This creates visible layers when you slice.
- Smooth the top with an offset spatula for the most professional appearance.
- Refrigerate uncovered for the first hour to prevent condensation, then cover loosely.
- Minimum 2 hours, but 4-6 hours or overnight is ideal for the firmest, most sliceable results.
─────────
Serving Suggestions and Presentation Ideas
Classic Simplicity: Serve slices on simple white plates with the chocolate drizzle as the main visual element. The pie is beautiful on its own and needs no additional garnish. Provide forks and napkins—this pie is rich and satisfying. This presentation works for any casual gathering or family dinner.
Candy Bar Explosion: Top the entire pie with additional chopped Snickers pieces, peanuts, and chocolate chips before the chocolate drizzle for maximum candy bar appeal. Drizzle with caramel sauce in addition to the chocolate for over-the-top indulgence. This presentation screams “celebration” and works beautifully for birthdays or candy-themed parties.
Elegant Plated Dessert: Slice neat wedges and plate individually with caramel sauce drizzled on the plate in an artistic pattern. Add a small dollop of whipped cream and three chocolate-covered peanuts as garnish. Dust the plate rim with cocoa powder for restaurant-quality presentation. This elevates the casual pie into something worthy of a dinner party.
Ice Cream Pairing: Serve slices with a scoop of vanilla ice cream or peanut butter ice cream on the side. The cold ice cream melting into the pie creates an incredible combination. Drizzle with hot fudge sauce for the ultimate sundae-pie hybrid experience.
Kids’ Party Perfect: Cut into smaller wedges for kid-friendly portions (this is rich!) and serve on colorful paper plates. Set out extra toppings—whipped cream, chocolate chips, crushed peanuts, caramel sauce—and let kids customize their slices. The interactive element makes dessert even more fun.
Holiday Presentation: For special occasions, pipe decorative borders of whipped cream around the edges using a star tip. Create a chocolate ganache drizzle instead of plain melted chocolate for extra richness. Add gold leaf or edible glitter for festive glamour. This transforms the pie into something celebration-worthy.
─────────
Storage, Reheating, and Make-Ahead Tips
Storage:
- Refrigerator: Store covered tightly with plastic wrap or in a pie carrier for up to 5 days. The cream cheese and whipped cream require constant refrigeration.
- Freezer: Freeze the whole pie (well-wrapped) or individual slices for up to 2 months. Thaw overnight in the refrigerator before serving. The texture remains excellent after freezing—in fact, some people prefer eating it partially frozen for a more ice-cream-cake-like experience.
- Never leave at room temperature for more than 2 hours due to dairy content.
Make-Ahead Strategy: This pie is ideal for advance preparation and actually improves with time:
- Make the crust 2-3 days ahead and store covered in the refrigerator
- Prepare the entire pie 1-3 days before serving—the flavors deepen and improve as they sit
- Add fresh chocolate drizzle the day of serving if you want it to look freshly made (optional—the original drizzle holds up fine for several days)
The pie actually tastes better on day 2 or 3 than on day 1 because all the flavors have time to meld together. The peanut butter flavor becomes more pronounced, and the Snickers pieces soften slightly and integrate more fully into the filling. Don’t hesitate to make this well in advance.
Serving Temperature: This pie is best served cold from the refrigerator—the chilled temperature is essential for maintaining the structure and creating that refreshing contrast to the rich flavors. Some people enjoy it partially frozen for an extra-cold, almost-ice-cream-like texture. Experiment to find your preference!
Slicing Tips: For the cleanest slices:
- Use a sharp knife dipped in hot water and wiped dry between each cut
- Make decisive cuts rather than sawing back and forth
- Wipe the knife clean after each slice to prevent peanut butter and chocolate buildup
- A thin-bladed knife works better than a thick one for cutting through the layers cleanly
Portion Control: This pie is incredibly rich, so smaller slices are appropriate—cut it into 10-12 slices rather than the traditional 8. People can always have seconds, but starting with smaller portions prevents waste and ensures no one feels overwhelmed by richness.
─────────
Why This Recipe Deserves a Spot in Your Rotation
No-Bake Peanut Butter Snickers Pie is one of those recipes that earns a permanent place in your collection not because you’ll make it every week, but because when you need it, nothing else will do. It’s your special occasion showstopper, your potluck hero, your “I need to impress someone” ace in the hole. And the beauty is that while it looks and tastes like you spent hours on it, the actual hands-on time is maybe 20 minutes.
What makes this pie genuinely special is how it captures beloved candy bar flavors in a more sophisticated, shareable format. Everyone loves Snickers—it’s one of the world’s best-selling candy bars for a reason. By incorporating those flavors into a pie with a light, mousse-like filling, you create something that feels more grown-up and special than just eating candy bars, but still delivers all those familiar, comforting flavors people crave.
The no-bake aspect is genuinely advantageous, not just convenient. The filling’s texture—light, airy, creamy—is achieved specifically because it’s not baked. Baking would make it denser and heavier. The no-bake method allows the whipped cream to maintain its airiness, creating something that’s rich without being overwhelming. It’s also perfect for hot weather when ovens are off-limits and for busy holidays when oven space is at a premium.
From a practical standpoint, the make-ahead capability is invaluable. You can prepare this pie completely 1-3 days before your event, which eliminates last-minute stress. The pie doesn’t decline in quality as it sits—it actually improves. For anyone who entertains regularly or brings desserts to gatherings, having a reliable make-ahead option that travels well and serves a crowd is worth its weight in gold.
The universal appeal cannot be overstated. I’ve served this to children, teenagers, adults, and grandparents. I’ve served it to people who claim not to like peanut butter (they changed their minds). I’ve served it to dessert snobs and people who “don’t really do sweets.” Everyone loves it. The combination of peanut butter, chocolate, and candy bars is so fundamentally appealing that it transcends personal preferences and dietary trends.
If you’re looking for a dessert that will make you the hero of every potluck, that captures beloved candy flavors in pie form, that’s easy enough for novice bakers but impressive enough for experienced hosts, that can be made entirely in advance—this is it. No-Bake Peanut Butter Snickers Pie proves that sometimes the best desserts are the ones that embrace pure, unapologetic indulgence and deliver exactly what people crave.
─────────
Recommended Drink Pairing
Cold Milk – Whole or 2%: Ice-cold milk is the classic, perfect pairing—peanut butter and milk are natural partners, and the cold milk cuts through the richness beautifully while complementing the flavors. This pairing is nostalgic, comforting, and appropriate for all ages. It’s what your inner child craves with this pie.
Coffee – Iced or Hot: A strong coffee (hot or iced) provides bitter contrast that balances the sweet pie while enhancing the chocolate notes. Cold brew with cream or an iced latte works beautifully, matching the cold temperature of the pie. The coffee’s bitterness prevents palate fatigue and makes you ready for another bite.
Peanut Butter Whiskey or Chocolate Stout: For adults, peanut butter whiskey (like Skrewball) served neat or on the rocks creates a flavor echo that peanut butter lovers will adore. Alternatively, a rich chocolate stout or peanut butter porter complements the pie’s flavors while adding roasted, malty notes. These pairings turn dessert into an adult indulgence.
Hot Chocolate: Rich, dark hot chocolate provides warm contrast to the cold pie while doubling down on chocolate flavor. The temperature contrast is delightful—warm sips between cold, creamy bites. Top the hot chocolate with whipped cream and chocolate shavings to mirror the pie’s presentation.
Baileys or Kahlúa on Ice: Baileys Irish Cream with its creamy sweetness or Kahlúa with its coffee-chocolate notes both complement the pie beautifully. Serve over ice as a dessert cocktail that extends the pie’s flavors into liquid form. This pairing feels sophisticated and indulgent for special celebrations.
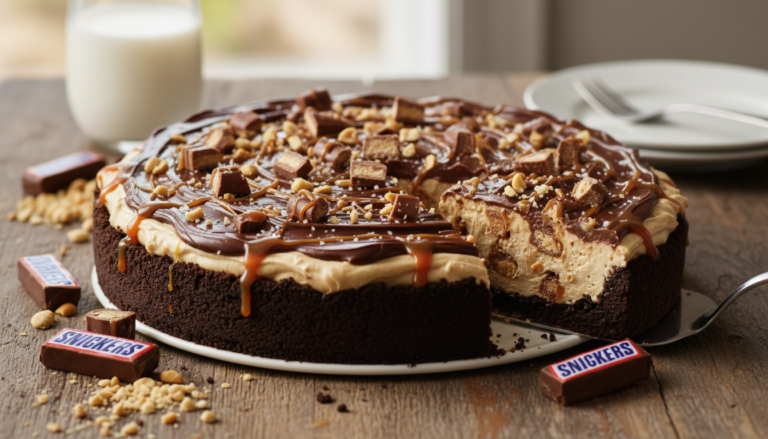
No-Bake Peanut Butter Snickers Pie
No-Bake Peanut Butter Snickers Pie is a candy lover’s dream—rich peanut butter cream cheese filling studded with chopped Snickers bars, all nestled in a graham cracker crust and finished with a glossy chocolate drizzle for the ultimate no-fuss showstopper.
4
servings30
minutes40
minutes300
kcal1
hour10
minutesIngredients
1 cup graham cracker crumbs
4 tablespoons unsalted butter, melted
1 cup creamy peanut butter
8 ounces cream cheese, softened
1 cup powdered sugar
1 teaspoon vanilla extract
1 cup heavy whipping cream
10 ounces Snickers bars, chopped
1 cup semisweet chocolate chips
Directions
- Combine graham cracker crumbs and melted butter, mixing well.
- Press mixture into a pie dish to form crust.
- In a large bowl, beat peanut butter, cream cheese, powdered sugar, and vanilla extract until smooth.
- Whip heavy cream until soft peaks form, then fold into peanut butter mixture.
- Spoon half the mixture into the crust; layer with chopped Snickers.
- Add remaining peanut butter mixture and smooth top.
- Melt chocolate chips in a microwave-safe bowl, stirring until smooth.
- Drizzle melted chocolate over pie; chill for at least 2 hours before serving.
Nutrition Facts
- Total number of serves: 4
- Calories: 550kcal
- Cholesterol: 0mg
- Sodium: 620mg
- Potassium: 400mg
- Sugar: 8g
- Protein: 6g
- Calcium: 60mg
- Iron: 2mg
About This Author

Aurora Wright
Pastry Chef & Dessert Editor
Aurora is the sweet side of Daily Dish. A trained pastry chef and dessert stylist, she’s responsible for our mouth-watering cakes, cookies, and confections. She brings precision, artistry, and a touch of whimsy to every recipe she creates — and taste-tests more chocolate than she’ll admit.
Favorite dish: Flourless dark chocolate torte.
Kitchen motto: “Life’s too short to skip dessert.”


