

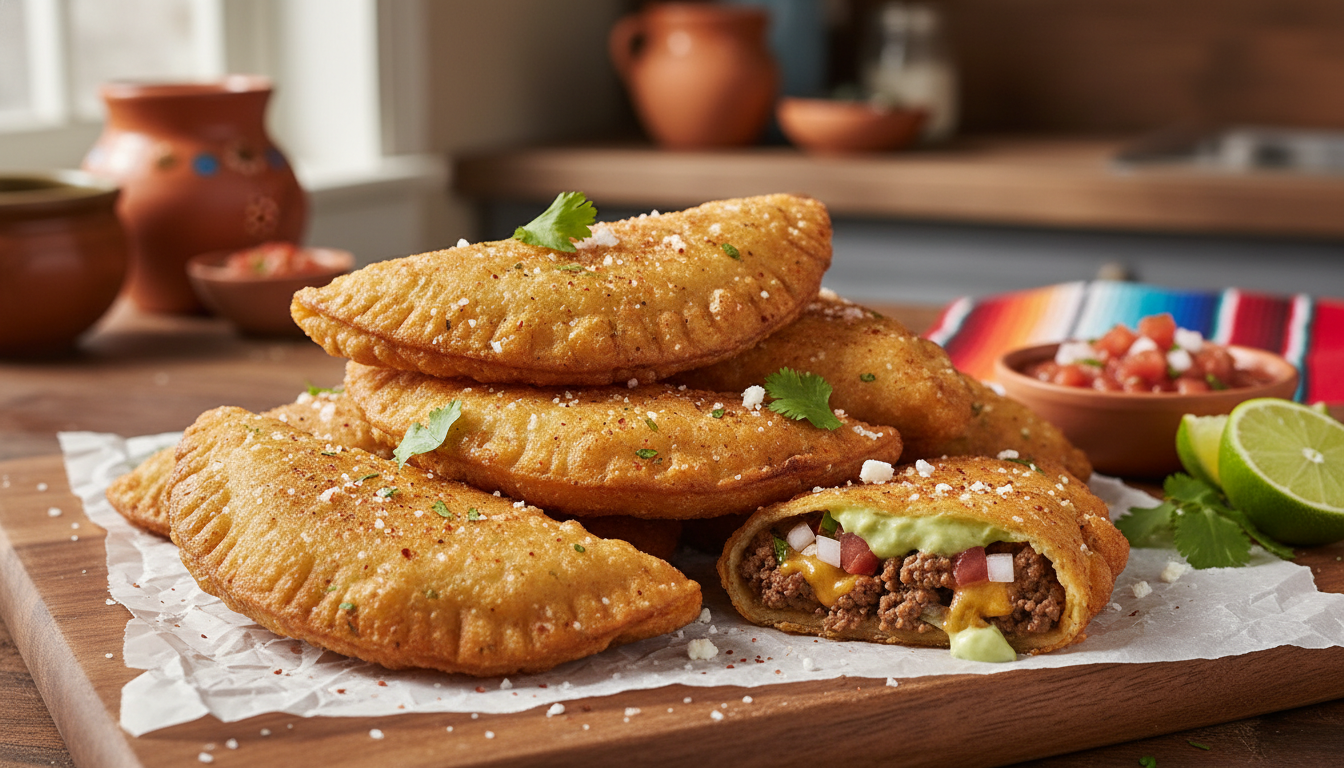
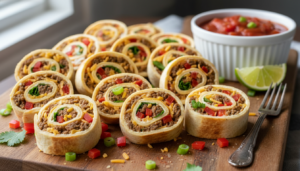
There are meals that solve a problem elegantly, and this is one of them. Crispy Mexican Taco Pockets take everything you love about taco night—seasoned ground beef, melted cheddar, fresh tomatoes and lettuce—and seal it inside a flour tortilla that bakes in the oven until golden, crispy, and completely self-contained. No taco shell cracking at the first bite. No filling spilling down your wrist. Just a perfectly portioned, handheld pocket with a satisfying crunch and every taco flavor you’re craving in every single bite.
I developed this recipe because I wanted taco night to work for a crowd without the assembly line chaos that a traditional taco bar can create. These pockets are made ahead, baked in batches, and come out of the oven ready to serve—no toppings bar to set up, no soggy shells to manage, no waiting for someone to assemble their plate before the food gets cold. They’re also, frankly, more fun to eat than a standard taco. The crispy exterior gives them a satisfying texture that makes them feel like something genuinely thought-about rather than just thrown together.
The baked approach is the practical decision that makes this recipe so weeknight-friendly. A brush of vegetable oil on the outside of each pocket is all it takes to achieve the kind of golden, blistered exterior that would otherwise require a deep fryer—and at 400°F, fifteen minutes produces a crust with real crunch and a filling that is piping hot and perfectly melted throughout.
The Inspiration Behind This Recipe
This recipe was inspired by the empanada and quesadilla traditions of Mexican and Latin American cooking—the understanding that sealing a savory filling inside a pastry or tortilla and applying high heat is one of the most satisfying cooking techniques in any cuisine. The handheld pocket format has appeared across food cultures worldwide—from the Cornish pasty to the samosa to the Indian paratha—because it solves the same fundamental problem everywhere: how do you make a filling that travels well, eats cleanly, and delivers a complete, satisfying meal in every bite?
Applying that concept to taco fillings felt like the most natural possible evolution of the format—familiar enough to feel instantly comfortable, different enough to feel genuinely exciting.
A Brief History of Baked Tortilla Pockets and Mexican Handheld Foods
The tradition of enclosing savory fillings in masa or wheat-based wrappers and cooking them over heat stretches back to pre-Columbian Mexican cooking, where tamales—masa filled with meat, beans, or chiles and steamed in corn husks—were a staple food of Mesoamerican civilization for millennia. The arrival of wheat flour with Spanish colonizers introduced flour tortillas to northern Mexico, which quickly became the vessel of choice for a wide range of handheld preparations: burritos, quesadillas, chimichangas, and the various regional pocket preparations that fold and seal fillings inside a tortilla before cooking.
The chimichanga—a deep-fried or baked burrito—is the closest American-Mexican culinary relative to this recipe, originating in Arizona’s Sonoran Mexican-American food tradition and becoming one of the most beloved Tex-Mex preparations in the American Southwest. This taco pocket takes that same sealing-and-crisping concept and applies it to a smaller, more portable format with classic taco seasoning and toppings as the filling.
Why the Baked Method Delivers Great Crispiness
Baking brushed-oil tortilla pockets at 400°F produces a crispy exterior through a combination of conduction and convection that is more practical for home cooks than deep frying and nearly as effective in terms of finished texture. The vegetable oil brushed on the outside of each pocket provides the fat needed for the tortilla surface to brown and crisp—without oil, the tortilla simply dries out in the oven rather than developing the golden, slightly blistered exterior that defines a great baked pocket.
The sealed filling inside creates a steam environment within the pocket as it bakes—the moisture from the beef and tomatoes turns to steam, which helps the cheese melt completely and keeps the interior filling piping hot and cohesive while the exterior crisps around it. That contrast—crispy outside, melty inside—is what makes these pockets so satisfying, and it happens through the physics of the baking process rather than any special technique on the cook’s part.
Flavor Profile: What to Expect
Every component earns its place in these pockets:
- Golden, crispy tortilla exterior that blisters and crisps in the oven into a satisfying crunch with every bite
- Savory, well-seasoned taco beef with warm cumin and chili powder carrying through the entire filling
- Melted, sharp cheddar that becomes gooey and cohesive inside the sealed pocket during baking
- Juicy diced tomatoes that release their moisture into the filling and keep the beef from tasting dry
- Cool, crisp lettuce that provides fresh contrast to the warm, spiced filling—added before sealing so it wilts slightly and integrates with the other components
- The sealed edge that holds everything together and delivers a clean, even bite every time
The overall effect is bold, cheesy, savory, and deeply satisfying—taco flavor in its most convenient, crowd-friendly form.
Tips for Making the Best Crispy Taco Pockets
A few details will make a meaningful difference:
- Don’t overfill: Too much filling makes the pocket impossible to seal properly and causes it to burst open during baking. A few tablespoons of each component per pocket is the right amount.
- Seal edges firmly: Press the folded edges of the tortilla firmly together and, if needed, use a fork to crimp them or secure with a toothpick before baking. A well-sealed pocket stays intact; a poorly sealed one loses its filling in the oven.
- Brush oil generously and evenly: The oil is what produces the crispy, golden exterior. Cover every surface of each pocket, including the edges.
- Place seam-side down on the baking sheet: Starting with the sealed side facing down allows the oven’s direct heat to set the seal immediately, preventing the pocket from opening before it has crisped.
- Use warm tortillas: Room-temperature or slightly warmed tortillas fold without cracking. Cold tortillas tear at the edges during folding and are harder to seal.
- Drain the beef well: Excess fat in the filling makes the pocket greasy and can prevent the bottom from crisping properly in the oven.
Serving Suggestions and Side Pairings
These pockets are versatile enough to work in a range of settings:
- With salsa, sour cream, and guacamole on the side for dipping
- Alongside a simple Mexican coleslaw for a cool, crunchy contrast
- With a bowl of Cheesy Southwestern Chicken Tortilla Soup for a complete Tex-Mex dinner
- Cut in half diagonally for a party platter presentation
- As a kid-friendly weeknight dinner alongside rice and beans
Storage, Reheating, and Make-Ahead Tips
These pockets hold up well for meal prep and leftovers:
- Refrigerate baked pockets for up to 3 days in an airtight container.
- Reheat in a 375°F oven for 8–10 minutes to restore crispness. A skillet over medium heat works equally well. Avoid the microwave—it softens the tortilla exterior entirely.
- Freeze assembled, unbaked pockets on a sheet pan, then transfer to a freezer bag for up to 2 months. Bake directly from frozen at 400°F for 20–22 minutes.
- Make ahead by assembling and refrigerating unbaked pockets for up to 24 hours—bake fresh at serving time for the best texture.
Why This Recipe Deserves a Spot in Your Rotation
Crispy Mexican Taco Pockets earn their rotation spot by solving taco night in the most practical and delicious way possible. They’re make-ahead friendly, crowd-scalable, kid-approved, and produce a dinner that is genuinely fun to eat. Once these appear on your table, regular tacos feel like they’re missing something—and that something is the golden, crispy, perfectly sealed pocket that keeps every bite exactly where it belongs.
Recommended Drink Pairing
The bold, taco-spiced beef and crispy tortilla exterior call for something equally festive and refreshing. A Strawberry Lemonade Whiskey Sour brings bright fruit acidity and citrus that plays beautifully against the cumin and cheddar while adding a fun, party-ready spirit that suits these pockets perfectly. A cold Mexican lager with lime or a sparkling hibiscus agua fresca works equally well for a more casual spread.
For non-alcoholic options, a cold horchata or a sparkling tamarind agua fresca provides the sweet, cooling contrast that makes a bold, savory pocket even more enjoyable.

Crispy Mexican Taco Pockets
Crispy Mexican Taco Pockets fold taco-seasoned beef, cheddar, tomatoes, and lettuce into flour tortillas and bake until golden and shatteringly crispy—a handheld, make-ahead taco night upgrade the whole family will request on repeat.
4
servings15
minutes20
minutes450
kcal35
minutesIngredients
1 pound ground beef
1 cup shredded cheddar cheese
1 packet taco seasoning
1 cup diced tomatoes
1 cup chopped lettuce
8 flour tortillas
2 tablespoons vegetable oil
Directions
- Preheat the oven to 400°F (200°C).
- In a skillet over medium heat, cook the ground beef until browned.
- Add taco seasoning and water to skillet; simmer until fully combined.
- Lay out tortillas and fill each with beef mixture, cheese, tomatoes, and lettuce.
- Fold tortillas into pockets, securing edges.
- Brush pockets with vegetable oil and place on a baking sheet.
- Bake in preheated oven for 15 minutes, or until golden and crispy.
- Serve hot and enjoy your taco pockets.
Nutrition Facts
- Total number of serves: 4
- Calories: 450kcal
- Cholesterol: 0mg
- Sodium: 620mg
- Potassium: 400mg
- Sugar: 8g
- Protein: 6g
- Calcium: 60mg
- Iron: 2mg
About This Author

Amelia Grace
Editor-in-Chief & Culinary Director
The heart and guiding voice of Daily Dish, Amelia leads our editorial vision and recipe development. With a background in food journalism and over a decade spent in professional kitchens, she has a knack for blending gourmet technique with real-world accessibility. Her goal? To make every reader feel like a confident cook, one dish at a time.
Favorite dish: Creamy lemon risotto with a sprinkle of fresh thyme.
Kitchen motto: “Good food doesn’t have to be complicated — it just has to be made with heart.”


