

Let me tell you about the first time I discovered baked tacos. I was attempting to make traditional fried tacos for a weeknight dinner, and after the third shell cracked and spilled its filling all over my stovetop, I had a moment of frustration-fueled innovation: what if I just stood them up in a baking dish and let the oven do the work? The result was a revelation—perfectly crispy shells, melted cheese, and zero oil splatter on my stove or walls.
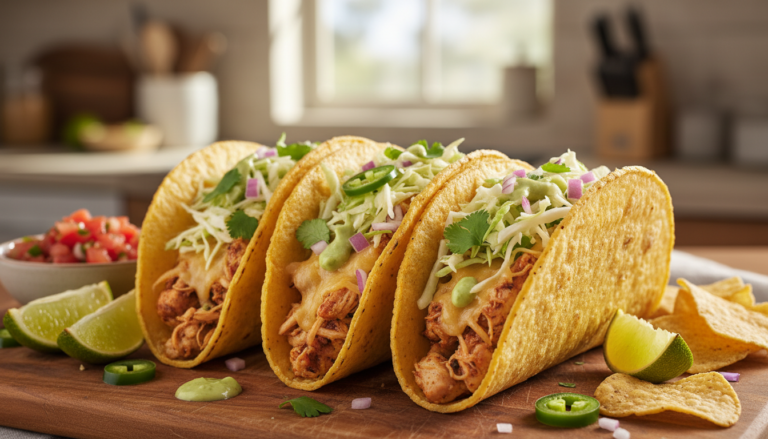
These Crispy Baked Chicken Tacos have become my go-to when I want the satisfaction of crunchy tacos without the hassle. The process is wonderfully straightforward: season and cook your chicken, shred it, mix it with salsa for moisture, stuff it into shells with cheese, and bake until everything is golden and gorgeous. The oven heat crisps the shells evenly while the cheese melts into gooey perfection, and you’re free to prep toppings, set the table, or simply relax instead of standing guard over hot oil.
What I appreciate most is how this method makes crispy tacos accessible even on busy Tuesdays. There’s no technique to master, no timing to worry about, and cleanup is minimal. The tacos come out of the oven looking restaurant-pretty, standing at attention in their baking dish like little edible soldiers ready for toppings. Kids love them because they’re fun to eat and customizable. Adults love them because they’re satisfying without being heavy.
These tacos remind me that sometimes the best recipes aren’t about complex techniques or exotic ingredients—they’re about smart shortcuts that deliver excellent results. So let’s embrace the ease, celebrate the crunch, and make Taco Tuesday a little less stressful and a lot more delicious.
─────────
The Inspiration Behind This Recipe
This recipe emerged from the desire to enjoy crispy tacos without the mess and monitoring required by traditional frying methods. While fried tacos are undeniably delicious, they require careful temperature management, significant amounts of oil, and constant attention to prevent burning or sogginess. Baked tacos offer a middle ground—they achieve that coveted crunch through dry oven heat rather than hot oil, making them more approachable for home cooks. The method of standing shells upright in a baking dish ensures even crisping and prevents filling spillage, solving one of the biggest challenges of taco-making. This approach reflects modern home cooking priorities: maximum flavor with minimum fuss, healthier preparation methods, and family-friendly execution that anyone can master.
─────────
A Brief History of Hard Shell Tacos
The crispy hard-shell taco as Americans know it today is actually a Tex-Mex invention rather than a traditional Mexican preparation. In Mexico, tacos are typically made with soft corn or flour tortillas, sometimes fried after filling for dishes like tacos dorados. The pre-formed hard taco shell became popular in the United States in the mid-20th century, largely due to commercial production that made them convenient and shelf-stable. Glen Bell, founder of Taco Bell, is often credited with popularizing the format in the 1950s and 1960s. While purists might argue that hard shells aren’t “authentic,” they’ve become an beloved part of American food culture, offering a satisfying textural experience that’s distinctly different from soft tacos. This baked version honors that Tex-Mex tradition while making it easier and healthier to prepare at home.
─────────
Why This Cooking Method Works
Oven heat creates even crispiness — Surrounding the tacos with hot air in a 400°F oven crisps the shells uniformly without the hot spots you get from stovetop frying.
Standing position prevents spillage — Arranging tacos upright in a baking dish keeps the filling secure while allowing heat to circulate around the entire shell for even browning.
Salsa adds moisture — Mixing the shredded chicken with salsa prevents dryness during baking while infusing every bite with extra flavor. The moisture steams slightly inside the shell, keeping the chicken tender.
Cheese creates a seal — The melted cheese on top forms a delicious barrier that helps hold the filling in place while adding richness and visual appeal.
No oil needed on shells — The shells crisp from dry heat alone. Any oil is only used for cooking the chicken, keeping the overall fat content lower than traditional frying.
Temperature matters — 400°F is hot enough to crisp without burning, and the 10-minute timing allows the shells to brown while the cheese melts perfectly.
─────────
Flavor Profile: What to Expect
Familiar Tex-Mex comfort — these tacos deliver savory, well-seasoned chicken with the warm spices typical of taco seasoning: cumin, chili powder, garlic, and paprika. The salsa adds tangy tomato notes with hints of cilantro and lime, while melted cheese provides creamy, salty richness. The crispy corn shell offers a toasty, slightly sweet crunch that contrasts beautifully with the tender filling. Fresh lettuce adds cool, crisp texture, and diced tomatoes bring juicy freshness that brightens every bite. It’s straightforward, crowd-pleasing flavor that satisfies without surprises—exactly what makes it perfect for family dinners.
─────────
Tips for Making the Best Crispy Baked Chicken Tacos
Use taco-seasoning wisely — If using a packet, follow the instructions but taste before adding all the seasoning—some brands are very salty. You can also make your own blend with cumin, chili powder, paprika, garlic powder, and oregano.
Don’t skip the salsa mixing step — This is crucial for keeping the chicken moist during baking. Choose a salsa you actually enjoy eating, as its flavor will be prominent.
Shred chicken while it’s hot — Warm chicken shreds more easily and evenly than cold. Use two forks or stand mixer with paddle attachment for quick work.
Don’t overfill the shells — A heaping 2-3 tablespoons of filling per shell is ideal. Overfilling causes spillage and prevents proper crisping.
Stand them securely — Place tacos close together in the baking dish so they support each other and stay upright. A 9×13 inch dish typically fits 8-10 tacos perfectly.
Add cheese generously — Don’t be shy—the melted cheese is part of what makes these special. It should drape over the edges slightly.
Watch the last few minutes — Oven temperatures vary. Check at 8 minutes to prevent burning, looking for golden shells and bubbly cheese.
Let them cool slightly — Fresh from the oven, these are lava-hot. A 2-3 minute rest makes them safe to eat and easier to handle.
─────────
Serving Suggestions and Side Pairings
These crispy baked tacos pair beautifully with:
- Mexican Street Corn Salad (Esquites) for creamy, tangy contrast
- Cilantro Lime Rice or Spanish Rice for a complete plate
- Refried beans or black beans with cumin and garlic
- Guacamole or sliced avocado for cooling creaminess
- Sour cream and salsa for customizable topping stations
- Pickled jalapeños for those who like extra heat
- Tortilla chips with queso as an appetizer
- Fresh fruit salad with lime and chili powder for a refreshing side
Topping bar idea: Set out bowls of shredded lettuce, diced tomatoes, sour cream, salsa, guacamole, pickled jalapeños, black olives, and extra cheese so everyone can customize their tacos.
─────────
Storage, Reheating, and Make-Ahead Tips
Storage:
- Store leftover assembled tacos in an airtight container for up to 2 days (shells will soften)
- Better option: store filling and shells separately for up to 4 days
- Keep toppings fresh in separate containers
Reheating:
- Reheat assembled tacos in a 350°F oven for 5-7 minutes to re-crisp shells
- Microwave works in a pinch but won’t restore crispiness
- Add fresh toppings after reheating for best texture
Make-Ahead Tips:
- Cook and season the chicken up to 3 days ahead
- Mix shredded chicken with salsa and refrigerate
- Assemble tacos up to 2 hours before baking, cover with foil, and refrigerate
- Bake directly from refrigerator, adding 2-3 minutes to cooking time
- Prep all toppings in advance and store in containers
Freezing:
- Freeze the seasoned chicken mixture (before adding to shells) for up to 3 months
- Thaw overnight in refrigerator before assembling tacos
- Do not freeze assembled tacos as shells become soggy
Leftover filling ideas:
- Use in quesadillas, burrito bowls, nachos, or taco salads
- Mix with rice for a quick burrito filling
- Top baked potatoes for a Tex-Mex twist
─────────
Why This Recipe Deserves a Spot in Your Taco Tuesday Rotation
Because Taco Tuesday should be fun, not stressful. These Crispy Baked Chicken Tacos deliver everything you want—crunch, flavor, melted cheese—without requiring you to stand over a stove managing hot oil. They’re kid-friendly, budget-conscious, and infinitely customizable based on what you have in your fridge. The hands-off baking method means you can prep other dishes, help with homework, or simply take a breath while dinner cooks itself. They’re also perfect for feeding a crowd since you can fit a dozen tacos in one baking dish and bake multiple pans simultaneously. When a recipe makes weeknight cooking this easy while delivering results this satisfying, it becomes indispensable. These tacos prove that simple methods often produce the best results—and that’s exactly the kind of wisdom that keeps Taco Tuesday thriving year after year.
─────────
Recommended Drink Pairing
Mexican Coca-Cola — The cane sugar sweetness and slight acidity cut through the richness of the cheese while complementing the taco seasoning’s spices.
Classic Lime Margarita — Bright citrus and tequila provide refreshing contrast to the hearty, cheesy tacos, making it feel like a proper celebration.
Horchata — This sweet, creamy rice drink with cinnamon offers cooling contrast to the savory, spiced chicken and pairs beautifully with the corn shells.
Light Mexican lager (Corona, Pacifico) — Crisp, clean, and refreshing without competing with the bold taco flavors. Perfect for casual weeknight dining.
Crispy Baked Chicken Tacos
Crispy Baked Chicken Tacos feature seasoned shredded chicken mixed with salsa, tucked into crunchy taco shells with melted cheese, then baked until golden—all the satisfaction of fried tacos with none of the splatter.
4
servings15
minutes25
minutes450
kcal40
minutesIngredients
1 lb chicken breast
1 taco seasoning packet
0.5 cup salsa
1.0 cup shredded cheese
8 corn taco shells
1.0 tbsp olive oil
0.5 cup chopped lettuce
1.0 tomato, diced
Directions
- Preheat the oven to 400 degrees Fahrenheit. This will ensure your tacos get crispy when baked in the end.
- Season the chicken breast with taco seasoning. Make sure both sides are evenly coated for maximum flavor in each bite.
- Heat olive oil in a pan over medium heat. Cook the seasoned chicken until fully cooked, about 5 minutes per side.
- Shred the cooked chicken into small pieces using two forks or a meat shredder to ensure uniform pieces.
- Place the shredded chicken in a bowl and mix with salsa until thoroughly combined to add moisture and flavor.
- Fill each taco shell with the chicken and salsa mixture. Do not overfill to keep the tacos intact when baked.
- Top each filled taco with shredded cheese to allow it to melt better during baking.
- Arrange the tacos in a baking dish side by side. Make sure they don’t tip over to prevent filling spillage.
- Bake in the oven for 10 minutes or until the taco shells become golden brown and cheese is melted.
- Remove from the oven and let cool slightly before serving. Add lettuce and diced tomato as toppings before serving.
Nutrition Facts
- Total number of serves: 4
- Calories: 450kcal
- Cholesterol: 0mg
- Sodium: 620mg
- Potassium: 400mg
- Sugar: 8g
- Protein: 6g
- Calcium: 60mg
- Iron: 2mg
About This Author

Amelia Grace
Editor-in-Chief & Culinary Director
The heart and guiding voice of Daily Dish, Amelia leads our editorial vision and recipe development. With a background in food journalism and over a decade spent in professional kitchens, she has a knack for blending gourmet technique with real-world accessibility. Her goal? To make every reader feel like a confident cook, one dish at a time.
Favorite dish: Creamy lemon risotto with a sprinkle of fresh thyme.
Kitchen motto: “Good food doesn’t have to be complicated — it just has to be made with heart.”


