

There’s a particular kind of recipe that I think of as a gift to yourself—one you make on a Sunday afternoon with very little effort, tuck into the refrigerator, and then rediscover throughout the week at exactly the right moments. The moment after a long meeting when lunch feels impossibly far away. The three o’clock stretch when the day still has a few hours left in it and your energy doesn’t. The post-workout window when you need something real, fast, and satisfying without having to think too hard about it.
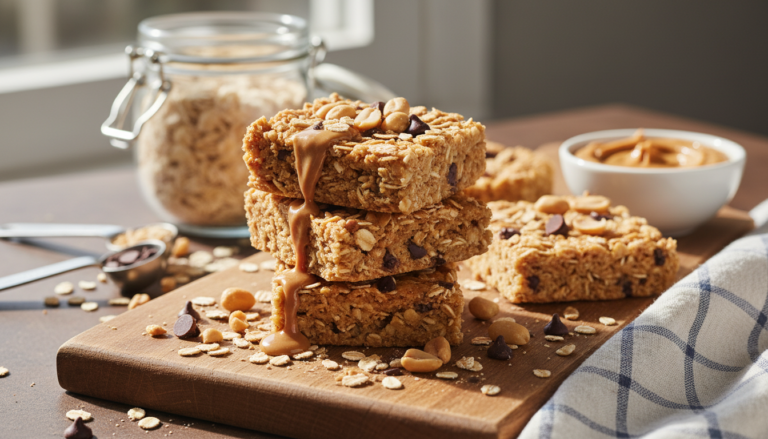
These Peanut Butter Oat Energy Squares are that recipe. They ask for thirty minutes of your time—most of which is the refrigerator doing the work while you do something else entirely—and they give back all week in the form of a snack that feels like a treat and functions like fuel. Chewy oats, creamy peanut butter, a drizzle of honey, the smallest hit of chocolate, a little crunch from the almonds. It’s the kind of snack that tastes like something you’d buy at a thoughtful little café, and the quiet satisfaction of knowing you made it yourself—and that there are eleven more in the fridge—is, I think, one of the small, genuine pleasures of meal prep done well.
What I love most about this recipe is how honestly it delivers on the promise of a snack that is both good for you and good to eat. Not a compromise. Not something you reach for because you’re trying to be disciplined. Just something genuinely, simply delicious that also happens to have oats, protein, and healthy fats doing their quiet work in the background. That combination—pleasure and nourishment in the same square—is rarer than it should be, and this recipe gets it exactly right.
─────────────────────────────────────────
The Inspiration Behind This Recipe
This recipe was born from a very simple observation: the best packaged energy bars on the market taste almost exactly like homemade versions, cost considerably more, and include ingredients lists that require more time to read than the bars take to eat. The challenge was to make something at home that matched the convenience and the flavor—chewy, satisfying, naturally sweetened, texturally interesting—without the cost, the packaging, or the additives.
Peanut butter and honey together are the functional heart of this recipe, and their combination is almost alchemical in a no-bake context. Peanut butter provides fat, protein, and a binding stickiness that holds the oats together into a cohesive, sliceable mass. Honey adds sweetness and a hygroscopic quality—it draws and holds moisture—that keeps the squares from drying out over the course of a week. Together they create a binder that sets firmly in the refrigerator without requiring any heat, any egg, or any additional stabilizer. The oats provide structure and chew, the almonds provide crunch, and the chocolate chips provide the small, dark sweetness that transforms a nutritious square into something you actually look forward to.
Vanilla extract was the final piece—a small amount that does an outsized amount of flavor work, adding warmth and depth that makes the finished square taste more bakery-like than a six-ingredient no-bake recipe has any right to. It’s the ingredient that bridges the gap between “healthy snack” and “something I genuinely want to eat,” and it’s the reason these squares taste as good on day five as they do on day one.
─────────────────────────────────────────
A Brief History of No-Bake Energy Bars
The energy bar as a distinct food category is a relatively modern invention—its origins trace largely to the endurance sports community of the 1980s and 1990s, where athletes needed calorie-dense, portable, non-perishable fuel that could be eaten quickly and easily during training or competition. The earliest commercial energy bars were functional rather than pleasurable: compressed, dense, and sweetened primarily for energy delivery rather than flavor. They solved a practical problem, and they did it without particular concern for the eating experience.
The homemade equivalent, however, has a much longer and warmer history. No-bake oat and nut butter preparations—pressed into pans, chilled, and cut into bars or balls—have been a feature of home cooking and school lunchboxes for generations, long before the energy bar industry gave them a name. The combination of oats, nut butter, and a natural sweetener like honey or maple syrup is a folk recipe that appears across cultures and decades, valued for its simplicity, its nourishing qualities, and its ability to satisfy the kind of hunger that a piece of fruit alone can’t quite address.
Contemporary meal prep culture has brought these homemade squares back into the spotlight, and for good reason. They represent the best of what home cooking can offer over commercial alternatives: fresher ingredients, complete transparency about what’s in them, and a flavor that is warmer, more personal, and more genuinely satisfying than anything that comes in a wrapper. A batch made on Sunday and tucked into the refrigerator is, in the most practical and pleasurable sense, exactly what a good snack should be.
─────────────────────────────────────────
Why This Preparation Method Works for Meal Prep
No-bake bars succeed as a meal prep format for a reason that is easy to overlook: the refrigerator does the structural work that the oven would otherwise do. In a baked bar, heat drives off moisture and sets the sugars and proteins into a rigid matrix. In a no-bake bar, cold temperature firms the fats—primarily from the peanut butter—and allows the honey’s natural sugars to stabilize at a lower temperature, producing a firm, sliceable texture without any of the drying or browning that oven heat introduces. The result is a bar that is moister, chewier, and more palatable than a baked equivalent of the same ingredients.
Pressing the mixture firmly and evenly into the pan before refrigerating is the technique that determines whether the final squares hold together cleanly or crumble when sliced. The mixture should be compacted with firm, even pressure—a flat-bottomed measuring cup or a piece of parchment paper pressed across the surface works well—until the surface is uniformly level and the mixture feels dense and cohesive rather than loose. Loose pressing produces squares that crumble at the edges when cut; firm pressing produces squares with clean, confident cuts and structural integrity that holds through a full week of storage.
Chilling for the full hour—or longer, if time allows—before slicing is not optional. The peanut butter needs sufficient cold time to fully firm from a sticky, pliable binder into a set, structural matrix. Cutting too early produces squares that are soft enough to compress under the knife, which distorts their shape and compresses the chocolate chips and almonds into the cut surface in a way that makes subsequent pieces messier to handle. Patience here produces twelve clean, uniform squares that stack beautifully in a container and stay that way all week.
─────────────────────────────────────────
Flavor Profile: What to Expect
These squares are warm, familiar, and deeply satisfying—the flavor of something homemade in the very best sense of the word:
- Rich, nutty depth – Creamy peanut butter is the dominant flavor note, warm and roasted and unmistakably comforting in the way that only peanut butter can be
- Gentle, floral sweetness – Honey adds a layered sweetness with its own subtle complexity—not as flat as sugar, not as sharp as maple, just warmly, naturally sweet
- Warm vanilla warmth – Vanilla extract threads through the entire square with a bakery-like softness that elevates the whole flavor profile and makes it taste more considered than six ingredients should allow
- Chewy, wholesome texture – Old-fashioned oats provide the structural backbone—slightly chewy, mildly earthy, and satisfying in a way that makes each bite genuinely filling
- Dark, sweet chocolate punctuation – Mini chocolate chips are small enough to distribute evenly through every bite, delivering a concentrated sweetness that makes each square feel like a small indulgence
- Crunchy, toasty contrast – Chopped almonds add a welcome textural variation and a slightly bitter, toasty note that balances the sweetness of the honey and chocolate
The flavor is at its best after a full overnight chill, when the vanilla and honey have had time to permeate the oats completely and the squares have reached their optimal firm-yet-chewy texture. By day two, they taste noticeably more cohesive and rounded than they do in the first hour out of the refrigerator.
─────────────────────────────────────────
Tips for Making the Best Peanut Butter Oat Energy Squares
A few reliable habits will ensure a perfect batch every time:
- Use creamy, natural peanut butter – Natural peanut butter (just peanuts and salt) binds more effectively and produces a cleaner, more cohesive texture than stabilized commercial varieties. Stir it well before measuring if the oil has separated.
- Warm the peanut butter and honey slightly – If the peanut butter is stiff or the honey thick, warm both together in a small saucepan over very low heat for 60 seconds before combining. A looser mixture coats the oats more evenly and produces a more consistently textured square.
- Use old-fashioned oats, not quick oats – Quick oats produce a pasty, dense texture that lacks the satisfying chew of old-fashioned oats. The larger, intact flakes are what give these squares their characteristic bite.
- Fold in the mix-ins last and gently – Chocolate chips and almonds should be folded in with a light hand after the oats are fully incorporated. Overmixing pushes the chips to the base and the almonds to the edges, creating uneven distribution throughout the batch.
- Line the pan generously – Line the baking dish with parchment paper and leave an overhang on all sides. This creates handles that allow you to lift the entire slab cleanly out of the pan before slicing, producing much neater cuts than slicing in the pan.
- Chill before and after slicing – Slice into squares immediately after lifting from the pan, then return to the refrigerator for 15 minutes before stacking in storage containers. This brief secondary chill re-firms the cut edges and makes the squares stack without sticking.
Optional: A drizzle of melted dark chocolate over the top of the pressed, un-chilled mixture before refrigerating sets into a thin, snappy coating that makes these squares look as special as they taste—and adds a satisfying texture contrast at the very first bite.
─────────────────────────────────────────
Portioning and Container Suggestions
A standard 9×9 inch pan yields 12 squares, which portions naturally into three squares per serving for a generous snack, or two squares for a lighter one. For a full five-day snack prep, twelve squares divided into two per day covers the week with two extra—ideal for the weekend or a particularly hungry afternoon.
Individual squares stack cleanly in a wide, flat airtight container separated by small pieces of parchment paper to prevent sticking. A glass container keeps them at their best and makes the stack of golden-brown squares visible through the lid—a small detail that makes the refrigerator feel genuinely well-stocked. Single-serving snack bags or small containers work equally well for pre-portioning by day, so each morning’s prep involves nothing more than grabbing a bag on the way out.
These squares are exceptionally travel-friendly—they hold their shape at room temperature for several hours without softening significantly, making them a reliable option for desk drawers, gym bags, and lunchboxes without the need for an ice pack. Few snack preps offer that combination of refrigerator stability and room-temperature durability, and it’s one of the qualities that makes this recipe so genuinely useful across a full week.
─────────────────────────────────────────
Storage, Reheating, and Shelf Life Tips
- Refrigerator storage: Squares keep in an airtight container for up to 7 days—one of the longest snack shelf lives in the collection. Flavor and texture are at their peak between days two and five.
- Freezer storage: These squares freeze exceptionally well for up to 3 months. Freeze in a single layer before transferring to a freezer bag, separated by parchment paper. Thaw at room temperature for 15–20 minutes or overnight in the refrigerator.
- Room temperature: Squares hold their shape and texture at room temperature for up to 4 hours, making them reliable for packed lunches and on-the-go snacking without refrigeration.
- No reheating required: These are a fully no-cook, ready-to-eat snack served cold or at room temperature. If squares have been frozen, allow to thaw fully before eating for the best texture—partially frozen squares will be too firm to enjoy.
- Softening note: If squares soften slightly over time—particularly in a warm kitchen—a brief return to the refrigerator for 20–30 minutes will restore their firm, clean-cut texture without any negative effect on flavor.
- Moisture tip: Store with a small piece of dry paper towel inside the container if your refrigerator runs humid—it absorbs excess condensation and keeps the oat texture from becoming sticky on the surface over time.
─────────────────────────────────────────
Why This Recipe Deserves a Spot in Your Meal Prep Rotation
Some recipes earn their place in a rotation through complexity or impressiveness—the ones that take real skill and reward you with something genuinely special. And then there are recipes like these squares, which earn their place through something equally valuable: absolute reliability. They are exactly what they promise to be, every single time. They take thirty minutes to make, keep for a full week, freeze for three months, travel without complaint, and taste better than anything you could buy in a wrapper at the same price point.
For a snack prep that has to compete with the convenience of packaged options, that combination of qualities is genuinely hard to beat. But what keeps this recipe on the list week after week isn’t just its practicality—it’s the moment on a Tuesday afternoon when you open the container and reach for a square, and it tastes like something someone made for you with care. Even when that someone was you, on a Sunday, in the middle of cooking everything else. Especially then.
─────────────────────────────────────────
Meal Prep Pairing Suggestions
Peanut Butter Oat Energy Squares anchor a sweet snack rotation beautifully alongside recipes that offer textural and flavor contrast. Our Honey Roasted Sunflower Seed Clusters provide a lighter, crunchier counterpoint—where these squares are dense, chewy, and richly peanut-forward, the clusters are airy, caramelized, and delicately sweet. Together they cover every snacking texture in the sweet-and-wholesome category without overlapping in flavor or format.
For a complete weekly snack spread, our Apple Slices with Cinnamon Almond Butter Dip rounds out the trio with a cool, fresh, fruit-forward option that balances the richness of the squares with something hydrating and bright. Three snack preps—chewy and indulgent, crunchy and caramelized, crisp and fresh—means every craving across the week has something waiting for it in the refrigerator. And all three together require less than an hour of Sunday prep, which leaves the rest of the afternoon for everything else the week is asking of you.
Peanut Butter Oat Energy Squares
These Peanut Butter Oat Energy Squares are a no-bake, six-ingredient snack that delivers the warm, familiar comfort of a peanut butter cookie in a wholesome, make-ahead square that fuels the whole week.
4
servings30
minutes40
minutes300
kcal1
hour10
minutesIngredients
2 cups old-fashioned oats
1 cup creamy peanut butter
1 cup honey
1 teaspoon vanilla extract
1 pint mini chocolate chips
0.5 cup chopped almonds
Directions
- In a large mixing bowl, combine peanut butter, honey, and vanilla extract.
- Stir in the oats until evenly mixed.
- Fold in mini chocolate chips and chopped almonds.
- Press the mixture evenly into a lined 9×9 inch baking dish.
- Refrigerate for 1 hour or until firm.
- Cut into 12 squares and serve.
Nutrition Facts
- Total number of serves: 4
- Calories: 215kcal
- Cholesterol: 0mg
- Sodium: 620mg
- Potassium: 400mg
- Sugar: 8g
- Protein: 6g
- Calcium: 60mg
- Iron: 2mg
About This Author

Amelia Grace
Editor-in-Chief & Culinary Director
The heart and guiding voice of Daily Dish, Amelia leads our editorial vision and recipe development. With a background in food journalism and over a decade spent in professional kitchens, she has a knack for blending gourmet technique with real-world accessibility. Her goal? To make every reader feel like a confident cook, one dish at a time.
Favorite dish: Creamy lemon risotto with a sprinkle of fresh thyme.
Kitchen motto: “Good food doesn’t have to be complicated — it just has to be made with heart.”


