

Let me tell you something about Oreo Lasagna that might surprise you coming from a pastry chef: this is one of my favorite recipes to make. Not because it challenges my technical skills—it doesn’t. Not because it requires precision or sophisticated technique—it absolutely doesn’t. I love it because it demonstrates something fundamental about what makes desserts great: layers of complementary flavors and textures that create a unified experience greater than any component alone. Strip away the playful name and the Oreo cookies, and what you have is a genuinely well-constructed dessert built on sound pastry principles.
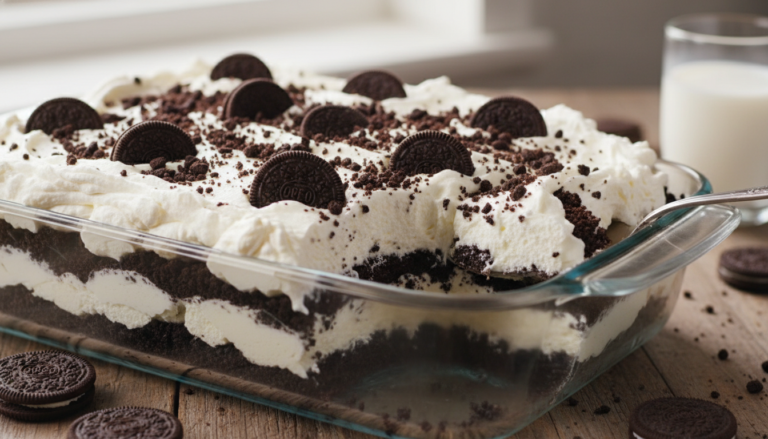
The layering approach isn’t just aesthetic—it’s functional. Each layer serves a specific textural and flavor purpose. The Oreo crust provides structure, crunch, and that essential chocolate-cookie foundation. The cream cheese layer adds tang and airy richness that prevents the dessert from being one-dimensionally sweet. The chocolate pudding brings dense, silky, intense chocolate flavor. The whipped topping provides lightness and a cooling, neutral finish that balances everything below. Each layer is calibrated to complement the others, and the sequence matters—you always want your most substantial elements at the bottom and lighter elements rising toward the top.
What I find particularly clever about this recipe is how it uses Cool Whip as both a functional and flavor ingredient. In the cream cheese layer, it lightens what would otherwise be a very dense filling, creating something fluffy and mousse-like. On top, it provides that classic clean, sweet finish that whipped topping does beautifully. The Oreo crumbles and mini chocolate chips on top aren’t just decoration—they add texture contrast and signal exactly what’s inside. This is dessert architecture done right, wrapped in the most unpretentious package imaginable.
─────────
The Inspiration Behind This Recipe
Oreo Lasagna belongs to a category of American potluck desserts—sometimes called “lush” desserts, “icebox cakes,” or “delight” desserts—that became wildly popular in the 1970s and 1980s when no-bake desserts were celebrated for their convenience and reliability. These desserts typically feature a cookie or cracker crust, a cream cheese layer, a pudding layer, and a whipped topping layer. The variations are endless: different cookies for the crust, different pudding flavors, different mix-ins and toppings.
The genius of calling this “lasagna” rather than “lush” or “delight” is pure marketing brilliance. The name immediately evokes the layered structure, makes people smile, and creates a memorable identity for what is otherwise a fairly standard layered dessert. It’s the kind of name that makes people stop when they see it at a potluck and say, “Wait—Oreo lasagna?” That curiosity converts directly into a tasted bite, and the bite converts into a recipe request.
From a flavor development perspective, this recipe works because Oreo cookies contain both sweet cream filling and cocoa wafers, which means the crust already has two flavor components—chocolate and vanilla cream. These complement both the cream cheese layer (which echoes the vanilla cream filling) and the chocolate pudding layer (which amplifies the cocoa wafer flavor). The whole dessert is essentially an elaborated Oreo cookie: chocolate, cream, more chocolate, more cream. That kind of flavor coherence is what makes it so satisfying.
─────────
A Brief History of Layered No-Bake Desserts
Layered no-bake desserts have deep roots in American home baking, tracing back to icebox cakes of the 1920s and 1930s. When refrigerators first became common household appliances, food companies immediately began promoting desserts that required refrigeration rather than baking—this showcased the new appliance and appealed to busy home cooks. Jell-O promoted elaborate molded gelatin desserts, while pudding brands promoted refrigerated pies and icebox cakes.
The classic icebox cake—alternating layers of whipped cream and cookies or wafers, refrigerated overnight until the cookies softened—became hugely popular. Nabisco promoted the Famous Chocolate Wafer Cake (still made today) using their chocolate wafers and whipped cream. Graham cracker-based desserts using the same principle spawned entire categories of recipes.
The cream cheese layer was added to these desserts in the 1950s and 1960s as cream cheese became more affordable and widely available. Combining softened cream cheese with whipped topping created a lighter, more stable filling that was easier to layer than pure whipped cream. Philadelphia Cream Cheese’s recipe pamphlets promoted countless variations of these layered desserts, cementing them as American potluck staples.
Instant pudding mix, introduced in the 1950s, added another dimension—a thick, smooth, intensely flavored layer that required no cooking and set quickly in the refrigerator. The combination of cream cheese layer plus pudding layer plus whipped topping became the classic formula for “lush” desserts, of which Oreo Lasagna is perhaps the most beloved modern iteration.
─────────
Why This Layered No-Bake Method Works
The Oreo crust has ideal flavor and structural properties. Oreo cookies contain both cocoa wafers and vanilla cream filling, which means the crushed mixture has complex flavor—chocolate, vanilla, and that distinctive Oreo taste—without any additional ingredients. Mixed with melted butter, the crumbs form a cohesive, press-able mixture that sets firmly when chilled. The fat from the filling and the butter creates a matrix that holds the crumbs together without baking.
Cool Whip serves as both lightener and stabilizer. Unlike real whipped cream, Cool Whip is pre-emulsified and contains stabilizers that make it extremely stable—it won’t weep, deflate, or separate in the refrigerator over several days. When folded into the cream cheese mixture, it lightens what would be a dense, heavy filling into something fluffy and mousse-like. The fat content contributes richness while the air incorporated during commercial whipping provides volume.
The cream cheese layer provides essential tang. Without the cream cheese layer, this dessert would be cloyingly sweet—Oreo crust, chocolate pudding, and whipped topping are all fairly sweet. The cream cheese introduces acidity and tang that cuts through the sweetness and prevents palate fatigue. This layer also provides structural support, acting as a dense, stable base for the more fluid pudding layer above.
Instant pudding thickens through starch hydration. Instant pudding mix contains pre-cooked modified food starch that hydrates rapidly when mixed with cold milk, creating a thick, smooth gel without heating. The starch granules absorb liquid and swell, creating a structure that sets within minutes and firms further in the refrigerator. This provides the smooth, dense chocolate layer that contrasts with the lighter layers above and below.
Layering sequence follows density and structural logic. The heaviest, most structural elements go on the bottom (crust, dense cream cheese mixture), lighter elements go in the middle and top (pudding, whipped topping). This prevents the dessert from becoming unstable or collapsing. If you inverted the layers—light cream on the bottom, heavy crust on top—the structure would fail.
Chilling time is essential for layer integration. During the 2+ hours of refrigeration, several important things happen: the butter in the crust solidifies and firms the base, the cream cheese layer sets completely, the pudding firms to its final consistency, and the flavors from all layers begin to meld. The chilling also allows some moisture transfer between layers, which softens the Oreo crust slightly from underneath, creating that characteristic slightly chewy texture rather than bone-dry crust.
Topping garnishes provide essential textural contrast. The reserved Oreo crumbles on top add crunch to what would otherwise be an entirely soft, creamy dessert. This textural contrast is crucial—without it, every bite would feel monotonous despite the flavor variety. The mini chocolate chips add both texture and additional chocolate flavor.
─────────
Flavor Profile: What to Expect
Oreo cookie flavor permeates the entire dessert. The crust provides concentrated, toasted Oreo taste—chocolate wafer with vanilla cream notes—while the reserved crumbles on top provide fresh, crunchy Oreo hits. This bookending of the dessert with Oreo flavor creates coherence and ensures the cookie’s distinctive taste appears in every bite.
Fluffy, tangy cream cheese provides the first contrast layer. The cream cheese and Cool Whip mixture is light and airy with a subtle tang that balances the sweet Oreo and chocolate layers. It’s sweet but not intensely so—more like sweetened cream than frosting. The texture is mousse-like and dissolves on the tongue.
Rich, dense chocolate pudding delivers the most intense flavor hit. Instant chocolate pudding has a deep, cocoa-forward taste with subtle vanilla notes. Its thick, silky texture provides satisfying substance and contrast to the lighter layers surrounding it. The chocolate is prominent and satisfying without being bitter.
Cool, neutral whipped topping provides the refreshing finish. The top layer is subtly sweet and airy—it functions as a palate cleanser that prepares you for another bite. Its temperature (cold from the refrigerator) and lightness provide relief from the richer layers below.
Textural layering creates constant interest. Each forkful ideally includes multiple layers: crunchy crust, fluffy cream cheese, silky pudding, airy topping, and crunchy Oreo crumbles. These textures hit in sequence as you eat, making each bite dynamic rather than static.
The overall experience is playful and satisfying. This dessert tastes exactly as fun as it looks—chocolatey, creamy, sweet with just enough tang, and unmistakably Oreo throughout. It’s crowd-pleasing in the most literal sense: broad appeal, familiar flavors, multiple textures, and pure enjoyment from first bite to last.
─────────
Tips for Making the Best Oreo Lasagna
Preparing the Oreo Crust:
- Use a food processor for the finest, most uniform crumbs—coarse crumbs create a less cohesive crust that crumbles when served.
- Reserve exactly 1 cup of crumbs before mixing with butter—this ensures you have enough for the topping without under-crusting the base.
- The crust mixture should feel like wet sand—it should hold together when squeezed but still be crumbly.
- Press firmly and evenly using the flat bottom of a measuring cup or drinking glass for a compact, uniform crust.
- Press slightly up the sides of the pan for a more contained structure that holds together when sliced.
- Chill the crust for 15 minutes before adding the cream cheese layer—this helps it set and prevents it from mixing into the filling.
Creating the Perfect Cream Cheese Layer:
- Room temperature cream cheese is non-negotiable—cold cream cheese will create lumps that no amount of beating will fix. Let it sit out for 30-60 minutes.
- Use full-fat cream cheese for best texture and flavor. Reduced-fat versions can be too soft and affect the layer’s stability.
- Beat cream cheese and powdered sugar thoroughly until completely smooth—scrape down the bowl several times to ensure no lumps.
- Fold Cool Whip gently with a spatula using sweeping motions from bottom to top. Stirring vigorously will deflate it.
- Spread carefully over the crust using an offset spatula—apply gentle pressure so you don’t disturb the crust beneath.
Making the Chocolate Pudding Layer:
- Use cold milk for best thickening—warm milk doesn’t set properly with instant pudding.
- Whisk vigorously for 2 minutes to fully activate the starch—under-whisked pudding won’t thicken properly.
- Let pudding sit for 3-5 minutes before spreading so it thickens to spreadable consistency.
- Spread gently over the cream cheese layer—pudding can be heavy and may push the cream cheese layer if applied too aggressively.
- Use an offset spatula for the most even spreading without disturbing the layer below.
Topping and Finishing:
- Spread remaining Cool Whip in an even layer—aim for consistent thickness across the entire surface.
- Sprinkle reserved Oreo crumbs evenly for visual and textural consistency in every slice.
- Add mini chocolate chips generously—their small size means even distribution and a chocolate hit in every forkful.
- Press crumbs and chips lightly into the whipped topping so they don’t roll off when serving.
Chilling and Serving:
- Minimum 2 hours, but 4-6 hours or overnight produces the best texture as the crust softens slightly and layers meld.
- Cover tightly with plastic wrap to prevent the whipped topping from absorbing refrigerator odors.
- Use a sharp knife dipped in hot water and wiped dry for the cleanest slices.
- Cut in a grid pattern (4 cuts lengthwise, 3 cuts widthwise) for 12 even portions.
- Serve with a spatula or pie server rather than a spoon for intact, layered slices.
Variations to Try:
- Peanut butter twist: Add ½ cup peanut butter to the cream cheese layer for a chocolate-peanut butter version
- Mint chocolate: Add mint extract to the cream cheese layer and use mint Oreos in the crust
- White chocolate: Substitute white chocolate pudding for chocolate pudding for a different flavor profile
- Strawberry: Add strawberry pudding instead of chocolate and garnish with fresh strawberries
─────────
Serving Suggestions and Presentation Ideas
Classic Potluck Style: Serve directly from the 9×13 baking dish with a sharp knife for cutting and a wide spatula for serving. The full pan looks impressive with its layered cross-section visible when you cut into it. Stack dessert plates and forks nearby and let guests serve themselves. This is unfussy, approachable, and perfect for casual gatherings.
Elegant Plated Dessert: Cut into neat rectangles and place on white dessert plates. Add a drizzle of chocolate sauce on the plate in an artistic pattern. Top each slice with a whole Oreo cookie standing upright in the whipped topping and a small dollop of extra whipped topping. This elevates the casual dessert into something dinner-party worthy.
Individual Cup Service: For parties, layer components in clear plastic cups or Mason jars for individual servings that showcase the beautiful layers. This creates the visual drama of a parfait while maintaining the Oreo Lasagna flavors. Top each with Oreo crumbles and a mini Oreo. These travel beautifully and eliminate the need for cutting and serving.
Birthday Party Celebration: Write “Happy Birthday” across the top using chocolate sauce in a squeeze bottle or spell out with Oreo pieces as letter shapes. Add birthday candles pressed into the whipped topping. This turns a simple dessert into a celebration centerpiece.
Black and White Elegance: For sophisticated events, cut precise squares and plate on black slate tiles or dark plates. The contrast of the white whipped topping, dark Oreo crumbles, and chocolate pudding layers looks stunning against dark backgrounds. Add a chocolate fan or white chocolate curl for garnish.
Mini Individual Portions: Make in mini loaf pans or 8×8 inch dishes for smaller gatherings, or use clear plastic portion cups for bite-sized individual servings at events. These are perfect for dessert tables where variety is more important than large portions.
─────────
Storage, Make-Ahead, and Serving Tips
Storage:
- Refrigerator: Store covered tightly with plastic wrap for up to 4 days. The dessert actually improves over the first 24 hours as the crust softens slightly and the layers meld.
- Freezer: Freeze tightly wrapped (without the Oreo crumb topping) for up to 1 month. Thaw overnight in the refrigerator and add fresh Oreo crumbles and chocolate chips before serving. The texture holds up surprisingly well after freezing.
- Important: This dessert must stay refrigerated due to the cream cheese and dairy layers.
Make-Ahead Strategy: Oreo Lasagna is perfect for advance preparation:
- Make 1-2 days ahead for the best flavor and texture—the layers meld beautifully overnight
- Add Oreo crumble topping up to 24 hours ahead—it stays crunchy for that long in the refrigerator
- Transport covered in the baking dish—it’s stable and travels well
This is the ideal make-ahead dessert because it genuinely improves with time rather than declining. Making it the night before an event is actually optimal.
Serving Temperature: This dessert is best served cold from the refrigerator—the chilled temperature is essential for structural integrity, flavor, and that refreshing cool-cream quality that makes it so appealing. Don’t let it sit at room temperature for more than 30-45 minutes or the layers will soften too much.
Cutting Clean Slices:
- Use a sharp, thin-bladed knife dipped in hot water between cuts
- Wipe the knife clean after each cut to prevent layer mixing on the blade
- A bench scraper can also be used for very clean sides on each slice
- Score the top lightly first to plan your cuts before committing
Portion Planning: For a 9×13 pan, plan on:
- 12 generous portions (4×3 grid) for dessert-focused events
- 16 smaller portions (4×4 grid) for gatherings with multiple dessert options
- 20+ small squares for cocktail party or dessert table service
─────────
Why This Recipe Deserves a Spot in Your Rotation
Oreo Lasagna occupies a unique position in any baker’s recipe collection—it’s the reliable crowd-pleaser that works for every occasion from casual Tuesday night dessert to holiday potlucks to children’s birthday parties. It’s impossible to bring this to a gathering without someone asking for the recipe. It appeals to every age group. It requires no oven, minimal skill, and basic ingredients. And somehow, despite its complete simplicity, it manages to be genuinely, spectacularly delicious.
From a pastry perspective, what I appreciate most about this recipe is its structural integrity. Each layer is calibrated to complement and support the others. The dense, stable base prevents everything from collapsing. The lighter layers rise toward the top. The flavors are coherent and mutually reinforcing. This isn’t accidental—it’s the result of a genuinely well-designed dessert that happens to use humble, accessible ingredients.
The make-ahead capability is invaluable. Unlike many desserts that peak when fresh and decline rapidly, Oreo Lasagna improves over 24-48 hours. The crust softens slightly to a perfect chewy-crunchy consistency. The layers meld and the flavors deepen. Making it the day before an event isn’t a compromise—it’s the correct technique. For anyone who entertains or brings desserts to gatherings, having a go-to option that’s actually better when prepared ahead is genuinely valuable.
The crowd-pleasing nature comes from familiar flavor combinations elevated through layering. Oreos, chocolate pudding, and cream cheese are all individually beloved. Combined in layers that create textural contrast and flavor interplay, they become something more exciting than any element alone. It’s the pastry principle of contrast and harmony applied to the most accessible possible ingredients.
This recipe also proves that “easy” and “impressive” aren’t mutually exclusive. When you bring this to a gathering and slice into it to reveal those beautiful layers, people are genuinely impressed—not because the technique is sophisticated, but because the result is beautiful and delicious. That’s actually harder to achieve than it sounds, and this recipe does it effortlessly.
If you’re looking for a recipe that works for any occasion, that can be made completely in advance, that appeals universally, that looks impressive and tastes even better—this is it. Oreo Lasagna proves that sometimes the most beloved desserts are the ones that prioritize joy and deliciousness over complexity and technique.
─────────
Recommended Drink Pairing
Cold Milk – Whole or 2%: Ice-cold milk is the undisputed champion pairing for this dessert—it’s what Oreos were made to be dunked in, and drinking cold milk alongside Oreo Lasagna creates that same perfect combination. The milk cuts through the richness of the cream cheese and pudding while complementing every Oreo note. This pairing is nostalgic, universally appealing, and simply perfect.
Coffee – Iced or Cold Brew: Iced coffee or cold brew provides bitter contrast that balances the sweet, creamy layers beautifully. The coffee enhances the chocolate pudding notes while cutting through the richness. Add cream to your coffee to echo the cream cheese layer. This pairing works beautifully for adult gatherings or afternoon dessert service.
Hot Chocolate: Rich hot chocolate with the cold, creamy dessert creates a wonderful temperature contrast and doubles down on chocolate flavor. The warm beverage contrasts the cold dessert, and the chocolate-on-chocolate pairing is deeply satisfying. Top the hot chocolate with mini marshmallows for a fun, casual presentation.
Chocolate Milkshake: For ultimate indulgence, pair with a thick chocolate milkshake—the ultimate chocolate-on-chocolate experience. This works particularly well for children’s parties or casual family dessert nights when calories are cheerfully ignored. The cold, creamy milkshake echoes every element in the dessert.
Sparkling Water – Plain or Vanilla: For a lighter pairing that lets the dessert shine, plain sparkling water or vanilla-infused sparkling water provides refreshing effervescence that cleanses the palate between bites without competing with the dessert’s flavors. This is an elegant, simple option for gatherings where you want beverages that support rather than overshadow.
Oreo Lasagna
Oreo Lasagna is the ultimate no-bake crowd-pleaser—layers of crushed Oreo crust, fluffy cream cheese, silky chocolate pudding, and billowy whipped topping finished with Oreo crumbles and mini chocolate chips for a dessert that’s as fun to make as it is to eat.
4
servings30
minutes40
minutes300
kcal1
hour10
minutesIngredients
36 pieces Oreo cookies
6 tbsp butter, melted
8 oz cream cheese, softened
1 cup powdered sugar
1 container Cool Whip (8 oz)
2 packages instant chocolate pudding mix
3.5 cups milk
0.5 cup mini chocolate chips
Directions
- Crush Oreo cookies into fine crumbs, set aside 1 cup for topping.
- Mix crushed Oreos with melted butter until well combined.
- Press Oreo mixture firmly into a 9×13 inch baking dish to form the crust.
- Use a stand mixer to beat cream cheese and powdered sugar until smooth and creamy.
- Gently fold in half of the Cool Whip, then spread mixture evenly over the Oreo crust.
- In another bowl, whisk together chocolate pudding mix and milk until thick.
- Spread chocolate pudding over the cream cheese layer in the dish.
- Top with remaining Cool Whip and sprinkle reserved Oreo crumbs and chocolate chips on top.
- Cover and refrigerate for at least 2 hours or until set.
Nutrition Facts
- Total number of serves: 4
- Calories: 350kcal
- Cholesterol: 0mg
- Sodium: 620mg
- Potassium: 400mg
- Sugar: 8g
- Protein: 6g
- Calcium: 60mg
- Iron: 2mg
About This Author

Aurora Wright
Pastry Chef & Dessert Editor
Aurora is the sweet side of Daily Dish. A trained pastry chef and dessert stylist, she’s responsible for our mouth-watering cakes, cookies, and confections. She brings precision, artistry, and a touch of whimsy to every recipe she creates — and taste-tests more chocolate than she’ll admit.
Favorite dish: Flourless dark chocolate torte.
Kitchen motto: “Life’s too short to skip dessert.”


