
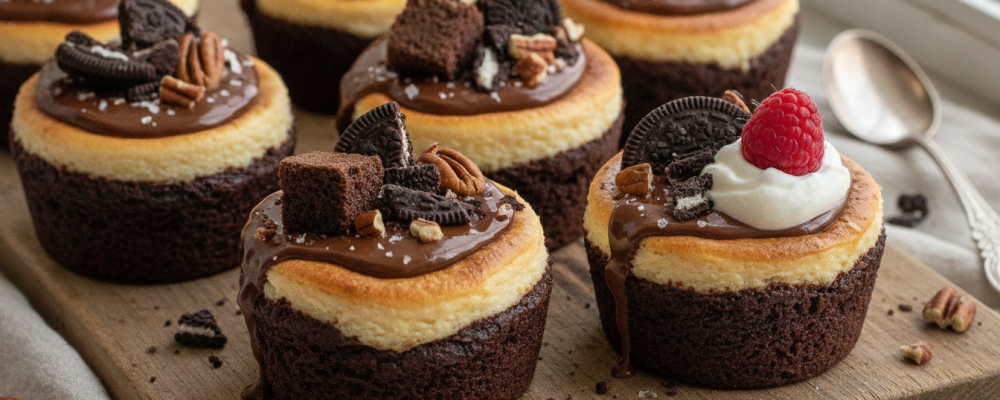

Brownie cheesecake combinations have always fascinated me because they represent a fundamental pastry principle: contrast creates interest. A plain brownie is delicious—fudgy, chocolatey, satisfying. Plain cheesecake is wonderful—tangy, creamy, rich. But combine them and something genuinely exciting happens. The chocolate’s bitterness amplifies the cream cheese’s tang. The cheesecake’s creaminess makes the brownie’s density feel more interesting. The two textures—dense and fudgy versus smooth and silky—create a dynamic eating experience where each component makes the other taste better. That’s the magic of contrast in pastry, and these cups execute it beautifully.
What I particularly love about the cup format is how it solves a persistent challenge with brownie-cheesecake combinations: achieving proper ratios in every serving. In a full-size brownie-cheesecake pan, the center portions get mostly cheesecake while the edge portions get mostly brownie. With individual cups, every single serving has the same perfect ratio of brownie base to cheesecake center—you don’t need to fight over the middle pieces because every piece is the middle. That’s smart pastry design that prioritizes consistency and fairness in every bite.
The technique here is also strategically brilliant from a baking perspective. By adding the cheesecake mixture as a dollop rather than a layer, you create a situation where the brownie batter bakes around and partially encases the cream cheese filling. The edges become fully baked brownie while the center stays almost molten and creamy from the cheesecake mixture. This creates a lava cake-like effect where the interior is still soft and yielding when you bite through the set brownie exterior. Warm from the oven, these cups are extraordinary. But cold from the refrigerator the next day? Equally spectacular in a completely different way.
─────────
The Inspiration Behind This Recipe
Brownie cheesecake combinations aren’t new—bakeries have been swirling cream cheese into brownie batter for decades, and for good reason. But most versions have a fundamental limitation: the cream cheese gets mixed into or swirled throughout the brownie batter, which means it fully incorporates during baking and loses its distinct cheesecake character. You get cream cheese flavor in your brownie, but not the distinct textural experience of actually encountering cream cheese filling.
I wanted to create a version where the cheesecake filling remained genuinely distinct—where you could bite through brownie and hit a pocket of actual cheesecake, experiencing both components as separate entities rather than a merged hybrid. The cup format made this possible in a way that flat brownies can’t achieve. By using a muffin tin, the brownie batter surrounds the cheesecake dollop on three sides (bottom and sides), creating a container that protects the filling from fully incorporating into the batter during baking.
The decision to use a box brownie mix was deliberate and unapologetic. From-scratch brownies are wonderful, but they introduce more variables—cocoa versus melted chocolate, different fat ratios, varying bake times. Box mix brownies are engineered for consistent, reliable fudginess, and that consistency is exactly what you want when you’re adding a cheesecake component that has its own baking requirements. The box mix ensures the brownie portion bakes predictably while the cream cheese filling can be calibrated accordingly.
─────────
A Brief History of Brownie-Cheesecake Combinations
Brownies themselves date to the late 19th century, though their exact origin is disputed. What’s certain is that brownies became uniquely American comfort food—dense, fudgy, intensely chocolate, and somewhere between cake and candy in texture and richness. By the mid-20th century, brownie baking had become a beloved home baking tradition, with recipes appearing in community cookbooks, school fundraisers, and family collections across the country.
Cream cheese brownies specifically emerged as a variation in the 1960s and 1970s, when cream cheese had become a mainstream American ingredient rather than a specialty item. Creative home bakers discovered that swirling softened cream cheese into brownie batter created beautiful visual patterns and added tangy, creamy flavor that balanced the chocolate’s richness. These “marble” brownies became popular for their visual appeal and flavor complexity.
The evolution from swirled cream cheese to distinct filled cups represents a natural progression—maximizing the textural distinction between the two components rather than blending them into a single uniform texture. Individual cup formats for brownies gained popularity as muffin tins became standard kitchen equipment and home bakers discovered the advantages of individual portions: even baking, easy serving, and perfect distribution of any mix-ins or fillings.
Today, loaded brownie-style desserts with multiple components—brownies filled with cheesecake, caramel, peanut butter, or cookie dough—represent a major category in American dessert culture, celebrated for maximizing indulgence through clever combination of beloved flavors.
─────────
Why This Two-Component Baking Method Works
Box mix provides engineered reliability. Commercial brownie mixes contain carefully calibrated ratios of cocoa, flour, fat, and leavening that produce consistent fudginess every time. This matters particularly in a combination dessert where you’re also managing a cheesecake component—having one reliable variable allows you to focus your attention on the interaction between the two components rather than worrying about whether the brownie base will be properly fudgy.
Filling halfway creates the correct brownie-to-cheesecake ratio. If you fill the cups more than halfway with brownie batter before adding the cream cheese dollop, the filling gets buried and surrounded on all sides, creating more of a stuffed brownie. Halfway filling creates cups where the cream cheese sits more prominently in the center, partially exposed on top and therefore visible—and the ratio of brownie to cheesecake in each bite is balanced rather than overwhelmingly brownie.
The dollop method creates distinct textural zones. Unlike swirling cream cheese into brownie batter (which creates a marbled effect where both components are mixed), placing a dollop of cream cheese on top of brownie batter creates distinct zones. During baking, the surrounding brownie batter rises around the cream cheese but can’t fully incorporate it—the cream cheese’s fat and protein content resists complete merging. This preserves distinct textural identity in each component.
Cream cheese filling sets differently from brownie batter. The cream cheese mixture (cream cheese, sugar, vanilla) sets through protein coagulation at a different rate than the brownie batter (which sets through starch gelation and egg protein coagulation). This means the cheesecake center will always be slightly softer than the surrounding brownie—perpetuating that lava-cake-like quality where biting through the set exterior reveals a yielding, creamy center.
Mini chocolate chips serve strategic purposes. Added to the top before baking, mini chips melt during baking and partially sink into both the cream cheese filling and surrounding brownie batter, creating chocolate bridges between the two components. As they cool, they resolidify, providing textural contrast (firmer chocolate hits in an otherwise soft landscape) and visual appeal. Mini chips specifically work better than regular chips because their smaller size allows more even distribution and more complete melting into the surface.
Muffin liner placement is functionally critical. Liners create non-stick walls that allow the brownie cups to release cleanly. Brownie batter is stickier than cake batter due to its higher sugar content—without liners, the cups would stick to the pan even if greased. Liners also create clean sides on the finished cups, making them portable and presentable without additional finishing work.
Cooling time in the pan allows structural setting. Hot brownie cheesecake cups are essentially molten—the brownie is still soft and the cheesecake center is liquid. The 10-minute cooling period in the pan allows the structure to set enough for the cups to hold their shape when removed. Removing too early risks the cups collapsing; cooling completely in the pan creates a firmer texture that some people prefer.
─────────
Flavor Profile: What to Expect
Intense, fudgy chocolate forms the foundation of every cup. The brownie exterior is deeply chocolatey—rich and almost candy-like in its sweetness and chocolate concentration. Box brownie mix delivers consistent chocolate intensity without any subtle variation, which is exactly what this combination needs as its base note.
Tangy, silky cream cheese center provides dramatic contrast. When you bite through the brownie exterior and hit the cheesecake filling, the flavor shifts completely—from intense chocolate sweetness to cool, tangy creaminess with vanilla undertones. This shift is surprising and delightful even when you know it’s coming. The cream cheese’s slight acidity amplifies the chocolate’s richness by contrast.
Vanilla warmth in the cheesecake filling adds aromatic depth that bridges the gap between the chocolate exterior and creamy interior. The vanilla is subtle but essential—without it, the cream cheese filling would taste flat and institutional rather than dessert-like.
Melty chocolate chips on top provide a third chocolate experience—distinct from the baked brownie chocolate, these chips are softer (from being melted and resolidified) and more individually concentrated. They provide chocolate punctuation marks throughout each bite.
The textural contrast is the star. Dense, fudgy brownie exterior giving way to smooth, silky cheesecake center with occasional melty chocolate chips throughout—each bite includes multiple textures that keep the eating experience dynamic and interesting. No two bites are exactly the same depending on the ratio of brownie to cheesecake you encounter.
The overall experience is indulgent and exciting. These cups aren’t subtle—they’re unapologetically rich, chocolatey, and decadent. They taste like a celebration of two great desserts simultaneously, which is exactly what they are.
─────────
Tips for Making the Best Loaded Brownie Cheesecake Cups
Preparing the Brownie Batter:
- Follow box instructions exactly for the brownie batter—don’t improvise with the egg, oil, or water ratios. These are calibrated for specific fudginess.
- Don’t overbeat the brownie batter—mix just until combined. Overmixing incorporates air, which creates a cakier rather than fudgier texture.
- Use vegetable oil as specified rather than substituting butter—oil creates fudgier brownies because it stays liquid when cool.
- Let batter rest 5 minutes after mixing before filling cups—this allows the ingredients to fully hydrate.
Preparing the Cheesecake Filling:
- Room temperature cream cheese is absolutely essential—soften for 30-60 minutes before beating. Cold cream cheese creates lumps that won’t smooth out.
- Beat cream cheese thoroughly before adding sugar—every lump at this stage remains in the final filling.
- Add sugar gradually while beating to ensure complete incorporation.
- Vanilla extract last—add after sugar is incorporated to prevent it from evaporating during extended beating.
- The filling should be very smooth and creamy—if it’s lumpy, keep beating.
Filling the Muffin Cups:
- Use a cookie scoop for consistent brownie batter portions—exactly halfway in each cup.
- Divide batter evenly across all cups before adding any cheesecake filling—once you start adding filling, it’s harder to adjust batter levels.
- The halfway mark is approximately 2 tablespoons of brownie batter per cup in a standard muffin tin.
- Add cheesecake dollop centrally using a spoon or small cookie scoop—positioning it in the center ensures it bakes symmetrically.
- A rounded tablespoon of cream cheese filling per cup creates the right ratio.
- The cream cheese should sit proud of the brownie batter—it will settle slightly during baking.
Adding Chocolate Chips:
- Sprinkle mini chips generously over both the cream cheese dollop and surrounding brownie batter.
- Press chips lightly into the surface so they adhere during the oven’s initial heat rather than rolling off.
- Cover the cream cheese center with chips especially—this creates a visual “loaded” effect and ensures chocolate in every bite.
Baking to Perfection:
- Don’t overbake—start checking at 20 minutes. The brownie edges should be set and pulling away from the liner slightly, but the centers can look slightly underdone.
- The cream cheese center won’t look fully set when you pull the pan—that’s correct. It will set as the cups cool.
- Use a toothpick in the brownie portion (not the cream cheese center) to test doneness—it should come out with moist crumbs but not wet batter.
- The tops will look slightly different depending on how much cream cheese shows through—this is normal and adds to the rustic, loaded appearance.
Cooling Strategy:
- 10-minute minimum in the pan before attempting to remove—rushing this step risks the cups losing their shape.
- For the lava-cake experience: serve warm (15-20 minutes out of the oven) when the cheesecake center is still slightly molten.
- For clean, sliceable cups: cool completely in the pan (1 hour), then refrigerate for at least 2 hours. The cups become firmer and more cheesecake-like when cold.
- Both temperatures are valid—warm cups are gooey and indulgent, cold cups are firmer and more refined.
─────────
Serving Suggestions and Presentation Ideas
Warm and Gooey:
Serve warm from the oven on small dessert plates with a scoop of vanilla ice cream melting alongside. The contrast of warm, fudgy brownie and melty cheesecake center with cold ice cream is spectacular. Drizzle with chocolate or caramel sauce and serve immediately for maximum drama.
Classic Party Platter:
Arrange cooled cups on a tiered dessert stand or rectangular serving platter in neat rows. The tops—with their golden-brown brownie edges, cream cheese centers, and chocolate chips—look beautiful arranged together. No garnish needed—the cups are visually striking on their own.
Elevated Plated Dessert:
Place individual cups on small white plates with a drizzle of warm ganache creating an artistic pool around the base. Add a dusting of cocoa powder, a few fresh raspberries, and a mint sprig for color contrast. This restaurant-quality presentation turns a simple muffin-tin dessert into something dinner-party worthy.
Gift and Favor Presentation:
Package 2-3 cups in clear treat boxes tied with ribbon for hostess gifts or party favors. The individual portions make them perfect for gifting—no cutting required, each cup is already perfectly sized. Include a small card with serving suggestions (warm vs. cold).
Dessert Bar Addition:
Set out cups at a dessert station alongside other mini desserts. The individual format means no serving utensils required—guests simply pick one up. Provide small plates and napkins and offer optional toppings like whipped cream, caramel drizzle, or crushed Oreos on the side.
Ice Cream Float Style:
For ultimate indulgence, place a warm cup in a deep bowl, add a generous scoop of vanilla or coffee ice cream directly on top, and drizzle with hot fudge sauce. The ice cream melts down into the brownie cup, creating a deconstructed brownie sundae experience.
─────────
Storage, Reheating, and Make-Ahead Tips
Storage:
- Room Temperature: Store in an airtight container for up to 2 days—the brownie portion maintains its fudgy texture well at room temperature.
- Refrigerator: Store in an airtight container for up to 5 days. Cold cups develop a firmer texture that some people prefer—the cheesecake center becomes more distinctly cheesecake-like.
- Freezer: Freeze individually wrapped cups for up to 2 months. Thaw at room temperature for 1-2 hours or microwave for 20-30 seconds.
Reheating:
These cups reheat exceptionally well:
- Microwave: 15-20 seconds transforms a refrigerator-cold cup back to warm, gooey perfection
- Oven: 325°F for 8-10 minutes wrapped loosely in foil for even reheating
- The cheesecake center becomes almost molten when reheated—the lava cake effect returns
Make-Ahead Strategy:
These cups are excellent for advance preparation:
- Bake 1-2 days ahead and store in an airtight container in the refrigerator
- Serve cold for a firmer, more cheesecake-like experience
- Or reheat briefly for the warm, gooey, just-baked experience
For parties:
- Bake the day before, refrigerate overnight
- Reheat in batches in the oven just before serving for freshly baked quality without day-of stress
Texture at Different Temperatures:
- Warm (just baked or reheated): Fudgy brownie exterior, molten cheesecake center, melty chocolate chips—maximum gooeyness
- Room temperature: Fudgy brownie, soft but set cheesecake, firm chocolate chips—ideal balance
- Cold from refrigerator: Firmer brownie, dense cheesecake center (almost truffle-like), firm chocolate chips—more structured and intense
All three temperatures are delicious—serve based on your preference and occasion.
─────────
Why This Recipe Deserves a Spot in Your Rotation
Loaded Brownie Cheesecake Cups occupy that perfect intersection of ease and impressiveness that every baker craves. They use a box mix (no judgment—it’s the right choice here), require basic technique, and come together in under an hour including baking time. Yet the result looks and tastes like something from a specialty bakery. That gap between effort and outcome is the recipe equivalent of getting a standing ovation for a five-minute speech.
From a pastry design perspective, these cups are well-engineered. Every component serves a purpose. The brownie base provides structure, chocolate intensity, and that familiar comfort we all crave. The cheesecake filling provides contrast, creaminess, and flavor complexity. The chocolate chips provide visual signal, textural variety, and extra chocolate intensity. Nothing is there just for show—every element contributes meaningfully to the experience.
The individual portion format solves real serving problems. No slicing, no plates required, no wondering how big to cut pieces, no fighting over the center versus edge pieces. Every cup is identical—every person gets the same experience. For anyone who bakes for gatherings, this practical elegance is genuinely valuable. They’re also portable, which means they work for office parties, potlucks, bake sales, and events where convenient serving matters.
The textural contrast is what makes these genuinely special. Dense, fudgy brownie giving way to smooth, silky cheesecake—this isn’t just two flavors in one cup, it’s two completely different textural experiences in one bite. That contrast is what keeps people eating past when they’re full, what makes them reach for a second one even when they promised themselves just one, what makes them ask for the recipe. Contrast creates desire in dessert, and these cups have it perfectly calibrated.
The make-ahead and reheating capability is practically valuable. Bake the day before, serve cold or reheated—both options produce excellent results. Having a freezer stash of individually wrapped brownie cheesecake cups means you always have an impressive dessert ready with 20 seconds of microwave time. That’s the kind of recipe that makes you look perpetually prepared and generous.
If you’re looking for a recipe that combines two beloved classics into one spectacular individual dessert, that’s genuinely easy but looks impressive, that works warm or cold, that travels well and serves beautifully—this is it. Loaded Brownie Cheesecake Cups prove that sometimes the best innovations are the simplest ones: take two great things, put them together thoughtfully, and let them make each other better.
─────────
Recommended Drink Pairing
Cold Milk – Whole or 2%:
Ice-cold milk is the undisputed champion pairing—brownies and milk are perhaps the most iconic dessert-beverage combination in American food culture. The milk cuts through the richness of both the brownie and cheesecake while cooling the palate between bites. This pairing is nostalgic, perfect, and appropriate for all ages.
Coffee – Espresso or Dark Roast:
Strong coffee provides bitter contrast that balances both the chocolate intensity and cream cheese richness while enhancing the brownie’s chocolate notes. An espresso or Americano feels sophisticated alongside these cups, elevating them from casual snack to proper dessert course. Cold brew works beautifully in warmer weather.
Raspberry or Cherry Liqueur:
For adults, Chambord (raspberry liqueur) or Kirsch (cherry eau de vie) creates a classic chocolate-fruit pairing. The fruit’s brightness and slight tartness amplifies the cream cheese filling’s tang while the alcohol provides warmth that contrasts the cold cups. Serve in small cordial glasses alongside for an elegant adult dessert experience.
Hot Chocolate – Rich and Dark:
Rich dark hot chocolate (made with actual dark chocolate) doubles down on chocolate while providing warm contrast to cold cups or complementing warm ones. The temperature contrast with cold refrigerator cups is particularly delightful—warm liquid, cold dense dessert. Add a splash of espresso for mocha hot chocolate that echoes every flavor in the cups.
Vanilla Milkshake:
For pure indulgence that doesn’t apologize, a thick vanilla milkshake alongside warm brownie cheesecake cups creates the ultimate comfort food combination. The cold, creamy shake contrasts warm gooey cups. The vanilla amplifies the cheesecake filling’s vanilla notes. This pairing works for casual family nights or whenever you want maximum comfort without any pretension.
Loaded Brownie Cheesecake Cups
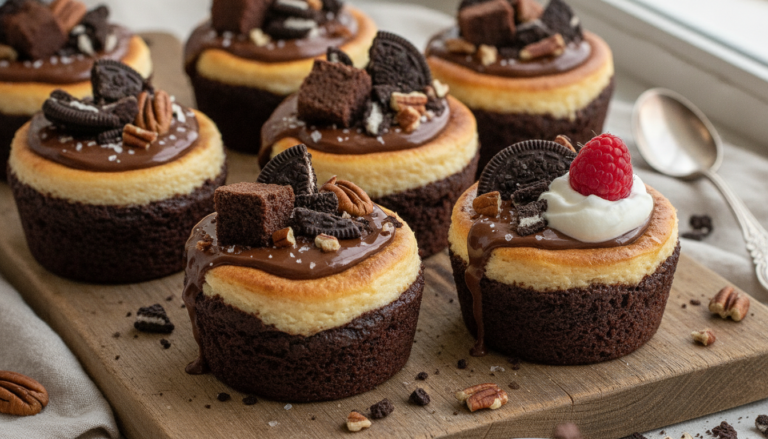
Loaded Brownie Cheesecake Cups combine the best of two beloved desserts—rich, fudgy brownie cups with a creamy cheesecake center and melty chocolate chips on top, baked in a muffin tin for the perfect individually portioned chocolate indulgence.
12
servings20
minutes25
minutes320
kcal45
minutesIngredients
1 box brownie mix
1/4 cup water
1/2 cup vegetable oil
2 eggs
8 oz cream cheese, softened
1/4 cup granulated sugar
1 tsp vanilla extract
1/2 cup mini chocolate chips
Directions
- Preheat the oven to 350°F (175°C) and line a muffin pan with cupcake liners.
- Prepare the brownie batter following the instructions on the box using water, oil, and eggs.
- Divide the brownie batter among the muffin cups, filling each about halfway.
- In a medium bowl, beat cream cheese, sugar, and vanilla until smooth and creamy.
- Add a dollop of the cream cheese mixture to the center of each brownie cup.
- Sprinkle chocolate chips over the cream cheese topping.
- Bake for 20-25 minutes or until the brownie edges are set.
- Allow to cool in the pan for at least 10 minutes before serving.
Nutrition Facts
- Total number of serves: 4
- Calories: 320kcal
- Cholesterol: 0mg
- Sodium: 620mg
- Potassium: 400mg
- Sugar: 8g
- Protein: 6g
- Calcium: 60mg
- Iron: 2mg
About This Author

Aurora Wright
Pastry Chef & Dessert Editor
Aurora is the sweet side of Daily Dish. A trained pastry chef and dessert stylist, she’s responsible for our mouth-watering cakes, cookies, and confections. She brings precision, artistry, and a touch of whimsy to every recipe she creates — and taste-tests more chocolate than she’ll admit.
Favorite dish: Flourless dark chocolate torte.
Kitchen motto: “Life’s too short to skip dessert.”















