

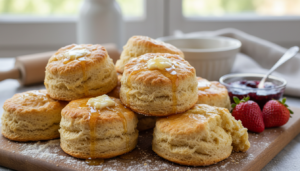
Biscuit making is one of those fundamental techniques that separates confident cooks from tentative ones. The process seems straightforward—flour, fat, liquid, leavening—but the execution requires understanding what you’re trying to achieve and why each step matters. These buttermilk biscuits represent the classic Southern approach: cold butter cut into flour, minimal handling, high heat. When executed properly, you get tall, flaky biscuits with distinct layers and a tender crumb. When done poorly, you get dense, tough pucks that no amount of butter can save.
What makes this recipe successful is the attention to temperature and technique. Cold butter is essential—it needs to remain in distinct pieces throughout mixing so that when it hits the oven’s high heat, it melts and creates steam pockets that form layers. The buttermilk provides both moisture and acidity, which reacts with the baking soda to create additional lift while tenderizing the gluten structure. The minimal kneading prevents gluten development that would make biscuits tough. Every step has a purpose rooted in chemistry and physics.
I appreciate biscuits because they’re honest baking. You can’t hide poor technique with elaborate decoration or complex flavors. Either you understand how to handle the dough properly and achieve those flaky layers, or you don’t. But once you master the basics—and it doesn’t take long—you have a foundational skill that applies to countless other recipes. These biscuits are both an end in themselves and a lesson in pastry technique that will improve everything else you bake.
─────────
The Inspiration Behind This Recipe
This recipe emerged from studying traditional Southern biscuit-making techniques and identifying the principles that consistently produce excellent results. Southern cooks have been making biscuits for generations, often without written recipes, relying instead on feel and experience. My goal was to translate that intuitive knowledge into precise measurements and clear instructions that would work for cooks at any skill level.
The key insight came from recognizing that biscuit quality depends more on technique than ingredients. You’re working with the most basic pantry staples—flour, butter, buttermilk, leavening—which means there’s nowhere to hide. The difference between good and great biscuits lies in how you handle the dough, the temperature of your ingredients, and your understanding of when to stop mixing. This recipe codifies those principles into a repeatable method.
What I wanted to create was a recipe that honored traditional biscuit-making while being accessible to modern home cooks who might not have grown up making them. The instructions are specific without being fussy, the technique is proven without being complicated, and the results are consistently excellent when you follow the guidelines. It’s the kind of recipe that rewards practice—your first batch will be good, but your tenth batch will be spectacular as you develop feel for the dough.
─────────
A Brief History of Buttermilk Biscuits
Biscuits as we know them today developed in the American South during the 19th century, though their origins trace back to European baking traditions. The word “biscuit” comes from the Latin “bis coctus,” meaning twice-baked, originally referring to hard, dry breads that could be stored for long periods. American biscuits evolved into something quite different: soft, tender, and meant to be eaten fresh.
The Southern biscuit tradition emerged from several factors: the availability of soft wheat flour (lower in protein than bread flour, producing more tender baked goods), the prevalence of buttermilk as a byproduct of butter-making, and the development of chemical leavening agents like baking powder and baking soda in the mid-1800s. These innovations allowed cooks to produce light, risen breads without yeast, dramatically reducing preparation time.
Buttermilk biscuits became a cornerstone of Southern cuisine and soul food tradition, representing comfort, hospitality, and home cooking. They appeared at every meal—breakfast with eggs and gravy, dinner alongside fried chicken, supper with butter and honey. The ability to make good biscuits was considered an essential cooking skill, particularly for women, and recipes were passed down through families as treasured heirlooms. Today, biscuits remain deeply connected to Southern identity while gaining appreciation nationwide as artisan baking traditions celebrate handmade, from-scratch cooking.
─────────
Why This Cooking Method Works
Cutting cold butter into flour creates the foundation for flaky layers. When you cut butter into pieces and coat them with flour, you’re creating a mixture where fat remains in distinct particles rather than fully incorporating into the flour. When this dough hits the oven’s high heat, the butter melts, creating steam that pushes apart layers of dough. The flour coating on the butter particles prevents them from merging, maintaining separation that becomes visible flakiness in the finished biscuits.
The minimal handling principle prevents gluten development. Gluten forms when flour proteins hydrate and are agitated through mixing or kneading. While gluten is desirable in bread (providing structure and chew), it’s detrimental in biscuits, where you want tenderness. By mixing just until combined and kneading only two or three times, you develop just enough gluten to hold the biscuits together without creating toughness. This is why the instruction “do not overwork the dough” isn’t optional—it’s the difference between tender and tough.
Baking at 450°F provides the rapid heat necessary to set the structure before the butter fully melts out of the dough. Lower temperatures allow butter to melt and leak before the dough sets, resulting in greasy, flat biscuits. High heat creates immediate steam production and rapid rise, then quickly sets the protein structure to lock in those layers. The golden-brown tops come from Maillard reactions and the brushed butter, adding flavor complexity beyond just the interior crumb. This temperature isn’t negotiable if you want proper biscuit texture.
─────────
Flavor Profile: What to Expect
These biscuits deliver classic, comforting flavors with appealing textural contrast:
- Rich butter – Present throughout but not greasy, adding depth and satisfying richness
- Tangy buttermilk – Subtle acidity that balances the butter and adds complexity
- Tender crumb – Soft interior that’s light and almost fluffy
- Flaky layers – Visible separation that creates textural interest
- Golden crust – Slightly crispy exterior with concentrated butter flavor
- Mild saltiness – Enhances all other flavors without tasting overtly salty
- Toasted notes – From the high-heat baking, adding subtle depth
The overall experience is one of pure comfort—these taste like home, like Sunday morning, like someone who cares about you made breakfast. They’re substantial enough to be satisfying but light enough that you’ll want seconds. The contrast between the crispy, buttery top and the tender, layered interior makes each bite engaging. They’re the kind of food that makes you slow down and pay attention, savoring something simple done exceptionally well.
─────────
Tips for Making the Best Homemade Buttermilk Biscuits
Keep all ingredients as cold as possible—some bakers even freeze the butter and chill the flour for maximum flakiness.
- Use a light hand – Handle the dough gently and minimally to prevent tough biscuits
- Don’t twist the cutter – Press straight down and lift straight up to allow maximum rise
- Place biscuits close together – Sides touching on the baking sheet helps them rise taller
- Work quickly – The faster you work, the colder the butter stays, creating better layers
- Use real buttermilk – Don’t substitute with milk and vinegar; real buttermilk provides better flavor and texture
- Freeze the scraps – Re-rolling makes tough biscuits; freeze dough scraps for topping casseroles instead
- Brush with butter immediately – Right when they come out of the oven for maximum absorption
- Check oven temperature – Use an oven thermometer; accurate heat is crucial for proper rise
For extra-tall biscuits, stack and fold the dough once or twice before the final rolling. This creates additional layers without overworking the dough—a technique professional bakers use for maximum height and flakiness.
─────────
Serving Suggestions and Side Pairings
These biscuits are incredibly versatile, working equally well in sweet or savory contexts. For a classic Southern breakfast, serve them with sausage gravy, scrambled eggs, and crispy bacon. Split them horizontally and use as the base for eggs Benedict or breakfast sandwiches with fried eggs and country ham. They’re also excellent alongside fried chicken, making them appropriate for brunch, lunch, or dinner.
On the sweeter side, serve warm biscuits with butter and jam, honey and whipped cream, or preserves and clotted cream for a Southern take on afternoon tea. They’re perfect for strawberry shortcake—split, filled with macerated berries and whipped cream. For an indulgent breakfast, try them with maple butter or apple butter. The neutral flavor profile means they adapt beautifully to whatever you’re serving.
These biscuits shine at family gatherings, holiday breakfasts, Sunday brunches, or any meal where you want to offer something homemade and comforting. They’re particularly appropriate for Southern-themed menus or anytime you want to demonstrate care through cooking. The aroma of fresh-baked biscuits creates an atmosphere of warmth and hospitality that makes everyone feel welcome.
─────────
Storage, Reheating, and Make-Ahead Tips
- Prep the dry mixture: Combine flour, leavening, and salt up to 1 week ahead; store airtight at room temperature
- Cut butter ahead: Cube and freeze butter up to 1 month; add frozen directly to dry ingredients
- Shape and freeze unbaked: Cut biscuits, freeze on a baking sheet, then transfer to bags for up to 3 months
- Bake from frozen: Add 2-3 minutes to baking time when cooking frozen unbaked biscuits
- Store baked biscuits: Keep in an airtight container at room temperature for up to 2 days
- Reheat properly: Wrap in foil and warm at 350°F for 10 minutes to restore texture
- Freeze baked biscuits: Wrap individually and freeze for up to 2 months; thaw and reheat before serving
- Best served fresh: Like most biscuits, these are truly best within an hour of baking
The ability to freeze unbaked biscuits is particularly valuable—you can have fresh-baked biscuits anytime by simply pulling a few from the freezer and baking them. This makes impressive breakfasts achievable even on busy mornings.
─────────
Why This Recipe Deserves a Spot in Your Rotation
This recipe earns its place because mastering biscuits gives you a fundamental skill that elevates countless meals. Once you can make good biscuits confidently, you have a go-to side dish, breakfast option, and dessert base that works in endless contexts. The technique translates to other pastries—scones, pie crusts, shortcakes—making this one recipe the gateway to an entire category of baking.
Beyond the practical applications, there’s genuine satisfaction in making excellent biscuits. It’s one of those skills that connects you to culinary tradition and history, particularly Southern cooking heritage. The act of making biscuits by hand—feeling the dough come together, watching them rise in the oven, pulling them out golden and steaming—creates a connection to generations of cooks who did the same thing. In an era of convenience foods, taking the time to make biscuits from scratch is both a practical choice and a meaningful one.
─────────
Recommended Drink Pairing
Traditional buttermilk biscuits pair beautifully with strong black coffee—the slight bitterness cuts through the butter and enhances the biscuits’ subtle sweetness. A medium to dark roast with nutty or chocolate notes complements the toasted flavors from high-heat baking. For a more indulgent pairing, coffee with cream and sugar echoes the richness while adding sweetness that works particularly well if you’re serving biscuits with savory accompaniments like eggs and bacon.
Hot tea, particularly robust black varieties like English Breakfast or Assam, provides similar bitter contrast while adding aromatic complexity. The tea’s tannins cleanse your palate between bites, making each taste as satisfying as the first. For Southern authenticity, sweet tea (iced black tea heavily sweetened) offers traditional accompaniment, though the sweetness works better with savory biscuit applications than sweet. Fresh-squeezed orange juice provides bright acidity and vitamin C that balance the butter’s richness. If you’re serving biscuits with gravy, cold milk offers simple, comforting pairing that many Southerners consider essential. For special occasions, a light sparkling wine or champagne brings celebratory elegance, with bubbles and acidity that cut through the butter while making breakfast feel luxurious.

Homemade Buttermilk Biscuits
These classic buttermilk biscuits deliver tender, flaky layers and buttery richness in every bite—the kind of from-scratch baking that makes your kitchen smell like home and your brunch table feel complete.
8
servings20
minutes15
minutes180
kcal35
minutesIngredients
2 cups all-purpose flour
1 tablespoon baking powder
0.5 teaspoon baking soda
0.5 teaspoon salt
0.5 cup unsalted butter, chilled and cubed
3 tablespoons unsalted butter, melted
1 cup buttermilk
Directions
- Preheat your oven to 450°F (230°C).
- In a large bowl, whisk together flour, baking powder, baking soda, and salt.
- Add chilled cubed butter to the flour mixture. Use a pastry cutter or fork to cut butter into the flour until it resembles coarse crumbs.
- Pour buttermilk into the flour mixture and stir just until combined. Do not overwork the dough.
- Turn the dough onto a floured surface and gently knead two or three times until the dough comes together.
- Flatten dough with your hands to about 1-inch thickness.
- Use a round cutter to cut out biscuits and place them on a baking sheet.
- Brush the tops of the biscuits with melted butter.
- Bake in the preheated oven for 12-15 minutes or until golden brown.
- Remove from the oven and allow to cool slightly before serving.
Nutrition Facts
- Total number of serves: 4
- Calories: 180kcal
- Cholesterol: 0mg
- Sodium: 620mg
- Potassium: 400mg
- Sugar: 8g
- Protein: 6g
- Calcium: 60mg
- Iron: 2mg
About This Author

Benjamin Brown
Recipe Developer
Benjamin is our flavor engineer. A classically trained chef turned recipe developer, he’s obsessed with balancing taste, texture, and creativity. He ensures that every recipe we publish is not only delicious but also reliable, approachable, and repeatable — even for beginners.
Favorite dish: Slow-braised short ribs with red wine reduction.
Kitchen motto: “Cooking is part science, part soul.”


