
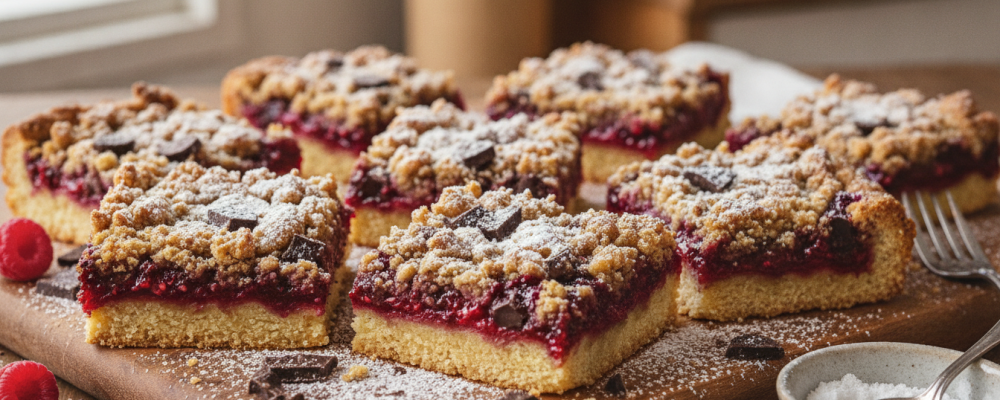

Chocolate Raspberry Crumb Bars represent one of my favorite categories of baking: recipes where a single well-designed component serves multiple structural functions. The oat-butter crumble here isn’t just a topping—it’s simultaneously the base crust, the filling’s structural support, and the golden, textured crown. This efficiency is elegant pastry design. By using one mixture for two purposes, you simplify the process while creating textural coherence throughout the bar: every bite from bottom to top contains the same buttery, oat-flecked crumble in different stages of compression and browning.
What makes this combination work so well from a flavor chemistry perspective is the classic pairing of chocolate and raspberry—two ingredients that share flavor compound families and thus amplify each other rather than competing. Both contain aromatic esters that contribute fruity, complex notes. Chocolate’s bitterness and depth provide the perfect foil for raspberry’s bright acidity and sweetness. When you add the buttery, slightly salty oat crumble as a neutral carrier, these two strong flavors find balance and the result is something more sophisticated than either could achieve alone.
The dual-texture raspberry filling—jam plus fresh berries—is where this recipe shows particular ingenuity. Jam alone would create a uniform, predictable filling. Fresh berries alone would be too wet and would make the bars difficult to cut cleanly. Together, they create a filling that’s both stable (from the jam’s pectin and concentrated sugar) and fresh-tasting (from the whole berries that retain some texture and bright flavor through baking). The fresh raspberries also release juice during baking that mingles with the jam, creating a slightly more complex, less processed-tasting filling than jam alone would produce.
─────────
The Inspiration Behind This Recipe
Crumb bars with fruit fillings have deep roots in American home baking—from classic lemon bars to blueberry crumble bars to various jam-filled iterations. The format appeals because it’s simultaneously structured (bars that hold their shape when cut) and rustic (the irregular crumble topping signals homemade care). The addition of chocolate chips to a raspberry crumb bar represents the kind of creative evolution that happens when bakers start asking “what if?”—what if the classic raspberry jam bar had chocolate in it? What if fresh berries complemented the jam filling? What if the humble crumb bar could be made more interesting without becoming more complicated?
The answer to all those questions is this recipe. The chocolate chips occupy a strategic position between the jam layer and the top crumble—when the bars bake, the chips melt and partially incorporate into the raspberry filling, creating streaks of chocolate throughout. As everything cools, the chocolate re-sets, creating those satisfying pockets of chocolate that you encounter unexpectedly while eating. This positional choice is intentional: chips on top of the crumble would just sit there and bake dry; chips underneath the jam layer would be lost; chips between the jam and top crumble are in the perfect position to melt into the filling and create maximum impact.
The oats in the crumble are both practical and flavor-driven. Practically, they add structure and prevent the crumble from becoming too fine and sandy—oats maintain some texture through baking, creating the distinctive rough, golden topping that identifies crumb bars visually. Flavor-wise, rolled oats have a subtle nuttiness from their processing that adds complexity to what would otherwise be a pure butter-flour-sugar crumble.
─────────
A Brief History of Crumb Bars & the Chocolate-Raspberry Pairing
Crumb bars—also called streusel bars, crumble bars, or jam bars—trace their lineage to European streusel-topped pastries that German and Scandinavian immigrants brought to America in the 19th century. Streusel (from the German word meaning “something strewn”) originally referred to a mixture of butter, flour, and sugar crumbled over yeasted coffee cakes. American bakers adapted the concept to bar cookies, using similar crumble mixtures as both base and topping with various fillings pressed between.
The oatmeal variation specifically—incorporating rolled oats into the crumble—became particularly popular in mid-20th century American baking as oats were promoted for their health benefits. Quaker Oats appeared on pantry shelves across America, and home bakers discovered that oats added texture, nuttiness, and substance to crumb bar recipes that plain flour couldn’t provide. The oatmeal crumb bar in various forms became a staple of community cookbooks, church potlucks, and school bake sales.
Chocolate and raspberry’s pairing history extends across multiple culinary traditions—French pastry uses the combination in tarts and entremet cakes; Austrian tradition pairs them in sachertorte variations; Belgian chocolatiers regularly incorporate raspberry into bonbons. The pairing works because raspberry’s malic acid and tartness provide the precise contrast chocolate needs to avoid feeling one-dimensionally rich. In American home baking, the combination appeared primarily in brownies and cakes before migrating to bar cookies as bakers experimented with fillings.
This recipe represents the convergence of European streusel technique, American oat-crumble adaptation, and the classic chocolate-raspberry pairing—three distinct traditions that combine naturally and deliciously.
─────────
Why This Layered Bar Method Works
Melted butter creates cohesive crumble without creaming. Using melted rather than cold or softened butter produces a crumble that’s less flaky than cold-butter shortbread but more cohesive than dry crumble made with room-temperature butter. The melted butter coats every flour and oat particle, creating a mixture that clumps together when pressed (forming the base) but remains irregular when scattered (forming the topping). This is the ideal consistency for dual-function crumble.
Baking soda in the crumble promotes browning and lift. Even a small amount of baking soda contributes to the Maillard reaction by slightly alkalizing the mixture, which accelerates browning. This produces the characteristic golden color that makes crumb bars so visually appealing. It also provides slight lift to the base layer, preventing it from becoming too dense and compressed under the filling’s weight.
Pressing half the mixture creates a stable, even base. The pressed base layer needs enough compaction to support the filling without crumbling when cut, but not so much that it becomes hard and dense. Pressing firmly with the bottom of a measuring cup or your hands to approximately ¼-inch thickness creates the right balance. The base bakes separately from the filling (the filling is added after pressing, before baking) but both components bake together during the main bake, allowing the base to form structural integrity while the filling sets.
Raspberry jam provides structure; fresh berries provide flavor and texture. Jam’s high pectin and sugar content means it sets firmly during baking, creating a stable, sliceable layer. Fresh raspberries alone would release too much liquid during baking, creating a wet filling that wouldn’t set properly. Together, the jam acts as a structural matrix while the fresh berries add pockets of brighter, more complex raspberry flavor and slight textural interest.
Chocolate chips between filling and top crumble achieve optimal melt. Positioned directly above the warm, moist jam layer, chocolate chips receive heat both from above (the oven) and from below (steam rising from the jam). This surrounding heat melts the chips more completely than placement elsewhere would achieve. As they melt, they mix with the upper surface of the jam, creating chocolate-raspberry swirls. When cooled, they resolidify as irregularly distributed chocolate pockets.
The gentle pressing of top crumble preserves texture. The instruction to press the top crumble “gently” is deliberate—too much pressure would compact it into a second dense base layer, eliminating the textural contrast between pressed bottom and loose, rough-textured top. Light, even pressing creates just enough cohesion for the top to hold together when cut while maintaining its crumbly, irregular surface appearance.
Cooling completely before cutting is essential. The jam layer is molten when hot, semi-set when warm, and properly gelled only when completely cool. Cutting warm bars causes the filling to compress and squish out the sides, destroying the clean layer structure. Completely cooled bars have jam that’s fully set, chocolate that’s resolidified, and crumble that’s set firmly through butter crystallization—all three layers maintain their integrity when cut.
─────────
Flavor Profile: What to Expect
Bright, tart raspberry dominates the flavor experience—this is unambiguously a raspberry bar. The jam provides concentrated, sweet raspberry flavor while the fresh berries add brighter, more complex notes with slight tartness. Together they create raspberry flavor with dimension—sweet and tart simultaneously, jammy and fresh, deep and bright.
Rich semi-sweet chocolate provides the essential counterpoint. The chocolate chips, partially melted into the raspberry filling, create pockets of bittersweet richness that interrupt the fruit’s brightness with satisfying density. The semi-sweet chocolate specifically is critical—milk chocolate would be too sweet and too mild, dark chocolate might overwhelm the raspberry; semi-sweet creates perfect balance.
Buttery, nutty oat crumble frames everything with familiar comfort. The crumble has gentle sweetness, rich butter flavor, and that characteristic rolled oat nuttiness that adds subtle complexity. The bottom layer is denser and slightly more cookie-like from compression and baking; the top layer is lighter and more irregular. Both have that satisfying golden, slightly crispy character that makes crumble bars so craveable.
Subtle salt note threads through the crumble, enhancing every other flavor. The salt in the crumble mixture amplifies the chocolate’s depth, brightens the raspberry’s tartness, and provides the baked goods’ characteristic savory undertone that prevents sweetness from becoming one-dimensional.
The overall experience is balanced and layered. Each bite moves through textures (crispy crumble, yielding jam, irregular chocolate pockets, golden base) and flavors (butter, raspberry, chocolate, oat) in a sequence that’s dynamic rather than uniform. No single element dominates—they take turns in each bite depending on where in the bar you are and which layers you’ve captured.
─────────
Tips for Making the Best Chocolate Raspberry Crumb Bars
Making the Crumble:
- Melt butter completely and let cool slightly before adding to dry ingredients—hot butter can partially cook the flour and affect texture.
- Mix until uniformly combined—every flour and oat particle should be coated with butter before testing the texture.
- The right consistency: squeeze a handful—it should clump together briefly then crumble apart. If it won’t clump at all, add a tablespoon more melted butter. If it stays solidly clumped, it’s slightly over-buttered but still workable.
- Use rolled oats (old-fashioned), not quick oats or instant—rolled oats maintain texture through baking; quick oats become too soft and lose their textural contribution.
Building the Layers:
- Press base firmly and evenly—use the flat bottom of a measuring cup or drinking glass for the most even compression. The base should be approximately ¼-inch thick throughout.
- Measure half accurately—use a kitchen scale if possible to divide the crumble mixture exactly. Too little base and it’s fragile; too much and the top layer will be thin.
- Spread jam to the edges of the base layer—bare edges of base with no filling will become dry during baking.
- Use good quality raspberry jam—this is the primary flavor driver in the filling, so quality matters. Jam with visible seeds and real fruit character will taste significantly better than smooth, artificially flavored versions.
- Distribute fresh raspberries evenly—place them individually if possible rather than scattering randomly, ensuring each bar gets fruit.
- Add chocolate chips in an even layer over the berries before adding the top crumble—resist the temptation to add more than the recipe calls for, as excess chocolate can make the filling too wet and prevent clean cutting.
The Top Crumble:
- Scatter rather than pour—use your hands to scatter pieces of crumble over the filling rather than dumping all at once, which creates thick spots and thin spots.
- Press gently and evenly—use your fingertips to press the scattered crumble into a relatively even layer with gentle pressure. You should see some filling peeking through at spots—this is correct and beautiful.
- Cover the entire surface without leaving large bare patches of filling exposed—exposed jam can bubble over the crumble during baking.
Baking and Cooling:
- Check at 25 minutes—the top should be golden brown throughout. The bars are done when the top is uniformly golden and the edges are slightly darker.
- Don’t underbake—pale crumble lacks the full buttery, toasted flavor that makes these bars so appealing. If in doubt, give them another 3-5 minutes.
- Cool completely in the pan—minimum 2 hours at room temperature. Refrigerate for 30 minutes after room temperature cooling for the absolute cleanest cuts.
- Use a sharp knife warmed in hot water and wiped dry—this cuts through the chocolate cleanly without dragging.
Flavor Variations:
- Cherry-chocolate: Substitute cherry jam and fresh cherries for raspberry
- Orange-chocolate: Add 1 teaspoon orange zest to the crumble and use orange marmalade instead of raspberry jam
- Peanut butter-raspberry: Dot tablespoons of peanut butter over the jam layer before adding chocolate chips
- White chocolate: Substitute white chocolate chips for semi-sweet for a sweeter, more delicate flavor profile
─────────
Serving Suggestions and Presentation Ideas
Classic Bar Platter:
Cut into neat squares or rectangles and arrange on a white serving platter or wooden board. The golden crumble top with visible raspberry and chocolate elements looks beautiful with no additional garnish. A light dusting of powdered sugar through a fine-mesh sieve adds elegance without obscuring the bars’ natural beauty.
Fresh Berry Garnish:
Place a single fresh raspberry on top of each bar or scatter fresh raspberries and a few fresh mint leaves around the platter. The fresh berries signal the filling flavor and add bright color contrast to the golden crumble. This simple garnish transforms a platter of bars into something worthy of a dinner party dessert table.
Elevated Plated Dessert:
Place a bar on a white dessert plate with a dollop of crème fraîche or whipped cream alongside. Add a few fresh raspberries and a drizzle of chocolate sauce creating an artistic pattern on the plate. A fresh mint sprig completes the restaurant-quality presentation.
Warm À La Mode:
Warm individual bars in the microwave for 15-20 seconds and serve in bowls with a scoop of vanilla ice cream or raspberry sorbet alongside. The slightly melted chocolate chips and warm jam create an irresistible combination with cold ice cream. This casual, indulgent presentation works beautifully for family desserts or informal dinner parties.
Bake Sale and Gift Packaging:
Wrap individual bars in clear cellophane or wax paper twisted at the ends for attractive portable packaging. Arrange 6-8 in a decorative tin or bakery box with tissue paper for hostess gifts. The combination of chocolate, raspberry, and golden crumble is universally appealing and makes these excellent gifts.
Dessert Table Addition:
Cut into smaller squares (the 9×9 pan can yield 16-25 pieces depending on size) for dessert table service. Their individual portability and beautiful appearance make them ideal alongside other bar cookies and treats. Label with a small card identifying the flavors for guests who might have allergies.
─────────
Storage, Make-Ahead, and Serving Tips
Storage:
- Room Temperature: Store in an airtight container for up to 4 days—the jam filling keeps the bars moist and the crumble stays relatively crisp.
- Refrigerator: Store for up to 1 week. Cold bars have a firmer jam layer and slightly firmer chocolate—some people prefer this more structured texture.
- Freezer: Freeze individually wrapped bars for up to 3 months. Thaw at room temperature for 30-60 minutes. The texture holds up remarkably well—the crumble maintains its character and the jam filling doesn’t become watery.
- Layer with parchment between stacked bars to prevent the jam from sticking layers together.
Make-Ahead Strategy:
These bars are excellent for advance preparation:
- Bake 1-2 days ahead—the flavors meld beautifully overnight and the layers set completely
- The jam filling deepens in flavor as it sits, integrating with the chocolate and crumble
- Cut before or after storing—both approaches work; cutting after storage produces slightly cleaner edges
For holiday baking specifically, these freeze beautifully and can be made weeks ahead—thaw at room temperature before serving.
Flavor Development:
Like many fruit-filled bars, these improve after 12-24 hours as the jam’s flavors integrate with the crumble and the chocolate fully sets. Day-two bars are often more flavorful and easier to cut than day-one bars made the same day.
Serving Temperature:
- Room temperature: Crumble slightly crispy, jam set but yielding, chocolate firm—classic and ideal for most occasions
- Slightly warm: Jam more fluid, chocolate melty, crumble softened—wonderfully gooey and indulgent
- Cold from refrigerator: Firm jam, snappy chocolate, crispy crumble—more structured and intense, excellent in summer
Cutting for Clean Results:
- Cool completely (overnight preferred) before cutting
- Refrigerate briefly (30 minutes) for the cleanest cuts through the jam and chocolate layers
- Warm the knife in hot water and wipe dry before each cut
- Apply firm, single downward pressure rather than sawing
- A 9×9-inch pan yields: 9 large squares (3×3), 16 medium squares (4×4), or 25 small squares (5×5)
─────────
Why This Recipe Deserves a Spot in Your Rotation
Chocolate Raspberry Crumb Bars are one of those genuinely versatile recipes that belongs in any baker’s collection—not just for special occasions but as a reliable go-to that works for every context from casual family snacking to elegant dessert table presentation. They’re straightforward enough for beginner bakers and interesting enough for experienced ones, crowd-pleasing enough for potlucks and refined enough for dinner parties. That range of applicability is rare.
From a pastry design perspective, the dual-function crumble is genuinely clever. One mixture, two textures, two functions—base and topping from a single recipe component. Understanding why this works (melted butter creates a mixture that can be pressed to density or scattered to roughness depending on how it’s handled) makes you a more thoughtful baker. Every technique in this recipe has a reason, and understanding those reasons improves your baking generally.
The flavor combination is essentially foolproof for crowd-pleasing. Chocolate and raspberry together appeal to virtually everyone—the pairing is internationally recognized as delicious for good reason. The buttery oat crumble provides comfort and familiarity that makes even skeptics happy. I’ve served these at gatherings where some guests claimed not to like fruit in desserts, and they made an exception for these bars every time.
The make-ahead and storage qualities are exceptional. Bars that improve with time, freeze beautifully for months, and maintain quality through various storage conditions are genuinely valuable for busy bakers and entertainers. Having these in the freezer means you’re always 20 minutes from a beautiful dessert—just thaw and serve.
These bars celebrate fresh seasonal fruit without requiring peak-season perfection. Fresh raspberries are best in summer, but the jam provides flavor backbone that makes these excellent year-round. In peak raspberry season, use all fresh berries and reduce the jam. In winter, lean more heavily on quality jam. The recipe flexes with ingredient availability.
If you’re looking for a bar cookie that delivers complex layered flavor and texture, that celebrates the classic chocolate-raspberry pairing, that uses clever technique to create impressive results from simple ingredients, that works for every occasion from casual to formal, and that stores and travels beautifully—this is it. Chocolate Raspberry Crumb Bars prove that the best bar cookies are the ones where every element—crumble, filling, chocolate—works in harmony to create something greater than any component alone.
─────────
Recommended Drink Pairing
Pinot Noir – Light to Medium Bodied:
A light Pinot Noir with its characteristic red fruit (cherry, raspberry) notes creates a beautiful pairing that amplifies the bars’ berry character. Pinot’s silky tannins complement the chocolate without overwhelming it, and its earthy complexity adds sophistication. This is the pairing that elevates these humble bars to dinner party status—wine and bar cookies in elegant conversation.
Coffee – Dark Roast or Espresso:
Strong dark roast coffee or espresso provides the ideal bitter contrast to both the sweet jam and the chocolate, while coffee’s roasted notes create affinity with the toasted oat crumble. The bitterness balances the bars’ sweetness and makes each subsequent bite of bar taste fresher. This is the everyday pairing—perfect for afternoon snacking or post-dinner service.
Raspberry Herbal Tea:
Hot or iced raspberry herbal tea creates a flavor echo that doubles down on berry character while providing refreshing contrast to the richness of butter and chocolate. The tea’s slight tartness amplifies the fresh raspberry filling and provides palate-cleansing contrast between bites. This elegant non-alcoholic pairing works beautifully for afternoon tea or brunch service.
Hot Chocolate – Dark:
Rich dark hot chocolate creates a chocolate-amplifying pairing that chocolate enthusiasts will love—the beverage’s chocolate echoes the chips in the filling while its warmth softens the cold bar pleasantly. Adding a splash of raspberry liqueur to the hot chocolate for adults creates a fully cohesive raspberry-chocolate experience.
Champagne or Sparkling Rosé:
Dry Champagne or sparkling rosé provides effervescent contrast that cleanses the palate beautifully between bites of rich crumble bar. The wine’s bright acidity amplifies raspberry’s tartness while the bubbles cut through butter and chocolate richness. This celebratory pairing works for holiday gatherings, showers, or any occasion that benefits from a little sparkle.
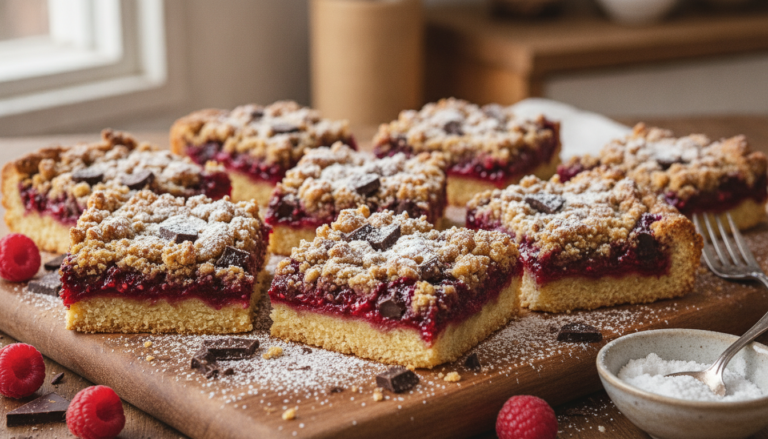
Chocolate Raspberry Crumb Bars
Chocolate Raspberry Crumb Bars are irresistible layered bars with a buttery oat crumble base, generous raspberry jam and fresh berry filling, melty chocolate chips throughout, and a golden crumble topping—the perfect balance of fruity, chocolatey, and buttery in every satisfying bite.
16
servings20
minutes30
minutes300
kcal50
minutesIngredients
1 cup all-purpose flour
1 cup rolled oats
3/4 cup granulated sugar
1/2 cup unsalted butter, melted
1 cup raspberry jam
1 cup fresh raspberries
1/2 cup semi-sweet chocolate chips
1/4 teaspoon salt
1/4 teaspoon baking soda
Directions
- Preheat the oven to 350°F (175°C) and grease a 9×9-inch pan.
- In a bowl, combine flour, oats, sugar, salt, and baking soda.
- Stir in melted butter until the mixture forms coarse crumbs.
- Press half of the crumb mixture into the prepared pan.
- Spread raspberry jam evenly over the base layer.
- Sprinkle fresh raspberries and chocolate chips over the jam.
- Cover with remaining crumb mixture, pressing gently.
- Bake for 25-30 minutes or until golden brown.
- Cool completely in the pan before slicing into bars.
Nutrition Facts
- Total number of serves: 4
- Calories: 300kcal
- Cholesterol: 0mg
- Sodium: 620mg
- Potassium: 400mg
- Sugar: 8g
- Protein: 6g
- Calcium: 60mg
- Iron: 2mg
About This Author

Aurora Wright
Pastry Chef & Dessert Editor
Aurora is the sweet side of Daily Dish. A trained pastry chef and dessert stylist, she’s responsible for our mouth-watering cakes, cookies, and confections. She brings precision, artistry, and a touch of whimsy to every recipe she creates — and taste-tests more chocolate than she’ll admit.
Favorite dish: Flourless dark chocolate torte.
Kitchen motto: “Life’s too short to skip dessert.”















