
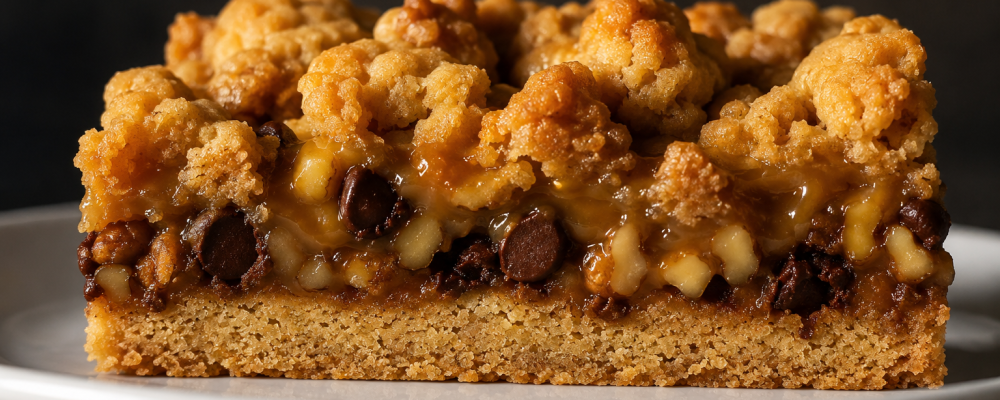

Chocolate Caramel Cookie Bars are what I call a “maximum impact, minimum technique” dessert—the kind that produces results so impressive that people assume complicated skill was involved, when actually the method is completely straightforward and the oven does most of the work. What makes these bars genuinely special isn’t just the flavor combination (though chocolate, caramel, brown sugar, and walnuts together are essentially a greatest hits of dessert flavors), it’s the layered structure that creates distinct textural zones in every single bite.
From a pastry construction standpoint, these bars are brilliantly designed. The brown sugar butter dough serves as both the foundation crust and the crumbled topping—one dough, two functions, perfect economy of ingredients. The par-baking technique is particularly smart: giving the base crust 10 minutes of baking before adding toppings ensures it has enough structural integrity to support the weight of caramel, chocolate, and nuts without becoming soggy. If you added everything to raw dough and baked at once, the toppings would push down into the unbaked crust and you’d lose those distinct layers. That single step of par-baking makes the difference between a great bar and a muddy one.
The caramel layer is where the real magic happens. Melted caramel bits flow between and around the chocolate chips and walnuts, then set during baking and cooling into a gooey, sticky layer that acts as both flavor element and structural adhesive. It holds the chocolate chips and walnuts in place, it glues the crumbled top dough layer down, and it creates that characteristic pull when you bite into these bars—that slight resistance before the layers yield together. That textural experience is what distinguishes great layered bars from merely good ones, and getting it right requires understanding that caramel needs to flow during baking and set during cooling.
─────────
The Inspiration Behind This Recipe
Chocolate Caramel Cookie Bars belong to the tradition of American bar cookies that became popular in the mid-20th century as home bakers discovered that baking in sheet pans and cutting into bars was more efficient and forgiving than individual drop cookies. Bar cookies could be assembled quickly, baked uniformly, and cut into consistent portions without the attention required by individual cookies that might spread unevenly or bake at different rates.
The specific flavor combination—brown sugar cookie, caramel, chocolate, walnuts—is inspired by millionaire’s shortbread (also called caramel slice), a Scottish bar cookie with a shortbread base, caramel layer, and chocolate topping. American versions evolved to be less precise and more rustic, using simpler doughs and more forgiving caramel (caramel bits versus homemade caramel) while adding walnuts for texture and the crumbled top layer that gives these bars their distinctive appearance.
What I find most interesting about this recipe from a development perspective is the decision to use the same dough for both the base crust and the crumbled topping. This creates visual and flavor coherence—every bite includes the same dough in different textures (compressed and crispy on the bottom, crumbled and slightly softer on top). That repetition-with-variation is a classic pastry technique that creates unity in complex layered desserts.
─────────
A Brief History of American Bar Cookies
Bar cookies are a distinctly American contribution to the global dessert tradition—a practical evolution of drop cookies and sheet cakes that prioritized efficiency without sacrificing flavor or variety. The format emerged as a response to the demands of wartime rationing (baking one pan rather than monitoring individual cookies), community baking (church and school events requiring large quantities), and the generally practical American approach to home cooking that values efficiency alongside quality.
The earliest bar cookie recipes appeared in American cookbooks in the late 19th century, but the format exploded in popularity during the 1950s and 1960s as baking sheet pans became standard kitchen equipment and as packaged ingredients like chocolate chips, condensed milk, and caramel candies made layered bar construction accessible to home bakers without professional training.
Layered bar cookies specifically—where different components are stacked before or during baking—represent a more sophisticated approach to the format. Magic bars (also called seven-layer bars), lemon bars, brownies with cream cheese swirls, and various caramel-chocolate combinations all emerged during this period. These bars captured the imagination because they offered variety and visual complexity that simple drop cookies couldn’t match.
The use of commercial caramel products (originally Kraft caramels, unwrapped and melted; later caramel bits designed specifically for baking) democratized caramel in bar cookies. Before these products, incorporating caramel required cooking sugar to precise temperatures—a technique beyond many home bakers. Commercially prepared caramel made gooey, stretchy caramel layers achievable for everyone.
─────────
Why This Layered Baking Method Works
Brown sugar butter dough is ideal for pressed and crumbled applications. Melting butter with brown sugar (rather than creaming them) creates a cohesive dough without incorporating air. This produces a dense, slightly crispy texture when pressed and baked—more like shortbread than cookie in character. The brown sugar’s molasses content adds caramel-like depth that complements the caramel layer above. This same dough, when crumbled over the top, bakes into irregular golden pieces that add textural variety.
Par-baking creates structural integrity before adding toppings. Ten minutes of baking sets the base crust enough to create a stable platform. Raw dough is soft and pliable—adding heavy toppings before any baking would cause them to sink into the dough rather than sitting on top of it. The par-baked crust has begun to set through starch gelation and protein coagulation, creating a surface that can support the weight of caramel, chocolate chips, and walnuts while maintaining distinct layers.
Caramel bits with milk creates perfect working consistency. Caramel bits are pre-cooked caramel in solid form—they melt easily and consistently with a small amount of milk, which prevents them from becoming too thick or burning. The milk also slightly dilutes the caramel’s sugar concentration, making it more pourable and ensuring it flows evenly over the chocolate and nuts rather than pooling in one area. As the bars bake, this caramel heats and becomes even more fluid, flowing into all the gaps before setting during cooling.
Chocolate chips melt partially but retain shape. Semi-sweet chocolate chips are formulated with stabilizers that help them hold their shape during baking even as they soften and become melty. This means they create distinct pockets of chocolate rather than fully melting into the caramel, providing concentrated chocolate flavor and textural contrast. The slight bitterness of semi-sweet chips balances the sweetness of caramel and brown sugar.
Walnuts provide essential textural contrast and flavor. Without nuts, these bars would be texturally soft throughout—cookie, caramel, chocolate, cookie. The walnuts introduce crunch that provides contrast and makes each bite more dynamic. Their slight bitterness also balances sweetness. Chopped walnuts specifically (rather than whole or large pieces) distribute evenly through the bars, ensuring walnut in every bite without overwhelming any single portion.
The crumbled top layer creates visual and textural interest. Rather than pressing all the dough into a flat top (which would create an enclosed bar with toppings buried inside), crumbling the remaining dough creates an irregular, rustic surface that’s partially exposed to direct heat. This produces varied textures—some pieces more golden and crispy, some softer—and allows the caramel, chocolate, and walnut layer to remain partially visible rather than completely hidden.
Cooling completely before cutting is non-negotiable. The caramel layer is liquid when hot and soft when warm. Cutting warm bars would compress all the layers, cause caramel to ooze out, and result in messy, uneven portions that don’t showcase the distinct layers. Completely cooled bars have caramel that’s set to a chewy-firm consistency, chocolate that’s solidified, and dough that’s fully structured—creating clean cuts that reveal the beautiful layers.
─────────
Flavor Profile: What to Expect
Deep, caramel-forward brown sugar creates the flavor foundation throughout. The brown sugar butter dough has a molasses-rich, caramel-like sweetness that’s more complex than white sugar baking—warmer, deeper, with butterscotch undertones. This same caramel quality appears in the actual caramel layer, creating flavor continuity that makes the dessert taste unified rather than like separate components stacked together.
Rich, gooey caramel is the defining experience of these bars. When you bite through the cookie layers into the caramel, it’s thick, chewy, and intensely sweet with that characteristic burnt-sugar complexity. The caramel’s slight pull and chew is the tactile highlight of eating these bars—that satisfying resistance before everything yields together.
Semi-sweet chocolate provides essential bitterness and richness. The chocolate chips create pockets of concentrated chocolate flavor that contrast with the surrounding caramel sweetness. Semi-sweet specifically (rather than milk chocolate) is the right choice—its slight bitterness cuts through the sugar and prevents the bars from becoming cloyingly sweet.
Walnut crunch and earthiness adds textural dynamism and a slightly bitter, earthy note that balances all the sweetness above and below. The walnuts also add a subtle nuttiness that deepens the overall flavor profile, creating complexity beyond just sweet-sweet-sweet.
Buttery, golden cookie layers provide structure and a clean, rich finish. The base and top dough layers taste like excellent shortbread—buttery, slightly crispy, with brown sugar warmth—creating familiar cookie comfort that anchors all the more intense flavors between them.
The overall experience is indulgent and multi-dimensional. These bars are unabashedly rich and sweet, but the interplay of butter, caramel, chocolate, and walnut creates genuine complexity rather than one-note sweetness. Every bite includes multiple flavors and textures hitting in sequence—crispy cookie, then yielding caramel, then melty chocolate, then walnut crunch, then cookie again. That sequence creates a dessert experience that keeps you engaged bite after bite.
─────────
Tips for Making the Best Chocolate Caramel Cookie Bars
Making the Brown Sugar Dough:
- Melt butter completely over medium heat before adding brown sugar—partially melted butter creates uneven dough.
- Stir constantly once brown sugar is added to prevent scorching on the pan bottom—this mixture burns quickly if left unattended.
- Remove from heat as soon as smooth—continued cooking can cause the sugar to crystallize.
- Add flour off heat and stir until fully incorporated. The dough will be thick and slightly sticky.
- Let dough cool for 5 minutes before pressing into the pan—too-hot dough is difficult to handle and can partially melt your greased pan.
Pressing the Base Crust:
- Use two-thirds of the dough exactly—the remaining third is needed for adequate crumble topping. Reserve the rest before pressing.
- Press firmly and evenly using the bottom of a measuring cup, your fingers, or a flat-bottomed glass. Consistent thickness ensures even baking.
- Press slightly up the sides of the pan for a more contained structure that holds layers together when sliced.
- Don’t press too thin—you need enough crust to support the weight of toppings without becoming fragile.
Par-Baking the Crust:
- 10 minutes exactly—not more. Over-par-baking creates a crust that’s too set and won’t bond properly with the caramel layer above.
- The crust should look set but not fully baked—pale golden rather than deep golden at this stage.
- Prepare the caramel while the crust par-bakes to streamline assembly.
Making Perfect Caramel:
- Use caramel bits, not wrapped caramel candies—bits are specifically formulated for melting and produce more consistent results.
- Microwave in 30-second intervals and stir thoroughly between each interval—caramel retains heat and continues melting after each interval, so stirring prevents overheating.
- Add milk gradually—start with less and add more if needed for drizzling consistency. The caramel should pour easily but not be watery.
- Work quickly once melted—caramel begins to set as it cools. Have all other components ready before melting.
Layering the Toppings:
- Sprinkle chocolate chips first, then walnuts—this ensures the chocolate is in direct contact with the crust where it can bond slightly, while walnuts sit above.
- Distribute both evenly across the entire crust surface for consistent coverage in every bar.
- Drizzle caramel in a zigzag pattern covering the entire surface, then use a spoon to nudge it into any uncovered areas.
- Crumble remaining dough in irregular pieces varying from pea-sized to marble-sized for rustic, interesting texture.
Final Baking and Cooling:
- 15-20 minutes until golden—look for the crumbled top pieces to be golden brown and caramel to be gently bubbling.
- Don’t overbake—golden brown crumble is perfect; dark brown means the caramel is burning.
- Cool completely before cutting—minimum 2 hours at room temperature. For cleanest cuts, refrigerate for 30 minutes after room temperature cooling.
- Use a sharp knife warmed in hot water and wiped dry for clean cuts through the caramel layer.
- Cut in a grid pattern (3×4 = 12 bars, or 4×6 = 24 smaller squares for parties).
─────────
Serving Suggestions and Presentation Ideas
Classic Bar Cookie Plate:
Arrange bars on a white rectangular platter in a single layer showing off the distinct layers visible on each bar’s cut sides. The caramel glint, chocolate chips, and walnut pieces visible in cross-section are visually beautiful with no additional garnish needed. Add parchment paper squares between layers if stacking for a party.
Bake Sale and Potluck Style:
Wrap individual bars in clear cellophane or wax paper for easy, portable serving. Place in a tiered display stand or flat basket for visual appeal. These are excellent bake sale items because they’re individually wrapped, substantial, and universally appealing.
Elevated Plated Dessert:
Warm an individual bar briefly (10 seconds in microwave) and place on a white dessert plate with a scoop of vanilla ice cream melting alongside. Drizzle with additional warm caramel sauce and a dusting of fleur de sel (sea salt). Add a chocolate sauce drizzle on the plate for restaurant-quality presentation.
Holiday Cookie Exchange:
Cut into smaller squares and arrange on a holiday platter with other bar cookies. The golden-brown, textured surface with visible chocolate and caramel makes these stand out visually among other cookies. Label with a small card (“Chocolate Caramel Cookie Bars”) for cookie exchange identification.
Ice Cream Sandwich:
For a fun variation, sandwich vanilla or caramel ice cream between two bars (pressing gently so they don’t crumble). Roll the ice cream edge in mini chocolate chips or chopped walnuts. Wrap in parchment and freeze for 30 minutes before serving for a decadent ice cream sandwich experience.
Gift Box Presentation:
Layer bars in a decorative tin or gift box with parchment paper between layers. The bars’ caramel and chocolate filling makes them look beautiful through clear packaging windows. These make excellent holiday gifts, hostess presents, or thank-you treats.
─────────
Storage, Reheating, and Make-Ahead Tips
Storage:
- Room Temperature: Store in an airtight container for up to 5 days. The caramel layer keeps the bars moist and the cookie layers maintain their texture well.
- Refrigerator: Store for up to 1 week. The bars firm up when cold—the caramel becomes chewier and more distinct, which many people prefer.
- Freezer: Freeze individually wrapped bars for up to 3 months. Thaw at room temperature for 30-60 minutes. The texture holds up beautifully after freezing.
- Layer with parchment between stacked bars to prevent caramel from sticking layers together.
Make-Ahead Strategy:
These bars are perfect for advance preparation:
- Bake 1-3 days ahead—the flavors actually deepen and improve as the caramel, chocolate, and cookie layers meld
- Cut before storing or store whole and cut before serving—both approaches work well
- Freeze up to 1 month ahead for holiday baking efficiency—thaw day before serving
For holiday baking specifically, these bars are ideal for making in large batches and freezing—the flavors are just as good after freezing, and having bars ready in the freezer eliminates last-minute baking stress.
Serving Temperature Options:
- Room temperature: Caramel is pleasantly chewy, cookie layers are slightly crispy, chocolate is set—classic and ideal
- Slightly warm: Caramel becomes gooey, chocolate softens and becomes melty, cookie layers stay tender—indulgent and wonderful
- Cold from refrigerator: Caramel is firm and chewy-dense, chocolate is distinct and snappy, cookie layers are crispy—more structured and intense
All three temperatures deliver excellent results—choose based on preference and occasion.
Cutting Tips:
For the cleanest cuts through the caramel layer:
- Cool completely (or briefly refrigerate) before cutting
- Use a sharp chef’s knife dipped in hot water and wiped dry
- Apply firm, single downward pressure rather than sawing back and forth
- Wipe knife clean after each cut to prevent caramel transfer
─────────
Why This Recipe Deserves a Spot in Your Rotation
Chocolate Caramel Cookie Bars occupy the sweet spot between everyday casual baking and impressive special occasion desserts. They’re simple enough that you can make them on a weeknight from pantry staples, but impressive enough to bring to holiday gatherings, bake sales, or gift exchanges where you want to stand out. That versatility—casual or special, weeknight or celebration—is genuinely valuable in a recipe collection.
From a pastry construction perspective, these bars are genuinely well-designed. The par-baking technique that creates structural integrity before toppings are added, the dual-function dough that serves as both crust and crumble, the caramel that flows during baking and sets during cooling—these aren’t accidental choices. They’re smart technique decisions that produce better results than simpler approaches would. Learning to understand why par-baking matters, how caramel behaves with heat, why crumbled topping creates better texture than pressed topping—these are lessons that make you a better baker beyond this specific recipe.
The flavor combination is essentially foolproof for crowd-pleasing. Brown sugar, butter, caramel, chocolate, and walnuts are individually beloved ingredients. Together, they create a combination that appeals to virtually everyone—the caramel satisfies sweet cravings, the chocolate adds richness, the walnuts add sophistication, and the brown sugar cookie provides familiar comfort. I’ve never served these at a gathering where they weren’t enthusiastically received.
The make-ahead and storage qualities are exceptional. Bars that improve over a few days, freeze beautifully, and maintain their quality through various storage methods are rare and valuable. For holiday baking especially, having a reliable bar cookie that can be made weeks ahead without quality loss is practically essential.
These bars also demonstrate the value of restraint in recipe design. Seven ingredients, simple technique, no special equipment—yet the result is a multi-layered, texturally complex, flavor-rich bar that tastes like you spent significantly more effort. That ratio of simplicity to impressiveness is what makes a recipe truly sustainable—you’ll actually make it repeatedly rather than attempting it once and finding it too complicated for regular rotation.
If you’re looking for a bar cookie that delivers complex layered flavor and texture, that uses familiar ingredients in smart combination, that works for both casual and special occasions, that stores and travels beautifully, and that earns genuine enthusiasm from everyone who tastes it—this is it. Chocolate Caramel Cookie Bars prove that thoughtful layering and good ingredients always produce results worth making again.
─────────
Recommended Drink Pairing
Coffee – Dark Roast or Espresso:
Strong dark roast coffee or espresso provides the ideal bitter contrast to the bars’ sweetness while the coffee’s roasted notes complement both caramel and chocolate beautifully. The heat of coffee also slightly softens the caramel layer when you take alternating sips and bites, creating a pleasantly gooey texture. This is the pairing I reach for instinctively—it just works.
Cold Milk – Whole:
Ice-cold whole milk is the classic American bar cookie pairing—clean, cooling, and cutting through richness perfectly. The milk cleanses the palate between bites and provides that nostalgic combination of cookies and milk that never loses its appeal. This works for all ages and occasions.
Bourbon – Caramel Notes:
For adults, good bourbon (particularly wheated bourbons like Maker’s Mark that have natural caramel and vanilla notes) creates a harmonious pairing that amplifies the bars’ caramel character. The alcohol’s warmth contrasts the dense sweetness, and oak and vanilla notes from barrel aging complement the brown sugar and caramel. This turns a simple bar cookie into a sophisticated adult dessert.
Hot Chocolate – Dark:
Rich dark hot chocolate doubles down on chocolate while providing warm contrast to the bars’ room temperature or cool serving temperature. The liquid chocolate amplifies the chocolate chips while the warmth softens the caramel slightly when alternated with bites. Add a pinch of sea salt to the hot chocolate to mirror the nut and caramel flavors.
Salted Caramel Latte:
A salted caramel latte (hot or iced) creates a flavor echo that caramel lovers will adore—the latte’s caramel amplifies the bar’s caramel while the coffee provides bitterness and the salt enhances all the sweet flavors. This cohesive pairing feels curated and intentional, perfect for afternoon dessert service or casual entertaining.
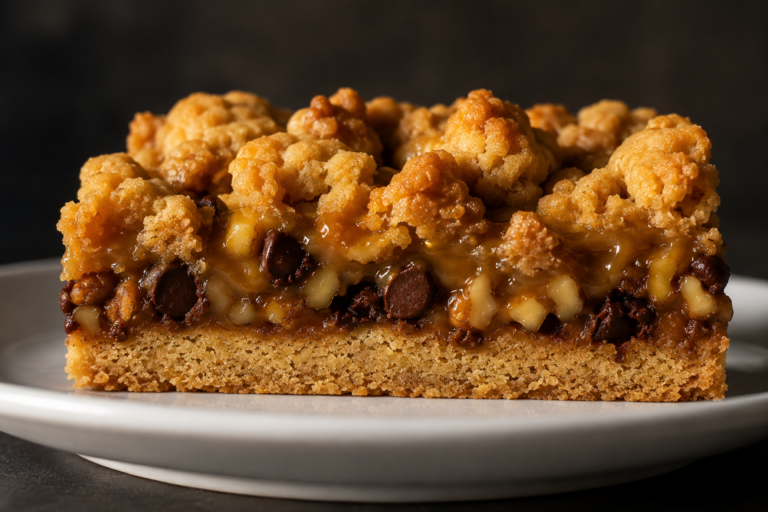
Chocolate Caramel Cookie Bars
Chocolate Caramel Cookie Bars are irresistible layered bars with a buttery brown sugar cookie crust, rivers of gooey caramel, melty chocolate chips, and crunchy walnuts all sandwiched between crumbly cookie layers for a dessert that’s impossible to eat just one of.
12
servings20
minutes35
minutes350
kcal55
minutesIngredients
1 cup butter
1 cup packed brown sugar
2 cups all-purpose flour
1 cup semi-sweet chocolate chips
1 cup caramel bits
2 tablespoons milk
1 cup chopped walnuts
Directions
- Preheat the oven to 350°F (175°C). Grease a 9×13 inch baking dish.
- In a medium saucepan over medium heat, melt the butter and brown sugar, stirring constantly until smooth.
- Remove from heat and stir in the flour until well combined to form a dough.
- Press two-thirds of the dough into the prepared baking dish.
- Bake in the preheated oven for 10 minutes.
- Meanwhile, melt the caramel bits with milk in the microwave, stirring every 30 seconds until smooth.
- Sprinkle chocolate chips and walnuts over the partially baked crust.
- Drizzle the melted caramel evenly over the chocolate and nuts.
- Crumble remaining dough over the top.
- Return to the oven and bake for an additional 15-20 minutes or until golden brown.
- Allow to cool completely before cutting into bars and serving.
Nutrition Facts
- Total number of serves: 4
- Calories: 350kcal
- Cholesterol: 0mg
- Sodium: 620mg
- Potassium: 400mg
- Sugar: 8g
- Protein: 6g
- Calcium: 60mg
- Iron: 2mg
About This Author

Aurora Wright
Pastry Chef & Dessert Editor
Aurora is the sweet side of Daily Dish. A trained pastry chef and dessert stylist, she’s responsible for our mouth-watering cakes, cookies, and confections. She brings precision, artistry, and a touch of whimsy to every recipe she creates — and taste-tests more chocolate than she’ll admit.
Favorite dish: Flourless dark chocolate torte.
Kitchen motto: “Life’s too short to skip dessert.”















