
Upside down cakes are one of my favorite examples of how a single technique can create genuinely spectacular results from modest ingredients and minimal skill. The concept is elegant in its simplicity: arrange fruit in the bottom of a pan, pour batter over it, bake, and invert. What happens during baking is where the magic lies—the fruit caramelizes in its own juices and the sugar you’ve sprinkled over it, creating a concentrated, glossy, intensely flavored layer that becomes the dramatic topping when the cake is flipped. This caramelization is what transforms ordinary fresh strawberries into something extraordinary.
The reason strawberries specifically work so beautifully in this application comes down to their water content and sugar composition. Strawberries are about 91% water with natural sugars that caramelize readily at baking temperatures. When heat is applied and they’re in contact with added granulated sugar, the Maillard reaction and caramelization processes both contribute to developing complex, concentrated flavor. The strawberries release juice that mingles with the melted sugar and butter from the cake batter, creating a natural glaze that sets slightly as it cools—glossy, jammy, and gorgeous when revealed by inverting.
What I find particularly interesting about this cake from a structural perspective is how the inversion timing affects the final result. The 10-minute cooling period in the pan is carefully calibrated: too short and the caramelized fruit layer is still liquid, causing it to slide when inverted; too long and the sugar solidifies, causing the fruit to stick to the pan rather than releasing cleanly. That 10-minute window allows the caramelized layer to semi-set—cohesive enough to hold its arrangement but warm enough to release cleanly from the pan. It’s a narrow window that rewards attention, and getting it right produces that perfect, photogenic reveal.
─────────
The Inspiration Behind This Recipe
Strawberry Upside Down Cake draws direct inspiration from the iconic pineapple upside down cake, which became one of America’s most beloved recipes after the Dole pineapple company’s 1926 recipe contest generated enormous interest in the format. The upside down cake technique—which had existed in various forms since at least the 19th century, when “skillet cakes” were made by cooking batter over fruit in cast iron pans—gained mainstream recognition through that contest and has remained a beloved American baking tradition ever since.
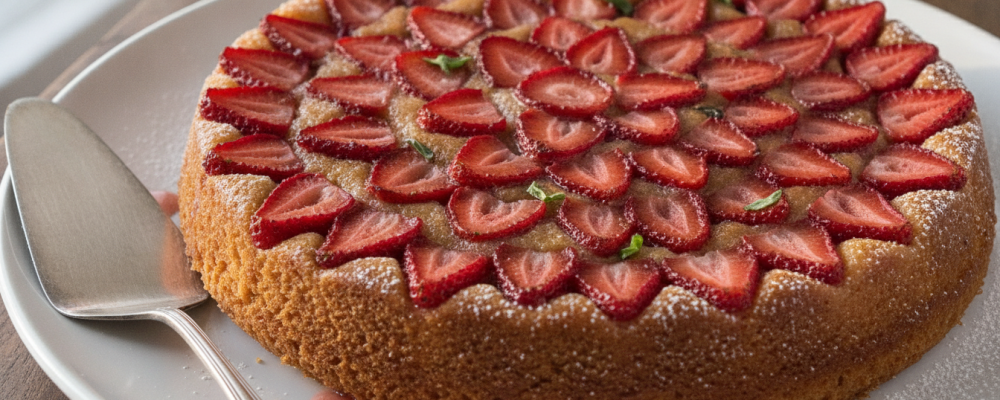
The translation from pineapple to strawberry represents a natural seasonal evolution. Pineapple upside down cake was associated with mid-century American modernity—the canned pineapple was exotic and convenient. Strawberry upside down cake celebrates summer seasonality and fresh fruit in a way that feels contemporary and regionally grounded. Strawberries’ availability, their visual appeal (those deep red halves arranged in concentric circles create a stunning pattern), and their flavor compatibility with vanilla butter cake make them ideal candidates for the upside down treatment.
The decision to use fresh rather than canned strawberries is fundamental to this recipe’s character. Fresh strawberries caramelize differently than canned—they maintain more structural integrity, develop more complex flavor through Maillard reactions with their natural sugars, and release just enough juice to create a natural glaze without becoming waterlogged. Their vibrant color also deepens beautifully during baking, creating that jewel-like appearance when the cake is inverted.
─────────
A Brief History of Upside Down Cakes
The upside down cake tradition has roots that extend far beyond the famous 1920s contest. Early American and European cooks made skillet-cooked cakes with fruit on the bottom as practical solutions to limited oven availability—cooking over an open fire or on a stovetop meant the bottom of the pan received most of the heat, and placing fruit there created a naturally basted, flavorful base that could be flipped for serving.
Cast iron skillet upside down cakes—essentially the same technique as modern versions—appear in American cookbooks throughout the 19th century, typically featuring seasonal fruits like apples, plums, and cranberries. These were everyday farmhouse desserts, practical rather than elegant, valued for using seasonal surplus and requiring minimal specialized ingredients.
The transformation from practical farmhouse dessert to iconic American classic came through the 1926 Dole contest. Dole’s promotion of pineapple upside down cake—using their canned pineapple rings and maraschino cherries in a visually organized, reproducible pattern—created the specific aesthetic we now associate with the format. The circular pineapple rings and bright cherries in cake centers created a graphic, reproducible presentation that home bakers embraced enthusiastically.
Strawberry upside down cake represents a more contemporary iteration of this tradition—moving back toward fresh, seasonal fruit and away from the mid-century convenience food aesthetic. It retains the technique’s theatrical reveal and gorgeous presentation while celebrating peak-season ingredients and a more vibrant, natural flavor profile.
─────────
Why This Upside Down Technique Works
The inverted method creates a self-glazing effect. When strawberries are placed cut-side down in a pan with sugar, they release juice during baking that combines with the sugar to create a natural glaze. This glaze—essentially a simple fruit syrup—coats the strawberries and the cake’s top surface (which becomes the bottom during baking). When inverted, this glaze is revealed as a glossy, concentrated layer that no amount of applied frosting could replicate in flavor or authenticity.
Sugar sprinkled directly on fruit accelerates caramelization. The direct contact between granulated sugar and fresh strawberries creates optimal conditions for caramelization and the Maillard reaction. As the oven heats, the sugar begins to melt and interact with the strawberries’ natural sugars and acids, creating complex flavor compounds that develop far beyond simple sweetness. This concentrated, caramelized flavor is the essential difference between fresh strawberries and baked upside-down-cake strawberries.
Batter poured over fruit creates protection and moisture exchange. The batter acts as an insulating layer that prevents the strawberry-sugar layer from burning while still allowing it to caramelize at the appropriate temperature. Simultaneously, steam and vapor from the baking batter penetrate the fruit layer from above, contributing to the strawberries’ texture softening. And fruit juice from below seeps upward into the batter’s bottom surface, creating that characteristically moist, fruit-flavored layer immediately beneath the topping.
The alternating-addition method creates tender cake texture. Adding dry ingredients alternately with milk (beginning and ending with dry) minimizes gluten development by never allowing the flour to fully hydrate before fat and liquid are introduced. This creates a more tender, fine-crumbed cake than adding all wet or all dry ingredients at once would produce. The tender crumb is essential—it yields to the fruit topping rather than competing with it texturally.
The 10-minute cooling window is precisely calibrated. Hot caramelized sugar is liquid; cold caramelized sugar is solid. The 10-minute window allows the sugar layer to partially crystallize—enough to hold the fruit arrangement intact when inverted, but not so much that it bonds to the pan rather than releasing cleanly. Running a knife around the edge before inverting releases any spots where the caramelized layer might have adhered to the pan sides.
Pan preparation affects the release. The butter from the cake batter that seeps down during baking creates a non-stick layer between the caramelized fruit and the pan. This is why recipes that call for buttering the pan separately before arranging fruit produce more reliable releases than those that don’t—the fat prevents the caramelized sugar from bonding directly to metal.
─────────
Flavor Profile: What to Expect
Concentrated, caramelized strawberry leads every bite—this isn’t fresh strawberry flavor but something more complex and intense. Baking transforms strawberries’ bright, slightly acidic freshness into something deeper and more jammy. The caramelization adds sweet complexity, and the fruit’s natural acids concentrate as moisture evaporates, creating a tart-sweet balance that’s more sophisticated than raw strawberry.
Natural glaze from caramelized sugar and fruit juice provides a glossy, slightly sticky topping layer with a subtle butterscotch quality from the sugar’s caramelization. This glaze coats the top of every slice and contributes a concentrated sweetness that contrasts with the cake below.
Tender, buttery vanilla cake provides the neutral, comforting foundation. The cake itself is subtly sweet with genuine vanilla warmth—it doesn’t compete with the strawberry topping but instead provides a yielding, moist vehicle that carries the fruit’s flavor into every bite. The crumb is fine and tender, slightly denser where it’s been in contact with the fruit layer.
Warm vanilla and butter weave throughout—the cake’s aroma during baking and serving is extraordinary, combining strawberry’s fruity sweetness with the Maillard-reaction products from the batter’s browning. This aroma is part of the experience.
The overall experience is simultaneously elegant and comforting. Upside down cake occupies a rare middle ground—it’s casual enough for a family dessert and beautiful enough for dinner party presentation. The flavors are summer-forward and fruit-first, the texture satisfying and substantial, the presentation genuinely stunning.
─────────
Tips for Making the Best Strawberry Upside Down Cake
Strawberry Selection and Preparation:
- Use peak-season strawberries for the most intense flavor and best caramelization—off-season strawberries lack the natural sugar content that caramelizes properly.
- Choose medium-sized berries of similar size for the most organized, visually striking arrangement. Very large berries can dominate the pan; very small ones get lost.
- Hull and halve through the stem end, creating flat surfaces that sit flush against the pan—this creates the clearest, most defined strawberry pattern when inverted.
- Pat dry after hulling—excess moisture from washing can prevent proper caramelization.
- Arrange cut-side down in concentric circles or rows starting from the edge—the arrangement visible on the bottom of the pan becomes the top of the finished cake, so invest time in making it beautiful.
Setting Up the Pan:
- Butter the pan generously before arranging strawberries—this ensures clean release and contributes to the glaze’s flavor.
- Consider lining the bottom with parchment (cut to fit) for insurance against sticking—caramelized sugar can be unpredictable.
- Arrange strawberries tightly with minimal gaps—they shrink during baking, and gaps that look small before baking can look large after.
- Sprinkle sugar evenly over the arranged fruit—uneven sugar distribution creates uneven caramelization.
Making the Batter:
- Room temperature ingredients for everything—cold eggs can cause the batter to appear curdled; cold milk prevents even mixing.
- Don’t overmix once the flour is added—mix just until no dry streaks remain. Overmixing develops gluten and creates a tougher, denser cake.
- Pour batter slowly and evenly over the strawberries—pouring too forcefully can displace the arrangement you’ve carefully created.
- Use an offset spatula to spread the batter gently to the edges without disturbing the fruit.
Baking and Inverting:
- Test for doneness at 40 minutes—a toothpick inserted in the cake center (avoiding fruit) should come out clean.
- Cool exactly 10 minutes—set a timer. Shorter and the glaze slides; longer and it sticks.
- Run a thin knife or spatula around the entire perimeter before inverting—this releases any stuck edges.
- Place your serving plate over the pan and invert in one confident, decisive motion. Hesitation leads to uneven release.
- Leave the pan on top for 30 seconds after inverting to allow the caramelized layer to release fully onto the cake.
- If fruit sticks to the pan, simply lift it off and rearrange on the cake—warm caramel is forgiving.
Serving Temperature:
- Warm from the oven (15-20 minutes after inverting): glaze is liquid and glistening, cake is soft—maximum drama and flavor
- Room temperature: glaze has set slightly, cake is firmer, easier to cut cleanly—best for presentations
- Both temperatures are wonderful—choose based on occasion
─────────
Serving Suggestions and Presentation Ideas
Classic Elegant:
Present the whole inverted cake on a white cake stand or serving plate—the jewel-bright strawberry topping needs no garnish. Serve slices with freshly whipped cream or vanilla ice cream alongside. The simplicity of presentation lets the stunning fruit topping speak for itself.
Whipped Cream Flourish:
Pipe or dollop lightly sweetened whipped cream around the base of the cake or place individual dollops on each slice. Add a fresh whole strawberry on top of the cream for each serving and a fresh mint leaf for color. This is beautiful without being complicated.
Crème Fraîche Sophistication:
Serve with crème fraîche on the side instead of whipped cream—its tanginess provides beautiful contrast to the caramelized sweetness of the topping and echoes strawberry’s natural acidity. A light dusting of powdered sugar over the cake adds visual elegance. This pairing feels European and sophisticated.
Strawberry Sauce Double Down:
Create a quick fresh strawberry sauce (blend fresh strawberries with a little sugar and lemon juice) and drizzle over each plated slice. The raw strawberry sauce provides brightness that contrasts with the caramelized baked berries, creating an interesting double-strawberry experience.
Ice Cream Sundae Style:
Place a warm slice in a wide bowl with a generous scoop of vanilla bean ice cream that melts into the warm caramelized glaze. Drizzle with balsamic reduction (a classic strawberry companion) for sophisticated depth. This casual but elevated presentation works beautifully for summer entertaining.
Brunch Centerpiece:
Serve at room temperature as part of a brunch spread—upside down cake works beautifully in the morning as the fruit-forward topping feels appropriate for daytime. Slice and display on a wooden board with berries, a small jar of honey, and individual portions of crème fraîche alongside.
─────────
Storage, Reheating, and Make-Ahead Tips
Storage:
- Room Temperature: Store loosely covered with plastic wrap or a cake dome for up to 2 days—the caramelized topping keeps the cake moist.
- Refrigerator: Store covered for up to 4 days. The caramelized topping firms when cold but softens again at room temperature or when reheated.
- Freezer: Freeze individual slices wrapped tightly in plastic wrap then foil for up to 2 months. Thaw at room temperature for 1-2 hours before serving.
Reheating:
This cake reheats beautifully:
- Microwave: Individual slices for 20-30 seconds until warm—the glaze becomes liquid and glistening again
- Oven: Whole cake covered loosely with foil at 325°F for 15-20 minutes—restores the just-baked quality
- Warm cake with cold ice cream is particularly spectacular after reheating
Make-Ahead Strategy:
- Bake 1 day ahead and store covered at room temperature—the cake stays moist and the caramelized topping deepens in flavor
- Reheat gently before serving for the most impressive warm-glaze presentation
- Do not assemble the pan ahead—the sugar will draw moisture from the strawberries and prevent proper caramelization. Assemble and bake in one session.
Optimal Serving Window:
This cake is best within 24 hours of baking when the caramelized topping is most vibrant and glossy and the cake is at peak moisture. However, it remains excellent for several days with proper storage.
Inversion Tips for Make-Ahead:
If baking ahead:
- Invert immediately after the 10-minute cooling (as directed) even if serving later
- Store inverted (fruit-side up)—this maintains the presentation and prevents the glaze from sticking to the pan if it cools completely
- Never store in the pan after the cooling window has passed—the caramelized sugar will bond to the pan and make clean release impossible
─────────
Why This Recipe Deserves a Spot in Your Rotation
Strawberry Upside Down Cake solves a specific and beautiful baking problem: how do you create a genuinely stunning cake that looks like it required advanced skill when it actually requires only basic technique and seasonal fruit? The answer is the upside down method—a technique that harnesses caramelization and the inversion reveal to create drama and visual beauty automatically, without requiring decoration skill, piping ability, or elaborate finishing work.
The theatrical reveal is genuinely satisfying every time. Even having made this cake dozens of times, I still feel a small thrill when I invert the pan and lift it away to reveal that glistening strawberry mosaic. It’s one of baking’s most reliable dramatic moments, and it never gets old. For guests who’ve never seen an upside down cake inverted, it’s genuinely impressive. That experiential element—the process of revealing the cake—adds value that no amount of applied decoration could.
This recipe celebrates seasonal fruit at its best. Peak-season strawberries, caramelized and concentrated through baking, taste extraordinary. This cake is an argument for the supremacy of fresh, seasonal ingredients over year-round convenience—the difference between peak-summer strawberries and off-season ones is dramatic in this application because the caramelization process amplifies both the best and worst qualities of the fruit. Use the best strawberries you can find, and this cake will be extraordinary.
The technique teaches fundamental baking principles. Understanding why the alternating-addition method creates tender cake, why the 10-minute cooling window is critical, why fruit arrangement matters and how to plan for the inversion—these are lessons that transfer to other recipes and make you a more thoughtful baker overall.
The format is endlessly adaptable. Master the strawberry version and you have a template for blueberry, peach, plum, raspberry, or mixed berry upside down cakes using the same technique. Each seasonal fruit creates a completely different visual and flavor experience while the fundamental approach remains constant. One recipe, infinite seasonal variations.
If you’re looking for a cake that creates a genuine presentation moment, that celebrates summer’s best fruit, that looks far more complex than it actually is, that rewards excellent seasonal ingredients, and that produces reliable delight in everyone who sees and tastes it—this is it. Strawberry Upside Down Cake proves that the most beautiful presentations are often the ones that let great ingredients and simple technique create their own drama.
─────────
Recommended Drink Pairing
Sparkling Rosé or Strawberry Bellini:
Chilled sparkling rosé with its berry notes and effervescence creates a harmonious pairing that amplifies the strawberry’s caramelized character while the bubbles cleanse the palate between bites. A strawberry Bellini (Prosecco with fresh strawberry puree) creates the ultimate strawberry-on-strawberry experience. Both feel celebratory and perfectly suited to this stunning summer cake.
Strawberry Lemonade:
Fresh strawberry lemonade creates a flavor echo—fresh strawberry and lemon’s brightness contrasting with the caramelized baked strawberry in the cake. The tartness of lemon cuts through the cake’s sweetness while the strawberry resonates with the topping. This non-alcoholic option is perfect for daytime serving and family gatherings.
Champagne or Crémant:
Dry Champagne or Crémant d’Alsace provides sophistication and effervescence that elevates this cake to special-occasion status. The wine’s crisp acidity and fine bubbles provide perfect contrast to the caramelized sweetness of the topping. This pairing feels appropriate for celebrations, anniversaries, or any occasion that calls for genuine elegance.
Earl Grey Tea:
Hot or iced Earl Grey tea provides bergamot-citrus notes that complement strawberry beautifully while the tea’s tannins cut through the cake’s richness. The floral quality of Earl Grey resonates with strawberry’s own subtle floral character. This sophisticated non-alcoholic pairing works beautifully for afternoon tea service or brunch.
Vanilla Cream Cold Brew:
Cold brew coffee with vanilla cream provides bitter contrast that balances the caramelized sweetness of the topping while vanilla notes echo the cake’s flavoring. The cold, creamy beverage provides temperature and texture contrast to the warm, tender cake. This pairing feels contemporary and works beautifully for casual summer entertaining.
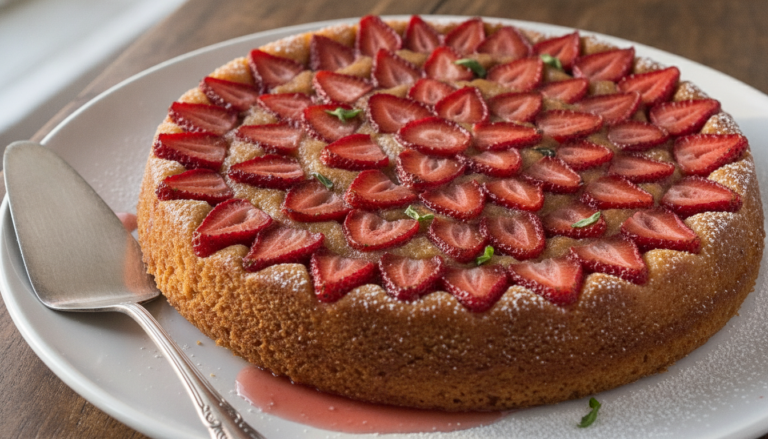
Strawberry Upside Down Cake
Strawberry Upside Down Cake is a stunning summer showstopper—fresh strawberry halves caramelize with sugar during baking and then reveal themselves as a jewel-like mosaic topping when the cake is inverted, all resting on tender, buttery vanilla cake that’s as beautiful as it is delicious.
8
servings20
minutes45
minutes320
kcal1
hour5
minutesIngredients
2 cups fresh strawberries, hulled and halved
1 cup granulated sugar
1/2 cup unsalted butter, melted
1 cup all-purpose flour
1 teaspoon baking powder
1/2 teaspoon salt
1/2 cup milk
1 teaspoon vanilla extract
2 large eggs
Directions
- Preheat your oven to 350°F (175°C).
- Layer the bottom of a 9-inch round cake pan with fresh strawberry halves.
- Sprinkle half of the sugar evenly over the strawberries.
- In a mixing bowl, combine flour, baking powder, and salt.
- In another bowl, beat melted butter with remaining sugar, eggs, and vanilla extract until smooth.
- Add dry ingredients to the wet mixture, alternating with milk, and mix until just combined.
- Pour batter evenly over the strawberries in the cake pan.
- Bake for 40-45 minutes or until a toothpick inserted in the center comes out clean.
- Let the cake cool in the pan for 10 minutes, then invert onto a serving plate.
- Serve warm or at room temperature.
Nutrition Facts
- Total number of serves: 4
- Calories: 320kcal
- Cholesterol: 0mg
- Sodium: 620mg
- Potassium: 400mg
- Sugar: 8g
- Protein: 6g
- Calcium: 60mg
- Iron: 2mg
About This Author

Aurora Wright
Pastry Chef & Dessert Editor
Aurora is the sweet side of Daily Dish. A trained pastry chef and dessert stylist, she’s responsible for our mouth-watering cakes, cookies, and confections. She brings precision, artistry, and a touch of whimsy to every recipe she creates — and taste-tests more chocolate than she’ll admit.
Favorite dish: Flourless dark chocolate torte.
Kitchen motto: “Life’s too short to skip dessert.”