

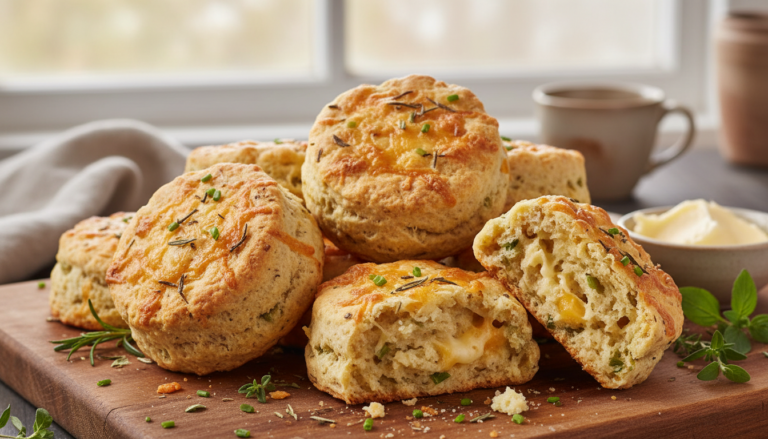
Scones occupy an interesting space in baking—they’re related to biscuits but with their own distinct character, simpler than pastries but more refined than quick breads. These Herb and Cheese Scones represent the savory side of scone-making, where the traditional British teatime treat becomes something appropriate for brunch or dinner. The technique remains the same: cold butter cut into flour, minimal handling, quick baking at high heat. But the addition of sharp cheddar and fresh herbs transforms the flavor profile completely, creating something more sophisticated and versatile than sweet scones could ever be.
What makes these scones successful is understanding the balance between structure and tenderness. You want enough butter to create flaky layers and rich flavor, but not so much that the dough becomes greasy. You need sufficient mixing to incorporate the cheese and herbs evenly, but not so much that gluten develops and creates toughness. The cheese adds both flavor and fat, which affects the dough’s hydration and texture. Each component plays a specific role, and the technique ensures they all work together rather than competing.
I appreciate how these scones demonstrate fundamental pastry principles while remaining approachable for home bakers. You’re learning about fat distribution, gluten management, and moisture balance—concepts that apply to countless other recipes—while making something genuinely delicious that you’ll want to repeat. These aren’t practice scones that teach you technique for future “real” baking. These are excellent scones that happen to also teach you important skills.
─────────
The Inspiration Behind This Recipe
This recipe emerged from studying traditional British scone-making and recognizing that American brunches could benefit from more savory baked options. We have biscuits, which are wonderful, but scones offer something slightly different—a bit more structure, slightly sweeter base (even in savory versions), and that characteristic tender-yet-crumbly texture that makes them special. The addition of cheese and herbs creates a sophisticated flavor profile that works beautifully alongside eggs, soups, salads, or even as an afternoon snack.
The specific combination of sharp cheddar with fresh herbs came from analyzing what flavors work together at brunch. You want richness (butter and cheese), aromatic complexity (fresh herbs), and enough savory depth to complement rather than compete with other dishes. Sharp cheddar provides both tang and pronounced flavor that doesn’t disappear during baking. Fresh herbs—particularly the combination of chives, parsley, and thyme—add layers of flavor without overwhelming: oniony bite from chives, fresh greenness from parsley, earthy warmth from thyme.
What I wanted to create was a scone that felt equally at home at an elegant brunch or a casual weekend breakfast, that could serve as a side dish or be substantial enough to be the meal’s anchor. These scones accomplish that versatility while maintaining the quality standards that make baking worthwhile—they’re tender, flavorful, and reliably excellent when you follow the technique properly.
─────────
A Brief History of Scones
Scones originated in Scotland in the early 16th century, though their exact origins remain debated. The name likely derives from the Dutch “schoonbrot” (fine white bread) or the Scots Gaelic “sgonn” (a large mouthful). Early scones were made with oats and griddle-baked rather than oven-baked, creating something closer to oatcakes than the tender, leavened scones we know today. The addition of baking powder in the 19th century transformed scones into the risen, cake-like baked goods that became associated with British tea culture.
By the Victorian era, scones had become firmly established in British teatime traditions, particularly when served with clotted cream and jam in the famous “cream tea.” While sweet scones dominated—plain, fruit-studded, or flavored with spices—savory versions existed in various regional traditions, often incorporating cheese, herbs, or bits of meat. These savory scones served as accompaniments to soups and stews or as portable meals for workers and travelers.
Scones traveled throughout the British Empire, adapting to local ingredients and preferences in countries like Australia, New Zealand, and South Africa. In America, scones gained popularity in the late 20th century as specialty coffee shops and bakeries introduced them alongside lattes and cappuccinos. The savory scone renaissance represents modern bakers recognizing that scones’ tender texture and buttery richness work beautifully with herbs, cheeses, and other savory ingredients—not just dried fruit and sugar.
─────────
Why This Cooking Method Works
Cutting cold butter into flour creates distinct fat particles that remain separate from the flour until baking. When these butter pieces hit the oven’s heat, they melt and create steam, which pushes apart layers of dough and creates flakiness. This is the same principle that makes pie crust and biscuits flaky—maintaining temperature throughout preparation is essential. If the butter warms and incorporates fully into the flour, you lose those discrete fat pockets and end up with dense, cake-like scones rather than tender, layered ones.
The minimal kneading prevents excessive gluten development. Gluten forms when flour proteins hydrate and are worked through mixing or kneading—desirable in bread where you want structure and chew, detrimental in scones where you want tenderness. The few gentle kneads are just enough to bring the dough together and create cohesion without developing toughness. This is why “gently” appears in the instruction—aggressive kneading would create tough, chewy scones that lack the tender crumb that makes them appealing.
Baking at 400°F provides rapid heat that sets the structure quickly while creating proper rise. Lower temperatures allow butter to melt out before the structure sets, resulting in flat, greasy scones. Higher temperatures brown the exterior too quickly before the interior cooks through. This specific temperature creates the conditions needed for proper texture: the outside develops golden color and slight crust while the interior stays tender and fluffy. The cheese melts and creates pockets of rich flavor throughout, while the herbs remain aromatic rather than burning.
─────────
Flavor Profile: What to Expect
These scones deliver sophisticated savory flavors with appealing textural contrast:
- Sharp cheddar tang – Pronounced cheese flavor that intensifies during baking
- Herb aromatics – Fresh, bright notes from chives, parsley, and thyme
- Buttery richness – Present throughout but not greasy, adding depth and satisfaction
- Tender crumb – Slightly crumbly texture that’s more delicate than biscuits
- Golden crust – Slightly crispy exterior with concentrated butter flavor
- Subtle sweetness – Just enough sugar to balance the savory elements without tasting sweet
- Melted cheese pockets – Gooey spots where cheese concentrated during baking
The overall experience is one of refined comfort—these taste elegant but not fussy, sophisticated but approachable. The combination of butter, cheese, and herbs creates complexity that keeps each bite interesting. They’re substantial enough to be satisfying but light enough that you’ll want a second one. The texture sits perfectly between biscuit flakiness and scone tenderness, creating something unique that works beautifully in multiple contexts.
─────────
Tips for Making the Best Herb and Cheese Scones
Keep all ingredients cold, including grating the cheese directly from the refrigerator, to maintain proper texture and flakiness.
- Use sharp or extra-sharp cheddar – Mild cheese disappears during baking; you need pronounced flavor
- Chop herbs finely – Large pieces create uneven distribution and can taste overwhelming in concentrated bites
- Don’t overwork the dough – Mix just until combined; lumps and rough texture are fine
- Cut straight down with the cutter – Don’t twist, which seals the edges and prevents rise
- Brush tops with egg wash – For golden, glossy finish (optional but attractive)
- Space scones properly – Leave room for slight expansion during baking
- Serve warm – These are best within an hour of baking when cheese is still slightly melty
- Freeze unbaked scones – Shape, freeze, then bake from frozen when needed
For variations, try different cheese and herb combinations: gruyere with rosemary, parmesan with basil, or pepper jack with cilantro. The basic technique remains the same while flavors change dramatically.
─────────
Serving Suggestions and Side Pairings
These scones are versatile enough to serve throughout the day in various contexts. For breakfast or brunch, serve them alongside scrambled eggs, bacon, and fresh fruit. Split them horizontally and use as the base for breakfast sandwiches with fried eggs and avocado. They’re also excellent alongside soups—particularly tomato soup, broccoli cheddar, or potato leek—where their rich, cheesy flavor complements the liquid course beautifully.
For afternoon tea or a light lunch, serve the scones warm with butter and perhaps a smear of soft goat cheese or cream cheese. They pair wonderfully with salads, making them appropriate for elegant luncheons. At dinner, they work as sophisticated bread service alongside roasted meats or grilled fish, offering something more interesting than rolls but equally appropriate for mopping up sauces and gravies.
Presentation-wise, serve these scones in a cloth-lined basket to keep them warm, or arrange them on a wooden board for rustic charm. They’re beautiful enough to serve at special occasions but casual enough for everyday meals. The herb flecks and cheese spots create visual interest that makes them look as good as they taste—no elaborate garnishing required.
─────────
Storage, Reheating, and Make-Ahead Tips
- Shape and freeze unbaked – Cut scones, freeze on baking sheet, transfer to bags for up to 3 months
- Bake from frozen – Add 3-5 minutes to baking time; no thawing needed
- Prep dry mixture ahead – Combine flour, leavening, salt, and sugar up to 1 week ahead
- Grate cheese early – Can be done up to 2 days ahead and refrigerated
- Store baked scones – Keep in airtight container at room temperature for up to 2 days
- Reheat properly – Wrap in foil and warm at 350°F for 10 minutes to restore texture
- Freeze baked scones – Wrap individually and freeze for up to 2 months
- Avoid microwave reheating – Creates tough, rubbery texture; oven reheating is essential
Like most pastries, these scones are truly best fresh from the oven when the cheese is melty and the crust is crispy. However, the ability to freeze unbaked scones means you can have fresh-baked results anytime with minimal effort—just pull a few from the freezer and bake.
─────────
Why This Recipe Deserves a Spot in Your Rotation
This recipe earns its place because it gives you a sophisticated savory baked good that works in countless contexts—breakfast, lunch, dinner, teatime, or entertaining. Once you master the basic technique, you can vary the cheeses and herbs endlessly, creating different flavor profiles while using the same reliable method. It’s the kind of versatile recipe that makes you feel accomplished because it looks and tastes impressive while being genuinely straightforward to execute.
Beyond versatility, these scones simply taste excellent and create moments of genuine pleasure. There’s something special about breaking open a warm, tender scone and seeing the melted cheese and herb flecks inside, smelling the butter and aromatics, taking that first bite while it’s still warm from the oven. Food that engages multiple senses and creates satisfaction beyond just filling your stomach is worth making repeatedly. These scones do exactly that—they’re functional (they feed people), beautiful (they look appetizing), and delicious (they taste wonderful). That combination makes them genuinely valuable in your cooking repertoire.
─────────
Recommended Drink Pairing
The savory, cheesy, herbal nature of these scones pairs beautifully with beverages that either complement or provide contrasting elements. For traditional British authenticity, serve with strong black tea—the tannins cut through the butter and cheese while providing astringency that cleanses your palate. Earl Grey’s bergamot notes work particularly well with the herbs, while English Breakfast’s robust character stands up to the sharp cheddar.
Coffee drinkers should opt for medium roasts with enough body to match the scones’ richness without overwhelming the delicate herb flavors. A flat white or cappuccino adds creamy texture that harmonizes with the cheese and butter, while the coffee’s slight bitterness provides balance. For white wine lovers, a crisp Sauvignon Blanc or unoaked Chardonnay brings acidity and fruit notes that complement the herbs and cut through the richness—perfect for brunch gatherings where wine feels appropriate. Sparkling water with lemon offers simple, palate-cleansing refreshment that allows the scones’ flavors to shine without competition. For heartier fare, especially if serving these alongside soup or as part of a lunch, light beer or hard cider provides effervescence and complementary flavors without overwhelming. Fresh-pressed apple juice offers a non-alcoholic option with enough acidity and sweetness to balance the savory elements, making it particularly good for morning service when alcohol feels premature.
Herb and Cheese Scones
Garlic and Worcestershire-marinated sirloin tips air fried to juicy, perfectly seared perfection—weeknight steak has never been this easy.
8
servings15
minutes20
minutes250
kcal35
minutesIngredients
2 cups all-purpose flour
1 tablespoon baking powder
1 teaspoon salt
1 tablespoon sugar
0.5 cup unsalted butter, cubed
1 cup sharp cheddar cheese, grated
0.25 cup fresh herbs, chopped (such as chives, parsley, and thyme)
0.75 cup milk
1 unit egg
Directions
- Preheat oven to 400°F (200°C) and line a baking sheet with parchment paper.
- In a large bowl, whisk together flour, baking powder, salt, and sugar.
- Cut in the butter until the mixture resembles coarse crumbs.
- Stir in cheese and herbs until evenly distributed.
- Mix together milk and egg, then gradually add to the flour mixture until dough forms.
- Turn the dough onto a floured surface and knead gently.
- Roll out to about 1-inch thickness and cut into rounds using a biscuit cutter.
- Place scones on the prepared baking sheet and bake for 15-20 minutes until golden brown.
- Serve warm, optionally with butter.
Nutrition Facts
- Total number of serves: 4
- Calories: 250kcal
- Cholesterol: 0mg
- Sodium: 620mg
- Potassium: 400mg
- Sugar: 8g
- Protein: 6g
- Calcium: 60mg
- Iron: 2mg
About This Author

Benjamin Brown
Recipe Developer
Benjamin is our flavor engineer. A classically trained chef turned recipe developer, he’s obsessed with balancing taste, texture, and creativity. He ensures that every recipe we publish is not only delicious but also reliable, approachable, and repeatable — even for beginners.
Favorite dish: Slow-braised short ribs with red wine reduction.
Kitchen motto: “Cooking is part science, part soul.”


