

Let’s address the elephant in the room: Fruity Pebbles Cheesecake Tacos sound absolutely bonkers. I know this. But here’s what I’ve learned from years of professional pastry work—sometimes the most unexpected combinations create the most memorable desserts. When I first developed this recipe, I was experimenting with cereal as a structural element rather than just a topping, and I wanted to create something that was both technically interesting and ridiculously fun. Mission accomplished.
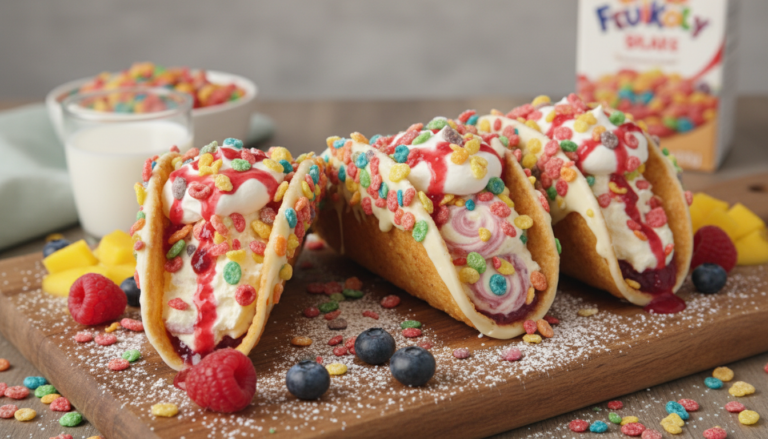
What makes these tacos work is the balance of textures and flavors. The cereal shells aren’t just crushed Fruity Pebbles—they’re bound with butter and baked into crispy, stable structures that hold their shape beautifully. They taste like a sophisticated Rice Krispie treat with a fruity twist, crunchy and sweet with that nostalgic cereal flavor we all remember from childhood. The cheesecake filling is the real star, though—it’s a stabilized whipped cream cheese mixture that’s lighter than traditional cheesecake but still has that signature tang and richness. When you bite through the crunchy shell into that cloud-like filling, topped with more cereal crunch, it’s a textural and flavor experience that’s genuinely delightful.
Are these over-the-top? Absolutely. Are they practical for everyday baking? Not particularly. But are they the most fun you’ll have making dessert this year? Without question. These are the treats you make for birthday parties, kids’ celebrations, or when you want to create something that makes people smile before they even taste it. And when they do taste it? The combination of childhood nostalgia and genuine deliciousness wins them over completely.
─────────
The Inspiration Behind This Recipe
The inspiration for Fruity Pebbles Cheesecake Tacos came from two separate trends I’d been watching in the dessert world. First, dessert tacos had been gaining popularity—using everything from waffle cones to chocolate shells to create taco-shaped vessels for sweet fillings. Second, cereal-based desserts were having a major moment, with pastry chefs incorporating childhood cereals into grown-up presentations. I started wondering: what if I could create a structural element from cereal that was crispy, stable, and fun?
The breakthrough came when I realized that cereal, when combined with butter and a binding agent like a small amount of flour, could be baked into shaped structures. It’s similar in principle to how Rice Krispie treats work—the marshmallow (or in this case, butter and sugar) acts as a binder that holds the cereal together. By spreading the mixture thin and shaping it while warm, I could create taco shells that were sturdy enough to hold filling but still had that satisfying crunch.
The cheesecake filling was inspired by my love of no-bake cheesecakes and stabilized whipped cream. I wanted something that was lighter and more airy than traditional cheesecake but still had that characteristic tang and richness. By whipping cream cheese with powdered sugar and then folding in whipped cream, I created a filling that’s stable enough to pipe or spoon but light enough to feel like a special indulgence rather than a heavy dessert.
─────────
A Brief History of Cereal in Desserts & Dessert Tacos
Breakfast cereal as a dessert ingredient has a surprisingly long history. Rice Krispies Treats, created in 1939 by Malibu Camp Fire Girls and popularized by Kellogg’s, proved that cereal could be more than just breakfast—it could be transformed into a beloved sweet treat. Since then, home bakers and professional pastry chefs alike have experimented with incorporating various cereals into desserts, from cereal milk ice cream to cereal-crusted cheesecakes.
Fruity Pebbles specifically—introduced by Post in 1971 as a companion to Cocoa Pebbles—became iconic for its bright colors and fruity flavor. The cereal’s visual appeal and nostalgic association with childhood made it a natural candidate for creative dessert applications. In recent years, Fruity Pebbles have appeared in everything from donuts to milkshakes, as pastry chefs recognized that nostalgia is a powerful flavor.
Dessert tacos represent a more recent trend, emerging in the 2010s as creative pastry chefs looked for fun, Instagram-friendly presentations. The taco format offers several advantages: it’s handheld, customizable, visually interesting, and playful. Dessert tacos can be made from waffle cones bent into shape, chocolate shells, cookie “shells,” or—as in this case—creative cereal constructions.
Fruity Pebbles Cheesecake Tacos sit at the intersection of these trends, combining cereal nostalgia with the playful dessert taco format and the beloved flavors of no-bake cheesecake. They’re modern, fun, and completely unexpected—exactly what contemporary dessert culture celebrates.
─────────
Why This Technique Works
Cereal as a structural element requires binding. Fruity Pebbles alone would just crumble—they need something to hold them together. The combination of melted butter, sugar, and a small amount of flour creates a binding matrix that coats each cereal piece and helps them adhere to one another when baked. It’s similar to how marshmallow binds Rice Krispies, but this version can be baked to create a crispier, more stable structure.
Baking sets the structure. As the mixture bakes, the butter and sugar caramelize slightly, the flour sets, and everything firms up into a crispy, cohesive shell. The heat also toasts the cereal slightly, which intensifies its flavor and creates an even crunchier texture. Baking at 350°F is hot enough to set the structure quickly without burning the delicate cereal.
Shaping while warm is crucial. Right after baking, the mixture is pliable enough to be shaped into taco shells. As it cools, it hardens and maintains whatever shape you’ve given it. This is the same principle used in making tuile cookies or pizzelle cones—you have a narrow window when the mixture is flexible before it sets permanently.
The cheesecake filling is stabilized with whipping. By beating cream cheese until smooth, then gradually adding powdered sugar and heavy cream while continuing to whip, you incorporate air bubbles that lighten the texture. The whipping process also emulsifies the mixture and creates stability—the whipped cream cheese holds its shape beautifully without needing gelatin or other stabilizers. Whipping to stiff peaks ensures the filling won’t deflate or weep.
Powdered sugar provides sweetness and stability. Powdered sugar dissolves more easily than granulated sugar and contains a small amount of cornstarch, which helps stabilize the whipped mixture. It also creates a smoother texture without any grittiness.
Assembly order matters. The shells must be completely cool before filling—warm shells would melt the cream cheese mixture and create a mess. The filling should be used immediately after whipping for best volume and texture, though it can be refrigerated and re-whipped gently if needed.
─────────
Flavor Profile: What to Expect
Fruity, sweet cereal flavor dominates the shells—it tastes exactly like Fruity Pebbles but with a more intense, concentrated flavor thanks to the baking process. The cereal’s artificial fruit flavors (which somehow work perfectly despite being artificial) create a fun, nostalgic taste that immediately transports you to Saturday morning cartoons and childhood breakfasts.
Crunchy, crispy texture in the shells provides essential contrast to the creamy filling. The shells are substantial enough to hold up to the filling without getting soggy, but they’re not so hard that they shatter when you bite them. They have that satisfying crunch that makes each bite texturally interesting.
Rich, tangy cream cheese forms the base of the filling. It’s recognizably cheesecake flavor—that characteristic tang and richness we associate with cream cheese—but it’s lighter and more airy than traditional cheesecake. The cream cheese provides a slightly savory, tangy note that balances all the sweetness.
Light, whipped creaminess makes the filling feel indulgent without being heavy. The whipped cream component creates a mousse-like texture that melts on your tongue. It’s sweet but not cloying, rich but not dense, substantial but not filling in that “I can’t eat another bite” way.
The combination is playful and balanced. The sweet, fruity, crunchy shell against the tangy, creamy, smooth filling creates contrast that makes each bite interesting. The additional Fruity Pebbles on top add color, crunch, and extra cereal flavor. It’s fun and whimsical but genuinely delicious—not just a gimmick.
─────────
Tips for Making the Best Fruity Pebbles Cheesecake Tacos
Making the Taco Shells:
- Crush cereal slightly before mixing—you don’t want powder, but breaking up some of the larger pieces helps them bind together better. Place cereal in a zip-top bag and gently crush with your hands or a rolling pin.
- Mix thoroughly to ensure every piece of cereal is coated with the butter mixture. This is what makes them hold together.
- Spread mixture thinly and evenly on the baking sheet—about 1/4-inch thick is ideal. Too thick and the shells will be hard to shape; too thin and they’ll be too fragile.
- Watch carefully while baking—cereal can burn quickly. Start checking at 8 minutes. The mixture should be lightly golden and set, but not dark brown.
- Work quickly while shaping. As soon as the mixture comes out of the oven and cools for just 1-2 minutes (so you don’t burn yourself), cut it into circles or rectangles and drape over a rolling pin, wine bottle, or taco shell mold to create the shell shape. You have about 30 seconds to 1 minute per piece before it sets.
- Let shells cool completely on the shaping form until they’re completely hardened—this takes about 5-10 minutes.
- Make extra shells because some will crack or not shape perfectly. This is normal when you’re learning the technique.
Creating Perfect Cheesecake Filling:
- Use full-fat cream cheese at room temperature—it should be soft enough to beat smooth but not melty or greasy. Let it sit out for 30-60 minutes.
- Beat cream cheese thoroughly before adding anything else to ensure there are no lumps. Scrape down the bowl frequently.
- Add powdered sugar gradually while beating to prevent a sugar cloud and ensure smooth incorporation.
- Use cold heavy whipping cream for best whipping results. Chill your bowl and beaters too if your kitchen is warm.
- Whip to stiff peaks—the mixture should hold its shape when you lift the beaters, with peaks standing straight up without drooping.
- Don’t overwhip or the mixture can become grainy or start to separate. Stop the moment you hit stiff peaks.
- Use immediately for best volume and texture, though you can refrigerate for up to 2 hours and gently re-whip if needed.
Assembly Tips:
- Fill shells just before serving for maximum crunch. If filled too far ahead, the shells can soften from the moisture in the filling.
- Use a piping bag for the neatest filling application, or simply spoon the filling into the shells.
- Don’t overfill—you want enough filling to be satisfying but not so much that it squishes out the sides when you bite.
- Top with extra Fruity Pebbles immediately after filling so they stick to the cream cheese mixture.
- Serve within 1-2 hours of assembly for best texture.
Troubleshooting:
- Shells breaking? The mixture may have been too thin or overbaked. Try spreading slightly thicker next time.
- Shells not holding shape? Work faster while they’re still warm, or reshape them in a warm oven for 30 seconds to make them pliable again.
- Filling too soft? Whip longer to incorporate more air and achieve stiff peaks. Make sure your cream was cold.
- Filling too stiff? Gently fold in a tablespoon or two of additional cream to loosen it slightly.
─────────
Serving Suggestions and Presentation Ideas
Kids’ Party Spectacular: Arrange the tacos on a colorful platter or cake stand and let kids assemble their own if desired. Set up a taco bar with the shells, filling in a piping bag, and bowls of extra Fruity Pebbles, sprinkles, mini chocolate chips, and whipped cream for customization. This interactive element makes the dessert even more fun.
Instagram-Worthy Presentation: Arrange 3-4 tacos on a white or pastel-colored plate with rainbow sprinkles scattered around. The bright colors of the Fruity Pebbles against a simple background create stunning photos. Add a small scoop of vanilla ice cream on the side for extra visual appeal and deliciousness.
Adult Party Presentation: Serve tacos on small individual plates with a dusting of powdered sugar and a fresh berry or mint sprig as garnish to make them feel slightly more sophisticated. The playful concept paired with elegant plating creates a fun contrast. Pair with champagne or prosecco for a whimsical yet grown-up experience.
Dessert Bar Addition: Include these as part of a dessert station alongside other fun, handheld treats. The tacos’ unique shape and bright colors make them stand out. Provide small napkins since these can be slightly messy to eat.
Birthday Celebration: Arrange tacos in a circle on a large platter with birthday candles stuck into the filling in the center. The rainbow colors make these perfect for birthday parties of any age. They’re festive without requiring a traditional cake.
Creative Variations: Try different cereal flavors for the shells (Cocoa Pebbles, Lucky Charms, Cinnamon Toast Crunch) or flavor the filling with vanilla, almond extract, or lemon zest for variety. Each variation creates a completely different flavor profile.
─────────
Storage, Reheating, and Make-Ahead Tips
Storage:
- Unfilled shells: Store in an airtight container at room temperature for up to 3 days. They stay crispy and can be filled as needed. Do not refrigerate unfilled shells—they’ll absorb moisture and become soft.
- Cheesecake filling: Refrigerate in an airtight container for up to 3 days. Gently re-whip before using if it has deflated slightly.
- Assembled tacos: These are best eaten within 1-2 hours of assembly. The moisture from the filling will gradually soften the shells if left too long.
- Freezer: You can freeze unfilled shells for up to 1 month in an airtight container. Thaw at room temperature before filling. Do not freeze the filled tacos or the filling alone.
Make-Ahead Strategy: The beauty of this recipe is that components can be prepared in advance:
- Make shells 1-3 days ahead and store airtight at room temperature
- Prepare filling up to 3 days ahead and refrigerate
- Assemble just before serving for maximum crunch and best presentation
This makes these tacos perfect for parties—do all the work ahead, then quick assembly right before guests arrive.
Serving Timeline:
- Fill tacos 30 minutes to 2 hours before serving if you need them ready ahead of time
- Store filled tacos in the refrigerator uncovered or loosely covered to prevent steam buildup
- Filled tacos will gradually soften but are still delicious for several hours—just less crunchy
Humidity Concerns: These shells are sensitive to moisture:
- Avoid making on very humid days if possible—the shells may not crisp properly or may soften quickly
- Store shells in a cool, dry place with a silica gel packet if your climate is humid
- Fill and serve quickly on humid days to maintain maximum crunch
─────────
Why This Recipe Deserves a Spot in Your Rotation
Let me be clear: Fruity Pebbles Cheesecake Tacos are not an everyday dessert. They’re not what you make on a random Tuesday when you’re craving something sweet. But they absolutely deserve a spot in your recipe collection because they solve a specific problem that every home baker faces: how do you create a dessert that’s genuinely memorable, that makes people talk, that brings pure joy rather than just satisfying a sweet tooth?
These tacos are conversation starters. When you bring them to a party, people gather around. They take photos. They laugh. They get excited before they even taste them. In our Instagram-saturated food culture, that kind of visual impact matters. But here’s the important part—these aren’t just pretty. They actually taste really, really good. The novelty gets people’s attention, but the flavor keeps them coming back for seconds.
They’re also surprisingly versatile in terms of when and where to serve them. Kids’ birthday party? Perfect. Adult game night? Hilarious and delicious. Bridal shower? Fun and unexpected. They work in contexts where a traditional cake might feel too formal or where cupcakes feel too expected. They’re the dessert that makes you known as the creative baker, the one who thinks outside the box.
From a technical standpoint, this recipe teaches valuable skills. Learning to work with cereal as a structural element, understanding how to stabilize whipped cream cheese, timing your assembly for optimal texture—these are all techniques that translate to other creative desserts. It’s playful experimentation that actually builds your baking competence.
Most importantly, these tacos remind us that dessert should be fun. Not every dessert needs to be sophisticated or traditional or taken seriously. Sometimes the best desserts are the ones that make you smile, that tap into childhood nostalgia while delivering grown-up flavors, that give you permission to be playful and creative and a little bit ridiculous. That’s valuable too.
─────────
Recommended Drink Pairing
Milk – Cold Whole or 2%: Ice-cold milk is the obvious and perfect pairing—it’s what you’d drink with Fruity Pebbles for breakfast, and it works just as well here. The milk cuts through the sweetness, cleanses the palate, and provides nostalgic comfort. This pairing works for all ages and feels natural and appropriate.
Fruity Cocktail – Fruit Punch or Berry Sangria: For adults, a fruit punch cocktail with vodka or rum creates a fun, playful pairing that matches the dessert’s whimsical vibe. Berry sangria with its fruit-forward flavors complements the Fruity Pebbles while adding sophistication. These pairings work for parties where you want everything to feel festive and fun.
Sparkling Lemonade or Fruit Soda: Sparkling pink lemonade or fruity Italian sodas provide effervescence and fruit flavors that complement the cereal without overwhelming it. The bubbles cleanse the palate between bites. These feel special and celebratory without being alcoholic, perfect for family gatherings or kids’ parties.
Coffee – Iced Vanilla Latte: An iced vanilla latte or cold brew with sweet cream provides enough sweetness to match the dessert while offering coffee’s gentle bitterness as contrast. The cold temperature matches the chilled filling. This pairing feels more grown-up while still being approachable.
Champagne or Prosecco: For elegant adult parties, champagne or prosecco creates a delightful contrast—serious sophistication paired with playful whimsy. The dry bubbles cut through the sweetness beautifully and make the whole experience feel celebratory. This is the “I’m an adult eating cereal dessert tacos and I’m fabulous” pairing.
Fruity Pebbles Cheesecake Tacos
Fruity Pebbles Cheesecake Tacos are pure whimsy and delight—crispy, colorful cereal “shells” filled with luscious no-bake cheesecake cream and topped with more rainbow crunch for the most playful dessert you’ll ever make.
8
servings20
minutes10
minutes300
kcal30
minutesIngredients
1.5 cups Fruity Pebbles cereal
1 cup all-purpose flour
0.5 cup sugar
0.25 teaspoon baking powder
0.25 teaspoon salt
1 teaspoon vanilla extract
2 tablespoons butter
4 ounces cream cheese
0.5 cup heavy whipping cream
0.25 cup powdered sugar
Directions
- Preheat the oven to 350°F (175°C).
- Mix Fruity Pebbles, flour, sugar, baking powder, and salt.
- Add melted butter and vanilla extract to the dry ingredients, mix well.
- Spread the mixture on a baking sheet, bake for 10 minutes or until golden.
- Let it cool, then crumble to form taco shells.
- Beat cream cheese until smooth.
- Slowly add powdered sugar and whipping cream to cream cheese.
- Whip the mixture until it forms stiff peaks.
- Fill the cooled taco shells with cheesecake mixture.
- Garnish with additional Fruity Pebbles and serve.
Nutrition Facts
- Total number of serves: 4
- Calories: 300kcal
- Cholesterol: 0mg
- Sodium: 620mg
- Potassium: 400mg
- Sugar: 8g
- Protein: 6g
- Calcium: 60mg
- Iron: 2mg
About This Author

Aurora Wright
Pastry Chef & Dessert Editor
Aurora is the sweet side of Daily Dish. A trained pastry chef and dessert stylist, she’s responsible for our mouth-watering cakes, cookies, and confections. She brings precision, artistry, and a touch of whimsy to every recipe she creates — and taste-tests more chocolate than she’ll admit.
Favorite dish: Flourless dark chocolate torte.
Kitchen motto: “Life’s too short to skip dessert.”


