

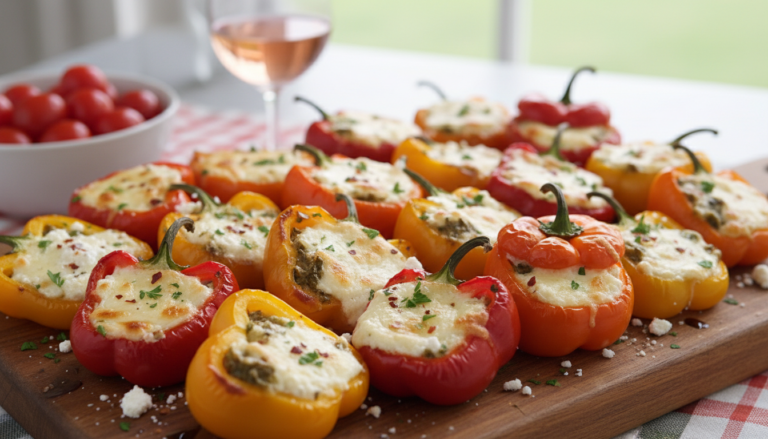
I’ve always believed that food should be a feast for the eyes before it ever reaches your mouth, and these stuffed mini peppers are exactly that kind of magic—little jewel-toned vessels filled with creamy, herby cheese that look like they belong on a party platter but are actually just your Tuesday afternoon snack. There’s something deeply satisfying about opening your refrigerator and seeing rows of these colorful beauties lined up and waiting, like tiny edible works of art you casually made on a Sunday afternoon.
What enchants me about this recipe is how it takes something as simple as cream cheese and transforms it into something that feels special through nothing more than presentation and a little bit of care. In pastry, we talk about “plating”—the art of making food beautiful on the plate—but these peppers do their own plating. The peppers themselves are the vessels, the architecture, the color, and all you have to do is fill them with something delicious and let them be gorgeous in their own natural way.
I started making these during a phase when I was tired of feeling guilty about snacking. I’d spent years in professional kitchens where snacking meant grabbing whatever was convenient—usually something sweet and decidedly not nutritious—and I wanted snacks that felt intentional rather than desperate. These peppers became my answer: they’re substantial enough to actually satisfy hunger, pretty enough to make me feel like I’m treating myself, and protein-rich enough that I don’t feel like I need to keep eating fifteen minutes later.
The best part? These are what I call “impressive without effort” food—the kind of thing where guests assume you must have spent hours when really you spent maybe twenty minutes start to finish. That gap between perceived effort and actual effort is one of my favorite kitchen tricks, and it works just as well for meal prep as it does for entertaining. When your snacks look this good, eating healthy doesn’t feel like sacrifice. It feels like you’re choosing something better because you’re worth it.
─────────
The Inspiration Behind This Recipe
This recipe was born from a realization I had while working in restaurant kitchens: the most popular appetizers weren’t necessarily the most complicated ones, but they were always the most visually appealing and easy to eat. Bite-sized foods have this magical quality—they feel like treats, they’re portion-controlled by nature, and they eliminate the awkwardness of trying to figure out appropriate serving sizes. Mini peppers offered all of that plus the built-in benefit of being naturally beautiful and requiring zero additional plating skill.
I’d experimented with various stuffed vegetable preparations over the years—mushrooms, tomatoes, zucchini boats—but mini peppers emerged as the clear winner for meal prep purposes. They have structural integrity that holds up beautifully over multiple days, their natural sweetness complements savory fillings perfectly, and that rainbow of colors means your container looks like a celebration rather than just another plastic box of food in the fridge. When meal prep looks this cheerful, you’re far more likely to stick with it.
The cream cheese base was a strategic choice. In professional kitchens, we use cream cheese as a binding agent all the time because it has this wonderful ability to hold everything together while staying creamy rather than becoming crumbly or dry. Mixed with mozzarella for added protein and meltiness, fresh parsley for brightness and color, and garlic for that essential savory depth, it creates a filling that’s rich enough to feel indulgent but not so heavy that you feel sluggish after eating three or four peppers. That balance—satisfying without being overwhelming—is what makes these work as a recurring snack rather than a one-time novelty.
─────────
A Brief History of Stuffed Vegetables and Finger Food Culture
The tradition of stuffing vegetables extends back centuries across multiple cultures—from Middle Eastern stuffed grape leaves to Italian stuffed zucchini flowers to Mexican chiles rellenos. These preparations emerged partly from practicality (using the vegetable itself as both ingredient and vessel) and partly from the universal human appreciation for foods that are self-contained and easy to eat. The vegetable serves as an edible container that both holds the filling and contributes its own flavor and nutrition.
Mini sweet peppers, despite seeming like they’ve been around forever, are actually a relatively recent commercial crop variety. Developed through selective breeding in the 1990s and 2000s, these petite peppers were specifically cultivated for snacking—sweeter than standard bell peppers, more convenient in size, with thinner walls that make them easier to bite through. Their rise in popularity coincided perfectly with the growing interest in healthy, portable snacks and the meal prep movement’s emphasis on portion-controlled, nutrient-dense foods.
What makes stuffed mini peppers particularly suited to contemporary food culture is how they bridge multiple desires simultaneously: they’re photogenic enough for social media, healthy enough to align with wellness goals, convenient enough for busy lifestyles, and elegant enough to serve to guests. The bite-sized format also addresses our modern eating patterns—people increasingly prefer smaller, more frequent eating occasions rather than three large meals. These peppers function equally well as a mid-afternoon desk snack, a pre-dinner appetizer, or a portable protein source eaten in the car between errands. That versatility across contexts and eating occasions makes them especially valuable in meal prep rotations.
─────────
Why This Baking Method Works for Meal Prep
The success of these stuffed peppers for meal prep hinges on understanding how heat affects both the pepper structure and the cheese filling. Baking at 350°F—a moderate temperature—allows the peppers to soften and become tender without collapsing or becoming mushy. The pepper walls contain pectin and cellulose that begin to break down at this temperature, transitioning from crisp-raw to tender-cooked while maintaining enough structural integrity to hold the filling. Higher temperatures would char the pepper skins before the filling fully heated through; lower temperatures would require excessive cooking time that would make the peppers too soft.
The cream cheese and mozzarella combination creates what’s essentially a stable emulsion that holds together beautifully during both initial baking and later reheating. Cream cheese has a high fat content and protein structure that prevents it from becoming grainy or separating when heated, unlike some other cheeses that would break down into greasy pools. The mozzarella contributes stretchiness and additional protein while melting at a similar temperature to cream cheese, creating a unified filling rather than two distinct layers. This synergy means your filling maintains its creamy, cohesive texture even after multiple reheatings throughout the week.
The parchment paper lining serves a dual purpose that extends beyond easy cleanup. It prevents the cheese filling from sticking to the pan and burning, which would create bitter flavors that would contaminate your peppers. More importantly for meal prep, it allows you to transfer the entire sheet of peppers directly into storage containers without scraping or fussing—they lift off cleanly, maintaining their pristine appearance. When your meal prep looks professional rather than scraped-together, you’re more likely to actually eat it with enthusiasm rather than viewing it as a chore.
The 15-20 minute baking time is calibrated to achieve multiple goals simultaneously: soften the peppers to tenderness, heat the filling through completely, create slight browning on the cheese surface for visual appeal and flavor complexity, and evaporate excess moisture that would otherwise make the peppers watery during storage. This timing also prevents overcooking that would cause the peppers to collapse or the cheese to separate into oil and solids—both textural failures that would make these less appealing as the week progresses.
─────────
Flavor Profile: What to Expect
These stuffed mini peppers deliver a sophisticated balance of sweet, savory, and creamy flavors with delightful textural contrast:
- Sweet and vegetal from the mini bell peppers themselves, which have natural sugars that become more pronounced when roasted
- Rich and tangy from cream cheese that provides luxurious creaminess with a subtle acidic edge
- Mild and melty from mozzarella cheese that adds protein and creates that satisfying cheese pull
- Fresh and herbaceous from finely chopped parsley that brightens the rich cheese filling
- Aromatic and savory from minced garlic that infuses the filling with depth without overwhelming
- Well-seasoned from salt and black pepper that enhance all the other flavors and prevent flatness
The overall impression is of something that tastes indulgent—like an appetizer you’d order at a nice restaurant—while remaining light enough to eat as a snack without feeling weighed down. The pepper’s natural sweetness plays beautifully against the savory, garlicky cheese filling, creating that addictive sweet-savory dynamic that makes it hard to stop at just one or two.
Over the first day or two in the refrigerator, the flavors actually improve and integrate. The garlic mellows from sharp to sweet as it continues to infuse the cheese. The parsley’s fresh notes distribute more evenly throughout the filling. The pepper’s natural juices mingle slightly with the cheese, creating pockets of concentrated flavor. This aging effect is generally positive—day-two peppers often taste more harmonious and complex than freshly baked ones because the components have had time to exchange flavors rather than existing as distinct elements.
─────────
Tips for Making the Best Stuffed Mini Peppers
Small refinements elevate these simple peppers from good to genuinely crave-worthy:
- Choose peppers carefully: Select peppers that are roughly equal in size and have flat bottoms so they sit upright on the baking sheet without rolling. Avoid any with soft spots or wrinkled skin.
- Cut peppers lengthwise for stability: Halving them pole-to-pole (stem to tip) rather than across the middle creates boat-shaped halves that sit flat and hold filling better than round cross-sections would.
- Remove all seeds and membranes thoroughly: Any remaining white membrane or seeds creates bitter flavors and unwanted texture. Take an extra moment to scrape the interiors completely clean.
- Bring cream cheese to room temperature: Cold cream cheese is difficult to mix smoothly. Let it sit out for 20-30 minutes before mixing, or microwave briefly (10-15 seconds) to soften. This ensures a creamy, lump-free filling.
- Mix filling until completely uniform: No streaks of unmixed cream cheese should remain. A hand mixer makes this easier, but vigorous stirring with a spoon works fine—just be thorough.
- Don’t overstuff: Fill each pepper generously but stop just below the rim. Overfilled peppers overflow during baking, creating a mess and wasting filling. You can always add more filling after baking if you have extra.
- Use a small spoon or piping bag for clean filling: A teaspoon works well for spooning filling into peppers. For ultimate precision and speed, transfer the mixture to a zip-top bag, cut off one corner, and pipe it into each pepper—professional-looking results in half the time.
- Space peppers evenly on the baking sheet: Leave at least an inch between peppers for air circulation. Crowding creates steam that makes peppers soggy instead of allowing them to roast properly.
- Watch for browning near the end: Every oven is slightly different. Start checking at 15 minutes—you want the cheese lightly golden and bubbling, and the peppers tender when pierced with a fork.
- Cool completely before storing: Hot peppers create condensation in sealed containers, which makes everything soggy and reduces shelf life. Let them cool to room temperature before packing away.
The single most important factor is even cooking through proper oven temperature and spacing. Crowded peppers or an oven running too hot results in some peppers burning while others remain undercooked—ruining the entire batch’s meal prep potential.
─────────
Portioning and Container Suggestions
This recipe yields approximately 20-24 stuffed pepper halves depending on the size of your mini peppers, which divides nicely into 4-5 servings of 4-5 peppers each. This portion size provides about 8-10 grams of protein per serving—substantial enough for a satisfying snack that holds you over between meals without being so filling that it interferes with your next meal.
For storage, I’m devoted to shallow, rectangular glass containers that allow you to arrange the peppers in a single layer without stacking. Stacking puts pressure on the delicate cheese filling and can cause peppers on the bottom to release liquid that makes everything soggy. A 9×13 glass container perfectly accommodates a full batch of peppers with room to keep them organized and undamaged. If you need to use multiple smaller containers, that works too—just maintain single-layer arrangements.
For grab-and-go convenience, portion peppers into individual meal prep containers—4-5 peppers per container creates perfectly portioned snacks you can grab on your way out the door. Choose containers with tight-sealing lids to prevent the garlic aroma from permeating your refrigerator or work bag. Glass containers are ideal because they don’t absorb odors or stains, but BPA-free plastic works fine if weight and portability are concerns for transporting to work or gym.
The visual presentation matters more than you might think for meal prep adherence. Arrange your peppers with attention to color distribution—alternate red, yellow, and orange peppers to create an appealing rainbow effect rather than grouping all the same colors together. This small aesthetic consideration makes opening your container genuinely pleasant, which increases the likelihood you’ll actually eat what you’ve prepped rather than letting it languish in the back of the fridge.
─────────
Storage, Reheating, and Shelf Life Tips
- Refrigerator storage: Properly stored in airtight containers, stuffed mini peppers maintain excellent quality for 4-5 days. The cheese filling remains creamy and the peppers stay tender without becoming mushy.
- Cool completely before storing: Let peppers reach room temperature (no more than 2 hours) before sealing in containers. Hot peppers create condensation that promotes bacterial growth and makes peppers soggy.
- Store in shallow, single layers: Avoid stacking peppers on top of each other, which can crush the filling and cause moisture accumulation. Single-layer storage maintains better texture and appearance.
- Reheating in microwave: Place desired number of peppers on a microwave-safe plate, cover loosely with a damp paper towel, and heat for 30-45 seconds until warmed through. The paper towel prevents drying while creating steam that refreshes the peppers.
- Reheating in oven: For best texture, reheat at 300°F for 8-10 minutes until warmed through. This method restores some of the initial texture better than microwaving but requires more time.
- Reheating in toaster oven: Place peppers on the toaster oven tray and heat at 300°F for 5-7 minutes. Perfect for single servings without heating your full oven.
- Eating cold is also excellent: These peppers are genuinely delicious straight from the refrigerator. The cold cheese becomes firmer and more cream-cheese-like, which some people actually prefer to the warm, melty version.
- Freezing with caveats: While these can be frozen for up to 2 months, the pepper texture changes significantly—they become softer and release more moisture when thawed. Freeze only if necessary, and expect textural differences.
- Thawing from frozen: Transfer to refrigerator overnight to thaw slowly, then reheat as directed. Avoid microwave defrosting, which creates uneven heating and excessive moisture release.
- Quality indicators: Fresh peppers smell pleasantly garlicky and cheesy. If you detect any sour or off odors, or if mold appears on the filling, discard immediately. Within 4-5 days, this shouldn’t occur with proper storage.
- Moisture management: If peppers release liquid during storage (sometimes the cheese sweats slightly), simply pour off the excess liquid before reheating. This is normal and doesn’t indicate spoilage.
─────────
Why This Recipe Deserves a Spot in Your Meal Prep Rotation
As someone who’s spent a career making beautiful desserts and appetizers, I can tell you that the highest compliment a recipe can receive is “I actually look forward to eating this.” These stuffed mini peppers earn that compliment repeatedly. They’re gorgeous enough to spark genuine excitement when you open your fridge, delicious enough to satisfy snack cravings without triggering the “I can’t stop eating” response that comes with chips or cookies, and substantial enough to actually bridge you between meals rather than just teasing your hunger.
From a practical standpoint, these peppers solve one of meal prep’s persistent challenges: having protein-rich snacks that don’t require utensils or elaborate preparation when you’re ready to eat. You can eat them in the car, at your desk, standing in the kitchen, or sitting on the couch—they’re completely portable and self-contained. That flexibility means you’re far more likely to actually eat them rather than skipping snacks because the logistics feel too complicated.
The nutritional benefits extend beyond just the protein content. Each pepper half provides significant vitamin C (mini bell peppers contain more vitamin C per ounce than oranges), vitamin A for eye health and immune function, and fiber for digestive health and satiety. The cheese contributes calcium and additional protein, while the garlic offers its well-documented anti-inflammatory and immune-supporting properties. You’re not just snacking—you’re genuinely nourishing your body with micronutrients that support overall health.
But perhaps most valuable is the psychological benefit these peppers provide: they make healthy eating feel like a choice you want to make rather than one you have to make. When your snacks look like something you’d serve at a dinner party—colorful, elegant, intentionally composed—eating them feels like self-care rather than deprivation. That emotional shift, from viewing healthy food as penalty to viewing it as privilege, often makes the difference between meal prep habits that last and ones that get abandoned after a few weeks of grim determination.
─────────
Meal Prep Pairing Suggestions
While these stuffed peppers work beautifully as standalone snacks, they integrate seamlessly into a comprehensive meal prep strategy that covers multiple eating occasions and provides variety throughout the week. Pair them with the Tuna Salad Cucumber Bites for a complete snack arsenal—some days you’ll crave the warm, cheesy richness of peppers, other days the cool, crisp refreshment of cucumber bites sounds more appealing. Having both options prepped ensures you’re never stuck eating something that doesn’t match your current mood or hunger level.
For a complete protein-snack rotation that prevents monotony, combine these peppers with Greek Yogurt Parfaits (for sweet cravings) and hard-boiled eggs (for maximum portability and protein density). This trinity of snack options—savory and warm (peppers), sweet and cold (parfaits), and neutral and portable (eggs)—covers virtually every snack scenario you’ll encounter during a typical week. You’re never bored, never stuck without options, and never tempted to grab something less nutritious because you have variety built into your system.
These peppers also function brilliantly as appetizers when you’re entertaining, which means your meal prep doubles as party prep. Keep a container in your refrigerator, and when unexpected guests arrive or you decide to have friends over for drinks, you’ve already got something impressive to serve. Just arrange the peppers on a pretty plate, warm them briefly if desired, and suddenly you’re the person who “always has it together” despite having done nothing extra. That multi-functionality—casual snack or elegant appetizer—makes them especially valuable because you’re getting more use cases from the same time investment.
For lunch strategy, these peppers pair excellently with the Mason Jar Salads or Chicken Grain Bowls as side additions that boost protein and make your meal feel more complete. Add 3-4 peppers to your lunch container alongside your salad or grain bowl, and suddenly you have a more substantial meal without having prepared entirely different recipes. This modular approach—where components can be mixed and matched based on daily hunger and preference—represents optimal meal prep thinking: maximum flexibility with minimum duplication of effort.
Stuffed Mini Peppers
This stuffed mini peppers recipe transforms colorful peppers into protein-packed, portion-controlled snacks that store beautifully and reheat perfectly for grab-and-go convenience all week long.
4
servings15
minutes20
minutes150
kcal35
minutesIngredients
1 pound mini bell peppers
8 ounce cream cheese
0.5 cup shredded mozzarella cheese
0.25 cup finely chopped fresh parsley
2 cloves garlic, minced
0.5 teaspoon salt
0.5 teaspoon black pepper
Directions
- Preheat the oven to 350 degrees Fahrenheit and prepare a baking sheet by lining it with parchment paper.
- Cut the mini bell peppers in half lengthwise and remove any seeds and membranes to make room for the stuffing.
- In a mixing bowl, combine cream cheese, mozzarella cheese, parsley, garlic, salt, and pepper until well mixed.
- Spoon the cheese mixture into each pepper half, filling them generously but not overflowing.
- Arrange the stuffed peppers on the prepared baking sheet, keeping them evenly spaced for even cooking.
- Bake in the preheated oven for 15 to 20 minutes, or until the peppers are tender and the cheese is bubbly.
- Remove from the oven and let cool for a few minutes before serving warm as an appetizer or snack.
Nutrition Facts
- Total number of serves: 4
- Calories: 150kcal
- Cholesterol: 0mg
- Sodium: 620mg
- Potassium: 400mg
- Sugar: 8g
- Protein: 6g
- Calcium: 60mg
- Iron: 2mg
About This Author

Benjamin Brown
Recipe Developer
Benjamin is our flavor engineer. A classically trained chef turned recipe developer, he’s obsessed with balancing taste, texture, and creativity. He ensures that every recipe we publish is not only delicious but also reliable, approachable, and repeatable — even for beginners.
Favorite dish: Slow-braised short ribs with red wine reduction.
Kitchen motto: “Cooking is part science, part soul.”


