You follow a recipe for caramelized onions.
Slice onions. Add them to a pan with oil or butter. Cook them, stirring occasionally.
Twenty minutes later, they’re soft and translucent. Maybe slightly golden. But they’re not caramelized. They’re nowhere near that deep, rich brown color that recipes promise.
You turn up the heat, hoping to speed things up. The onions start to burn in spots while staying pale everywhere else.
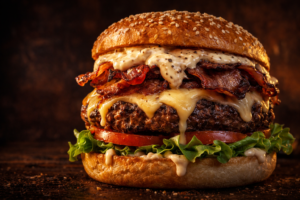
Restaurant caramelized onions are mahogany brown. Deeply sweet. Complex. The kind that transforms a burger or tops a steak perfectly.
You assumed caramelizing onions was simple. It is simple. But simple doesn’t mean fast.
And most people are making mistakes that prevent onions from ever reaching that deep caramelization—no matter how long they cook.
The Heat Is Too High
This is the most common problem and the most counterintuitive fix.
High heat browns the outside of onion pieces quickly through burning, not caramelization. The onions char before their sugars have time to properly break down and transform.
True caramelization requires sustained moderate heat. The sugars need time to melt, break down, and recombine into new compounds that create that characteristic deep color and complex sweetness.
Chefs cook onions on medium to medium-low heat. Sometimes even lower. The process is slow and patient.
Home cooks often start on medium-high or high heat, trying to speed things up. The onions burn instead of caramelize. They develop bitter spots rather than uniform sweetness.
Lower your heat. It feels wrong because nothing seems to be happening. But that slow transformation is what creates real caramelization.
Patience is the technique.
You’re Not Cooking Them Long Enough
Twenty minutes isn’t enough. Thirty minutes isn’t enough.
Properly caramelized onions take 45 minutes to an hour. Sometimes longer.
The onions go through stages: translucent, soft, lightly golden, golden brown, deep brown. Each stage takes time.
Most recipes lie about this timing. They say “caramelize onions, about 20 minutes” because they know most home cooks won’t commit to an hour of stirring onions.
But 20-minute onions are sautéed onions, not caramelized onions. They’re different things.
Chefs know this. They block out an hour when caramelizing onions. They start well before they need them.
Home cooks follow recipe times, then wonder why their onions never get dark. The recipe lied. The onions needed three times longer.
Set aside an hour. Actually an hour. Not “I’ll check them in 20 minutes and see how they look.”
Real caramelization takes real time.
There’s Not Enough Fat
Fat helps onions cook evenly and prevents burning. It also helps distribute heat and prevents sticking.
Too little fat means onions stick to the pan, creating hot spots that burn instead of caramelize.
Chefs use more fat than most home cooks would expect—several tablespoons for a large batch of onions. Sometimes butter, sometimes oil, often both.
Home cooks often use a light coating, trying to keep things healthy. The onions stick. They burn in spots. They never properly caramelize.
Use enough fat. If that’s uncomfortable, make caramelized onions less frequently. But when you do make them, do it right.
Insufficient fat guarantees inferior results.
The Pan Is Too Small
Overcrowding onions in a small pan creates problems.
The onions pile up. The bottom layer burns while the top layer barely cooks. Steam gets trapped, preventing proper browning.
Chefs use large pans or skillets. They want onions in a relatively thin layer with room to spread out.
This allows even heat distribution and moisture evaporation. The onions caramelize uniformly instead of cooking unevenly.
Home cooks often use whatever pan fits all the onions—even if they’re piled deep.
Use a larger pan than you think you need. If you’re caramelizing multiple pounds of onions, use two pans or do it in batches.
The extra effort produces dramatically better results.
You’re Stirring Too Much or Too Little
Constant stirring prevents onions from developing contact with the hot pan. They never get the sustained heat needed to caramelize.
But too little stirring means the bottom layer burns while the top stays raw.
The right rhythm is: stir every 3 to 5 minutes. Let onions sit undisturbed between stirs so they develop color, then scrape up any browned bits and redistribute.
Chefs develop this timing through experience. They stir regularly but not constantly.
Home cooks either stir constantly out of nervousness or barely stir at all. Neither produces proper caramelization.
Set a timer. Stir every 3 to 5 minutes. No more, no less. Let the onions do their work between stirs.
You’re Not Deglazing
As onions caramelize, browned bits stick to the pan bottom. This is fond—concentrated flavor.
If you don’t deglaze, those bits eventually burn and turn bitter. The onions also miss out on the rich flavor trapped in that fond.
Chefs add liquid when fond develops—a splash of water, wine, or stock. They scrape up the browned bits, incorporating that concentrated flavor back into the onions.
This happens multiple times during the cooking process. Each deglaze adds depth.
Home cooks often ignore the fond or let it burn because they don’t realize it’s supposed to be incorporated.
When you see dark brown bits stuck to the pan, add a tablespoon or two of liquid. Scrape with a wooden spoon. Let it cook off. Repeat as needed.
Those accumulated deglazes are what create the complex, deeply flavored caramelized onions restaurants serve.
The Onions Are Too Wet
Starting with wet onions adds moisture that must evaporate before caramelization can begin.
This extends cooking time and can prevent onions from ever properly caramelizing if you give up before the moisture is gone.
Chefs use dry onions. They don’t rinse them. If they’re stored in a humid environment, they might pat them dry before cooking.
Home cooks sometimes rinse onions or use them straight from refrigeration where condensation has formed.
That extra moisture has to cook off before real caramelization can start. You’re adding 10 to 15 minutes to your cooking time for no benefit.
Don’t rinse onions. Use them dry. If they’re cold and damp from the refrigerator, let them come to room temperature.
You’re Adding Sugar
This seems helpful. It’s not.
Added sugar caramelizes faster than onion sugars, creating quick browning. But it’s one-dimensional sweetness, not the complex flavors that develop from the onions’ own sugars breaking down.
You end up with onions that are brown but taste simply sweet, not deeply caramelized.
Chefs don’t add sugar to caramelized onions. They let the onions’ natural sugars do the work.
Home cooks sometimes add sugar thinking it’ll speed things up or improve flavor. It creates a different product—not necessarily bad, but not true caramelization.
Skip the sugar. Trust the onions’ own sweetness. Let the process take as long as it takes.
The Pan Material Matters
Thin pans heat unevenly. They create hot spots that burn onions in some areas while others barely cook.
Heavy-bottomed pans distribute heat evenly. Caramelization happens uniformly across the whole batch.
Chefs use heavy stainless steel, cast iron, or heavy-bottomed skillets for caramelizing onions.
Home cooks often use whatever pan is handy—sometimes thin nonstick or aluminum that doesn’t distribute heat well.
The pan choice affects how evenly onions caramelize. Better pans produce better results with the same technique.
Use your heaviest pan. The investment in good cookware pays off in consistent caramelization.
You’re Using the Wrong Onions
Not all onions caramelize equally well.
Yellow onions are ideal—they have high sugar content and develop deep flavor. Sweet onions like Vidalia work too, though they’re more one-note sweet.
Red onions can be caramelized but they stay slightly firm and don’t break down as completely. White onions have less sugar and produce less sweetness.
Chefs use yellow onions almost exclusively for caramelizing. They know these produce the best results.
Home cooks sometimes use whatever onions they have. Results vary based on variety.
Use yellow onions. If you want the best caramelized onions, this isn’t negotiable.
The Salt Timing Is Wrong
Salt draws moisture out of onions. Added too early, this can extend cooking time as you wait for that moisture to evaporate.
Added at the end, salt seasons without creating extra liquid to cook off.
Chefs usually salt caramelized onions near the end of cooking—once most of the caramelization has happened.
Home cooks often salt at the beginning out of habit. The onions release liquid. Everything takes longer.
Wait to salt until the onions are mostly caramelized. Then season and continue cooking just until the seasoning is incorporated.
What You Should Do This Weekend
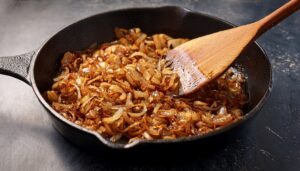
Slice 2 to 3 pounds of yellow onions. Use a large, heavy pan on medium to medium-low heat.
Add 3 to 4 tablespoons of butter or oil—more than seems necessary.
Cook for an hour, stirring every 3 to 5 minutes. When brown bits stick to the pan, add a splash of water or wine and scrape them up.
Don’t turn up the heat. Don’t rush. Don’t add sugar. Just cook, stir occasionally, deglaze as needed.
After 45 to 60 minutes, the onions will be deep mahogany brown, jammy, and intensely sweet.
That’s actual caramelization. Not quick-cooked onions. Not sautéed onions with a bit of color.
Real caramelized onions that taste like the ones in restaurants.
The Takeaway
Caramelized onions aren’t hard to make. They just take time and patience that most recipes don’t acknowledge.
The onions need moderate heat, adequate fat, sufficient space, and an actual hour to properly caramelize.
Restaurants serve deeply caramelized onions because they start them well before service and let them cook properly—low heat, long time, regular stirring, occasional deglazing.
Home cooks often try to rush the process with high heat and short cooking times. The onions never properly caramelize.
But now you know what real caramelization requires.
Low heat. Long time. Regular attention but not constant stirring. Deglazing to incorporate fond. No sugar. Yellow onions.
Do that and your onions will finally turn that deep brown color that actual caramelization produces.
Not in 20 minutes. In an hour.
But worth every minute.