

Sheet pan cooking represents the convergence of several important principles: heat distribution, timing coordination, and strategic ingredient selection. This particular recipe isn’t just about throwing chicken and vegetables on a pan and hoping for the best—it’s about understanding how different ingredients respond to high heat, how to leverage the Maillard reaction for maximum flavor development, and how to engineer a meal that maintains quality through multiple days of storage and reheating.
The elegance of this approach lies in its simplicity backed by sound technique. A 400°F oven provides sufficient heat for both browning proteins and caramelizing vegetables without burning either. Cutting chicken into chunks rather than leaving breasts whole increases surface area for seasoning while reducing cooking time, ensuring the meat doesn’t dry out. The vegetable selection isn’t arbitrary—broccoli, carrots, and red onion were chosen specifically because they have similar density and water content, meaning they’ll finish cooking at roughly the same time as the chicken without becoming mushy or remaining undercooked.
What makes this particularly effective for meal prep is the intentional balance between immediate palatability and extended storage viability. The cooking method creates sufficient caramelization for flavor complexity while stopping short of the char that would make leftovers taste stale or burnt. The olive oil coating isn’t just for flavor—it creates a protective barrier that helps proteins and vegetables retain moisture during refrigeration. The seasoning blend uses dried herbs rather than fresh specifically because dried herbs maintain their potency better over multiple days, continuing to flavor the food rather than fading into the background.
This is meal prep as system design. You’re not just cooking dinner—you’re creating a reliable platform that delivers consistent nutrition and satisfaction across four separate eating occasions with minimal degradation in quality. That kind of efficiency deserves analysis and respect.
─────────
The Inspiration Behind This Recipe
This recipe emerged from examining the core challenges that cause meal prep failure: time constraints, cleanup burden, and the expectation of eating identical meals repeatedly. I wanted to engineer a solution that addressed all three simultaneously without requiring advanced culinary skills or specialized equipment. The sheet pan method solved the practical problems—single dish cooking meant minimal cleanup, and the thirty-minute cook time fit realistic weeknight schedules.
But the deeper innovation was in the modular thinking. Rather than creating one specific meal to eat four times, I designed a flexible base that could be modified throughout the week. The chicken and vegetables provide your nutritional foundation—lean protein, fiber-rich vegetables, healthy fats from olive oil—but how you serve them can vary. Monday’s dinner might be the roasted components as-is. Tuesday could see them tossed with pasta. Wednesday might involve adding them to a salad. Thursday could feature them wrapped in tortillas with cheese and salsa. The cooking method remains constant; the application flexes.
The ingredient choices reflect strategic thinking about storage and reheating. Chicken breast chunks maintain moisture better than whole breasts because the smaller pieces have more surface area for the olive oil coating, which acts as a moisture barrier. Broccoli and carrots were selected over more delicate vegetables (like zucchini or bell peppers) because their structural integrity holds up better over multiple days—they soften slightly but don’t become mushy or watery. Red onion adds flavor complexity while providing natural sugars that caramelize beautifully and continue to enhance other ingredients during storage as their flavors meld.
─────────
A Brief History of Sheet Pan Cooking and One-Pan Meals
The concept of cooking multiple components on a single vessel has ancient roots—from paella cooked in wide pans over open fires to traditional roasting dishes that combined meats and vegetables in communal ovens. However, the modern “sheet pan dinner” phenomenon is distinctly contemporary, rising to prominence in the 2010s as home cooks sought efficiency without sacrificing nutrition or flavor.
The popularization of sheet pan cooking coincided with several cultural shifts: increased awareness of the relationship between diet and health, growing interest in meal prep as a time management strategy, and the social media amplification of visually appealing, seemingly simple cooking methods. Food bloggers and recipe developers recognized that sheet pan meals photographed beautifully—the organized arrangement of colorful ingredients appealed to both aesthetic sensibilities and the promise of easy preparation.
What distinguishes modern sheet pan cooking from its historical predecessors is the emphasis on precise timing and temperature control. Traditional one-pan meals often involved long, slow cooking where everything eventually became tender. Contemporary sheet pan recipes leverage higher heat (typically 400-450°F) and shorter cooking times (20-40 minutes) to achieve caramelization and browning while maintaining textural distinction between components. This shift reflects both modern taste preferences for vegetables that retain some bite and practical considerations for meal prep—ingredients that maintain structural integrity reheat better and prevent textural monotony across multiple meals. The sheet pan dinner has evolved from cooking convenience into a strategic meal prep methodology.
─────────
Why This Cooking Method Works for Meal Prep
The success of sheet pan cooking for meal prep is rooted in the physics of dry heat and the chemistry of surface browning. At 400°F, you’re operating in the optimal temperature range for the Maillard reaction—the complex series of chemical reactions between amino acids and reducing sugars that creates hundreds of flavor compounds. This browning isn’t merely aesthetic; it’s fundamental to creating depth and complexity that prevents meal prep boredom. Steamed or boiled chicken and vegetables, even when well-seasoned, taste one-dimensional. Roasted versions develop nutty, savory notes that remain interesting across multiple reheating cycles.
The dry heat environment is critical for moisture management. Unlike steaming or braising, roasting in an oven removes surface moisture, creating that desirable exterior texture while sealing in internal moisture. For chicken specifically, the high heat causes the proteins on the surface to coagulate rapidly, forming a barrier that prevents excessive moisture loss from the interior. This is why properly roasted chicken breast chunks remain relatively juicy even after 3-4 days of refrigeration—the initial cooking created a protective layer. The olive oil coating amplifies this effect, creating a lipid barrier that further reduces moisture migration.
The vegetable selection leverages an understanding of plant cell structure. Broccoli and carrots both have relatively rigid cell walls reinforced with cellulose and lignin, which means they can withstand high heat without collapsing into mush. During roasting, these vegetables lose some surface moisture (concentrating flavors) while their interiors soften just enough to become tender without turning mealy. Red onions contain natural sugars that caramelize at high temperatures, developing sweet, complex flavors that actually improve over the first 24 hours of storage as those compounds continue to develop and integrate with other ingredients.
The parchment paper lining serves a dual purpose that extends beyond easy cleanup. It creates a slight buffer between the pan and the food, moderating heat transfer and preventing the underside from burning while the top browns. More importantly for meal prep, it prevents the Maillard reaction products (which can taste burnt when concentrated) from sticking to the pan and over-browning. This keeps your flavor development in the “delicious caramelization” zone rather than crossing into “bitter char” territory—crucial when food will be reheated multiple times.
─────────
Flavor Profile: What to Expect
This sheet pan meal delivers a balanced, savory flavor profile built on complementary browning and seasoning:
- Savory and herbaceous from garlic powder, paprika, and dried thyme that create an aromatic coating on both protein and vegetables
- Subtly sweet from caramelized red onions and natural sugars in the carrots that develop during roasting
- Earthy and nutty from roasted broccoli that takes on deeper, more complex notes than its raw or steamed counterpart
- Rich and coating from olive oil that carries flavors and creates a pleasant mouthfeel
- Well-seasoned from salt and black pepper that enhance rather than dominate the other ingredients
- Umami depth from the Maillard reaction on chicken surfaces, creating savory complexity
The overall composition creates what I call a “layered simplicity”—straightforward ingredients elevated through proper technique. The paprika contributes subtle smokiness and vibrant color without aggressive heat. The garlic powder distributes evenly and mellows during cooking, providing background savoriness rather than sharp garlic bite. The thyme adds herbal notes that complement rather than compete with the vegetables’ natural flavors.
Over the course of 3-4 days in refrigeration, the flavors integrate and mellow. The onions’ sweetness becomes more pronounced as their cellular structure continues breaking down slightly. The thyme and paprika infuse more deeply into the chicken and vegetables. The olive oil distributes seasoning more evenly throughout the mixture. This aging effect is generally positive—day three often tastes more harmonious than day one because the components have had time to exchange flavors rather than existing as distinct elements simply sharing a container.
─────────
Tips for Making the Best Sheet Pan Chicken and Vegetables
Precision in execution transforms this simple recipe from adequate to excellent:
- Cut chicken into uniform chunks: Aim for 1½-inch pieces that are roughly equal in size. Inconsistent sizing means some pieces overcook while others remain undercooked, leading to dry, tough chicken alongside properly cooked pieces.
- Don’t crowd the pan: Ingredients should be in a single layer with visible space between pieces. Overcrowding creates steam instead of roasting, preventing browning and resulting in soft, pale vegetables rather than caramelized ones. Use two pans if necessary.
- Cut vegetables to appropriate sizes: Broccoli florets should be medium-sized (1½-2 inches), baby carrots can stay whole, and red onion wedges should be about ½-inch thick. This ensures everything finishes cooking simultaneously.
- Toss thoroughly with oil and seasonings: Use your hands to massage the oil and spice mixture into every surface. Uneven coating means uneven browning and flavor distribution. Each piece should glisten with oil but not be dripping.
- Preheat the oven completely: Wait until the oven reaches 400°F before inserting the pan. Starting with a properly heated oven ensures immediate browning rather than gradual warming that can make chicken release too much moisture.
- Stir at the halfway point: The 15-minute stir redistributes pieces from hot spots to cooler areas, ensuring even cooking. This single intervention prevents burning on one side while the other remains pale.
- Monitor chicken internal temperature: Use an instant-read thermometer to check that chicken reaches 165°F at the thickest part. This ensures food safety while preventing overcooking that would dry out the meat for meal prep purposes.
- Let it rest before portioning: Allow the pan to cool for 5-10 minutes after removing from the oven. This resting period lets juices redistribute within the chicken and prevents steam buildup in storage containers that would make everything soggy.
- Season strategically: The initial seasoning should be slightly under-salted compared to what you’d serve immediately, as flavors concentrate during storage. You can always add more salt when reheating.
The single most critical factor is oven temperature accuracy. If your oven runs hot or cold by even 25°F, you’ll either burn vegetables while chicken stays raw or end up with pale, steamed-tasting food. An oven thermometer provides certainty.
─────────
Portioning and Container Suggestions
This recipe yields four generous meal-prep portions when following the ingredient quantities as written. Each portion should contain approximately 5-6 ounces of chicken chunks (about 35-40 grams of protein) alongside 1½-2 cups of mixed vegetables. This macronutrient ratio—roughly 40% protein, 40% vegetables, 20% healthy fats from olive oil—provides balanced nutrition that supports satiety and stable energy levels.
For optimal storage, I recommend 3-cup (24-ounce) glass containers with tight-fitting lids. Glass is superior to plastic for this application because the acidic components in the vegetables (particularly the onions) can interact with plastic over time, and glass allows you to reheat directly in the microwave without concerns about chemical leaching. The 3-cup size provides adequate space for generous portions without excessive headspace that would allow ingredients to shift during storage.
Employ strategic layering within containers for maximum freshness: heavier, moisture-resistant items (chicken and carrots) on the bottom, lighter items (broccoli) on top, with onions distributed throughout. This prevents the broccoli from getting crushed and maintains distinct textures rather than everything compressing into a homogeneous mass. If you prefer keeping components more separated, use divided containers with 2-3 compartments, though this is more about personal preference than preservation necessity.
For calorie tracking or specific dietary goals, weigh portions on a kitchen scale rather than estimating visually. Chicken density varies, and olive oil contribution can differ significantly between portions if you’re eyeballing. Consistent portioning ensures predictable macronutrient intake across all four meals—important if you’re tracking nutrition carefully or trying to maintain specific caloric targets.
─────────
Storage, Reheating, and Shelf Life Tips
- Refrigerator storage: Properly stored in airtight containers at 40°F or below, this meal maintains optimal quality for 4 days. The chicken remains safe through day 5, but texture quality peaks earlier.
- Cool before storing: Allow the sheet pan to cool for 10-15 minutes at room temperature before portioning into containers. Sealing hot food creates condensation that promotes bacterial growth and makes vegetables soggy.
- Freezing protocol: The chicken and harder vegetables (carrots, onions) freeze acceptably for up to 2 months. Broccoli’s texture degrades somewhat after freezing but remains edible. Freeze in portions without adding fresh vegetables until serving.
- Reheating in microwave: Transfer contents to a microwave-safe dish, add 1-2 tablespoons of water or chicken broth to create steam, cover loosely, and heat for 2-3 minutes, stirring halfway through. The added moisture prevents drying.
- Reheating in oven: For better texture preservation, reheat in a 350°F oven for 10-12 minutes. This method restores some of the exterior crispness lost during refrigeration, making day-four meals taste closer to freshly made.
- Reheating on stovetop: Add contents to a large skillet over medium heat with a splash of liquid. Stir frequently for 5-7 minutes until heated through. This method provides the most control and best texture retention.
- Add fresh elements when serving: Brighten reheated meals with a squeeze of fresh lemon juice, a drizzle of extra olive oil, or a sprinkle of fresh herbs. These additions counteract any flavor flatness that develops during storage.
- Texture expectations: Chicken will be slightly less juicy than day one but should remain tender if not overcooked initially. Vegetables soften somewhat but should maintain structural integrity rather than becoming mushy.
- Quality indicators: Discard if chicken develops a sour smell, slimy texture, or visible mold. Properly prepared and stored, these issues shouldn’t occur within 4 days, but temperature fluctuations or contamination can accelerate spoilage.
─────────
Why This Recipe Deserves a Spot in Your Meal Prep Rotation
From a systems efficiency perspective, this recipe delivers exceptional return on investment across multiple metrics. The thirty-minute active cooking time generates four complete meals—a 7.5-minute per-meal time cost that’s impossible to match with individual cooking sessions. The single-pan methodology minimizes cleanup to essentially rinsing one sheet pan, cutting cleaning time from 15-20 minutes per meal to under 5 minutes total. These time savings compound significantly: over a month of weekly meal prep, you’re recovering approximately 4-5 hours compared to cooking individual dinners.
The nutritional architecture is equally compelling. This recipe provides complete protein from chicken, diverse micronutrients from three different vegetables, healthy monounsaturated fats from olive oil, and significant fiber for digestive health and satiety. The macronutrient balance supports stable blood sugar levels and sustained energy release—you won’t experience the mid-afternoon crash associated with carbohydrate-heavy lunches or the lethargy from excessively fatty meals. For individuals tracking nutrition, the consistent portions make accurate logging straightforward, removing guesswork that often derails dietary adherence.
The economic calculation is straightforward: four servings cost approximately $10-12 to prepare—roughly $2.50-3 per meal. Comparable nutrition from restaurant meals or prepared meal services typically runs $10-15 per serving, meaning you’re saving $28-48 per weekly batch. Annualized, that’s $1,450-2,500 in savings from a single meal prep recipe. These aren’t trivial numbers; this represents significant budget optimization that can be redirected toward other financial goals.
But perhaps the most valuable aspect is psychological: decision fatigue reduction. Each batch eliminates four separate decisions about what to eat for dinner, removing mental load during the week when cognitive resources are already depleted by work and other obligations. This consistent, reliable option prevents the cascade of poor choices that often follows when you’re hungry, tired, and lacking a plan. From a behavioral psychology standpoint, you’re pre-committing to healthy eating when you’re most rational (Sunday afternoon) to support your less rational future self (Wednesday evening at 7 PM when you’re exhausted). That strategic use of present-self discipline to help future-self success is precisely what makes meal prep effective.
─────────
Meal Prep Pairing Suggestions
This sheet pan chicken functions optimally as part of a comprehensive meal prep strategy rather than as a standalone solution. The most efficient approach is pairing it with complementary recipes that share ingredients or equipment while providing variety throughout the week. The Chicken Grain Bowls utilize the same protein but different preparation and flavor profiles, meaning you can buy chicken in larger quantities and use it across two distinct recipes, improving per-pound economics while preventing poultry fatigue.
For nutritional completeness and meal variety, consider preparing a grain or starch base separately that can be added to portions throughout the week. A batch of brown rice, quinoa, or roasted sweet potato cubes requires minimal additional effort but significantly increases the caloric density and satisfaction level of meals. Store these starches separately and add them only to meals where you want more substantial portions—perhaps dinner servings but not lunch portions if you’re managing caloric intake differently throughout the day.
The Tuna Salad Cucumber Bites or Breakfast Burritos provide meal prep solutions for other eating occasions (snacks and breakfast respectively), creating a complete food system where Sunday preparation covers all primary eating occasions for the week. This comprehensive approach maximizes the time efficiency of meal prep—once you’ve committed the mental energy and kitchen time to batch cooking, extending that session to cover multiple meal categories provides disproportionate returns compared to the incremental effort required.
From a flavor chemistry perspective, this mildly seasoned chicken and vegetable base pairs excellently with bold finishing sauces or condiments that can be added at serving time. Prepare or purchase several sauce options—pesto, chimichurri, tahini-lemon dressing, buffalo sauce, teriyaki glaze—and store them separately. This allows you to transform the same base ingredients into distinctly different meals throughout the week, preventing monotony without requiring entirely separate cooking sessions. A Monday dinner with pesto tastes fundamentally different from Wednesday’s dinner with buffalo sauce, despite starting from identical base ingredients. This modular approach—neutral base plus variable flavor amplifiers—represents optimal meal prep strategy: maximum variety from minimum preparation.
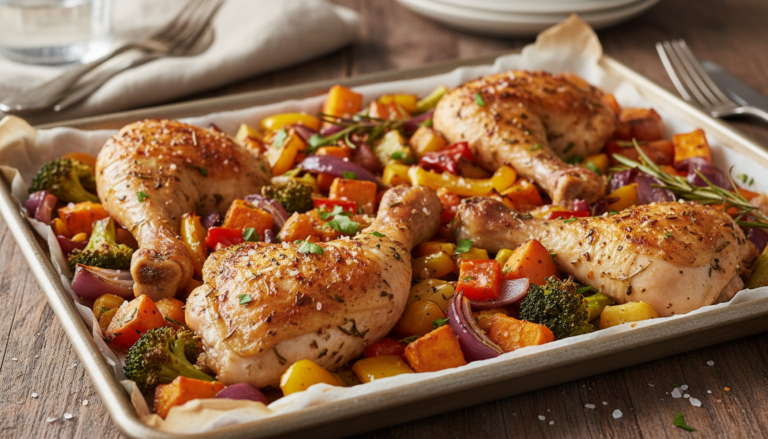
Sheet Pan Chicken with Vegetables
This sheet pan chicken and vegetables recipe delivers tender, herb-seasoned chicken alongside perfectly roasted vegetables that hold up beautifully throughout the week for effortless meal prep dinners.
4
servings15
minutes30
minutes400
kcal45
minutesIngredients
1 pound chicken breasts
2 cups broccoli florets
2 cups baby carrots
1 large red onion
1 tablespoon olive oil
1 teaspoon garlic powder
1 teaspoon paprika
1 teaspoon dried thyme
0.5 teaspoon salt
0.5 teaspoon black pepper
Directions
- Preheat your oven to 400°F (200°C) and line a large sheet pan with parchment paper or lightly grease it.
- Cut chicken breasts into chunks and spread them evenly on the prepared sheet pan to ensure even cooking.
- Cut the red onion into wedges and arrange them on the sheet pan along with broccoli and baby carrots.
- Drizzle olive oil over chicken and vegetables, tossing them gently to coat evenly with the oil.
- In a small bowl, mix garlic powder, paprika, dried thyme, salt, and pepper, then sprinkle evenly over the pan.
- Roast in the oven for about 30 minutes, stirring halfway through, until chicken is cooked through and vegetables are tender.
- Remove the sheet pan from the oven and let the dish cool slightly before serving to enhance the flavors.
Nutrition Facts
- Total number of serves: 4
- Calories: 400kcal
- Cholesterol: 0mg
- Sodium: 620mg
- Potassium: 400mg
- Sugar: 8g
- Protein: 6g
- Calcium: 60mg
- Iron: 2mg
About This Author

Benjamin Brown
Recipe Developer
Benjamin is our flavor engineer. A classically trained chef turned recipe developer, he’s obsessed with balancing taste, texture, and creativity. He ensures that every recipe we publish is not only delicious but also reliable, approachable, and repeatable — even for beginners.
Favorite dish: Slow-braised short ribs with red wine reduction.
Kitchen motto: “Cooking is part science, part soul.”


