

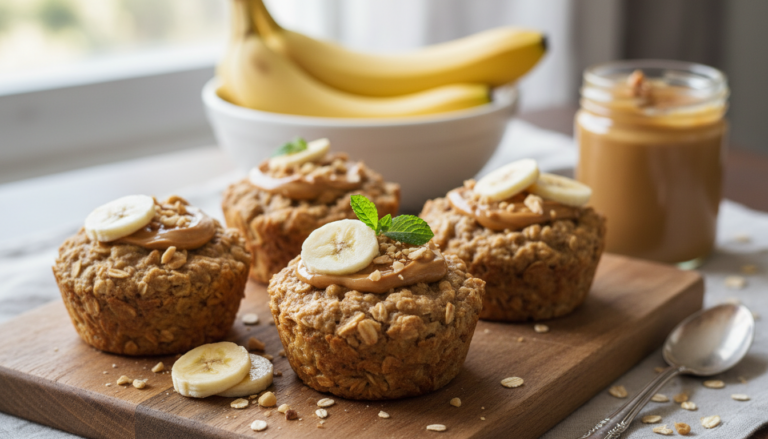
As someone who’s spent years making elaborate desserts with precise measurements, expensive ingredients, and techniques that require actual skill, I’m constantly delighted when I discover recipes that deliver genuine satisfaction from almost nothing. These peanut butter banana oat cups are exactly that kind of magic—you throw ripe bananas, peanut butter, and oats into a bowl, bake for twenty minutes, and emerge with something that tastes indulgent enough to be dessert but is actually nutritious enough to be breakfast. It’s kitchen alchemy at its simplest and most rewarding.
What captivates me about these cups is how they occupy that perfect space between virtue and pleasure. They look like muffins—that familiar, comforting muffin shape that signals “treat” to your brain. They taste sweet and satisfying, with that classic peanut butter-banana-chocolate combination that’s beloved for good reason. But unlike actual muffins made with flour, butter, and sugar, these are held together by oats and sweetened primarily by fruit. You get to eat something that feels like dessert for breakfast without any of the guilt or blood sugar crash that comes from actual dessert.
I started making variations of these during a period when I was working on a cookbook and testing multiple desserts daily—my body was basically running on butter and sugar, and I desperately needed breakfast that felt like a reset button without tasting like punishment. These cups became my answer. They satisfied my sweet tooth enough that I wasn’t craving pastries by 10 AM, but they provided actual sustained energy rather than the spike-and-crash cycle I’d been stuck in. The fact that they freeze beautifully meant I could make massive batches and have breakfast sorted for weeks, which felt like the ultimate self-care when everything else in my life was chaotic.
The best part? These are so simple that you literally cannot mess them up. No creaming butter, no folding techniques, no worrying about overmixing or gluten development. You just stir everything together, scoop it into a muffin tin, and walk away. Twenty minutes later, you have a dozen portable breakfasts that taste like you actually tried, when really you just threw bananas at a problem and it worked. That’s my favorite kind of recipe—maximum results from minimum effort, proving that the best food doesn’t have to be complicated to be wonderful.
─────────
The Inspiration Behind This Recipe
This recipe was born from a simple realization: overripe bananas and pantry staples could create something that satisfied both my professional baker’s standards and my busy person’s need for convenience. I’d seen various iterations of flourless banana oat recipes floating around wellness blogs, but most tasted virtuously boring—very obviously “healthy” in that way that makes you feel like you’re eating food as medicine rather than food as pleasure. I wanted to engineer something that tasted genuinely good while maintaining the simplicity and nutritional benefits.
The breakthrough came from understanding that texture matters as much as flavor. Many flourless oat recipes produce dense, gummy results because they don’t account for how ground oats behave differently than flour. This recipe uses whole rolled oats, which maintain their structural integrity during baking and create pleasant textural contrast—some oats soften completely, others stay slightly chewy, creating complexity that keeps each bite interesting rather than uniformly mushy.
The peanut butter addition serves multiple purposes beyond flavor. It provides fat that creates tenderness and richness, preventing these from tasting dry or crumbly. It contributes protein that makes these genuinely sustaining rather than just carbohydrate delivery vehicles. And perhaps most importantly, it creates that familiar peanut butter-banana flavor combination that’s so universally appealing it overrides any “health food” associations. When something tastes like peanut butter banana bread, people don’t care that it’s flourless and naturally sweetened—they just care that it tastes good.
The chocolate chips are non-negotiable in my opinion. Yes, these cups are perfectly nutritious without them. But nutrition isn’t the only thing that matters—pleasure matters too, and those little bursts of chocolate throughout transform these from “oat cups I eat because they’re good for me” to “oat cups I genuinely crave and look forward to eating.” That psychological shift from obligation to desire is what makes meal prep sustainable long-term.
─────────
A Brief History of Flourless Baking and Banana Bread Culture
Flourless baking has existed for centuries, with almond flour cakes in European pastry traditions and naturally gluten-free preparations in cultures that didn’t have wheat. However, the modern movement toward flourless oat-based baking emerged relatively recently, gaining momentum in the 2010s alongside growing awareness of gluten sensitivities, Celiac disease, and general interest in reducing refined grain consumption.
The specific trend of using oats as a flour substitute—either grinding them into oat flour or leaving them whole—reflects both practical and nutritional considerations. Oats provide soluble fiber (beta-glucan) associated with cholesterol reduction and improved glycemic control, making them nutritionally superior to refined wheat flour in several measures. Their mild flavor and binding properties when combined with moisture-rich ingredients like banana create workable batters without requiring the gluten development that traditional baking depends upon.
Banana bread itself has a fascinating history as an American baking staple. The preparation gained popularity during the Great Depression when home bakers sought ways to use overripe bananas rather than wasting food. The addition of chemical leaveners (baking powder and baking soda) that became commercially available in the early 20th century made quick breads like banana bread accessible to home cooks without requiring yeast expertise. Banana bread remained a fixture in American baking because it solved the eternal problem of what to do with bananas that have gone past eating-fresh quality.
What makes these peanut butter banana oat cups particularly suited to contemporary meal prep culture is how they bridge multiple desires: the comfort and nostalgia of banana bread, the convenience of muffin-sized portions, the nutritional superiority of whole grain preparations, and the freezer-friendly storage that makes weekly meal prep actually sustainable. They represent the evolution of home baking from occasional treat to strategic meal prep component.
─────────
Why This Baking Method Works for Meal Prep
The success of these oat cups for extended storage and freezing hinges on understanding how oats behave as a baking structure without gluten development. Traditional muffins rely on gluten proteins from wheat flour to create structure—these proteins form networks when hydrated and mixed, then set during baking to create the familiar muffin crumb. Without flour, these oat cups use a completely different structural mechanism.
When oats are combined with moisture from mashed banana and baking powder (which creates gas bubbles during baking), they form a matrix held together primarily by gelatinized starch rather than protein networks. The oats’ starch granules absorb liquid from the banana and peanut butter, swell during baking, and create a tender but cohesive structure. This starch-based structure is actually more stable during freezing and thawing than gluten-based structures—starch doesn’t undergo the same moisture loss and retrogradation issues that make frozen muffins dry and crumbly.
The banana serves multiple critical functions beyond sweetness. Its natural pectin content acts as a binder, helping hold the oat mixture together in the absence of gluten. The fruit’s moisture prevents the cups from being dry or crumbly. The sugars in banana (primarily fructose and glucose) contribute to browning through Maillard reactions and caramelization, creating that appealing golden-brown surface that signals “baked good” rather than “compressed oat puck.” The riper your bananas, the sweeter and more effective they are—those brown-spotted bananas you’d otherwise discard are actually ideal for this recipe.
Peanut butter’s fat content is essential for creating tender texture and preventing these from being dry or chalky. Fat molecules coat the oat particles and create a protective barrier that maintains moisture during storage and prevents the cups from becoming hard. The protein in peanut butter also contributes to structure—when heated, these proteins denature and help bind everything together, creating a more cohesive final product than oats and banana alone would achieve.
The baking temperature and time—350°F for 18-20 minutes—are calibrated to achieve full baking without overdrying. Lower temperatures would require longer baking that could dry out the cups; higher temperatures would create overly browned exteriors while leaving interiors undercooked. The specific timing ensures the oats have fully hydrated and gelatinized, the banana’s moisture has distributed throughout, and the surface has developed enough structure to prevent the cups from collapsing as they cool.
─────────
Flavor Profile: What to Expect
These peanut butter banana oat cups deliver comforting, naturally sweet flavors with satisfying richness:
- Sweet and fruity from ripe bananas that provide natural sweetness with that characteristic banana flavor
- Rich and nutty from peanut butter that adds savory depth and prevents excessive sweetness
- Subtly sweet with floral notes from honey that rounds out the banana’s sweetness
- Warm and aromatic from vanilla extract that enhances the other flavors
- Toasty and wholesome from baked oats that contribute pleasant grain flavor
- Sweet and indulgent from chocolate chips that provide bursts of rich chocolate
- Tender with pleasant chew from the oat texture that’s somewhere between muffin and granola bar
The overall impression is remarkably similar to banana bread or peanut butter banana muffins despite the absence of flour and refined sugar. The banana-peanut butter combination is so familiar and beloved that your brain registers “treat” rather than “health food.” The chocolate chips reinforce that treat perception while the oats provide substance that makes these genuinely filling rather than just sweet.
After freezing and reheating, these cups maintain exceptional flavor and texture. The banana’s sugars and the peanut butter’s fats protect the oats from freezer damage, preventing the staleness or off-flavors that sometimes develop in frozen baked goods. The chocolate chips remain perfectly distributed and delicious. Week-three cups taste nearly identical to freshly baked ones—they might be slightly denser after freezing but remain tender and flavorful, proving these are genuinely designed for long-term meal prep rather than just surviving it adequately.
─────────
Tips for Making the Best Peanut Butter Banana Oat Cups
Small refinements create significantly better results and longer storage life:
- Use very ripe bananas: Brown-spotted, soft bananas provide more sweetness and easier mashing. Under-ripe bananas create less sweet cups with chunks that don’t integrate smoothly.
- Mash bananas completely: Use a fork to mash until nearly smooth with only tiny lumps remaining. Large banana chunks create uneven texture and wet spots in finished cups.
- Use natural peanut butter: Products with just peanuts and salt work best. Conventional peanut butters with added oils and sugars alter the texture and sweetness unpredictably. Stir natural peanut butter well before measuring.
- Don’t overmix the batter: Stir just until ingredients are combined. Overmixing doesn’t create gluten issues (there’s no flour), but it can deflate the mixture and create denser cups.
- Fill muffin cups 3/4 full: This allows room for slight rising without overflow. These cups don’t rise dramatically like flour-based muffins, but they do expand slightly.
- Use silicone liners or grease well: Paper liners can stick stubbornly to these cups because they’re more dense and moist than traditional muffins. Silicone liners release perfectly, or grease metal/paper liners generously.
- Check doneness properly: Cups are done when tops are golden brown and spring back when lightly pressed. A toothpick should come out mostly clean—a few moist crumbs are fine.
- Cool completely before storing: Let cups cool in the pan for 10 minutes, then transfer to a wire rack to cool completely (about 30 minutes). Storing warm cups creates condensation that makes them soggy.
- Freeze individually before bagging: Place cooled cups on a baking sheet, freeze for 1 hour until solid, then transfer to freezer bags. This prevents them from freezing together in a solid block.
- Customize mix-ins thoughtfully: Want to add different mix-ins? Dried fruit, nuts, or different chocolate types all work. Maintain similar volumes to keep texture consistent.
The most important factors are banana ripeness (determines sweetness), complete cooling before storage (prevents sogginess), and proper portioning (ensures even baking). These three elements determine whether your cups are genuinely excellent or merely adequate.
─────────
Portioning and Container Suggestions
This recipe yields 12 standard muffin-sized cups, which divides conveniently into 6 days of breakfast (2 cups per serving) or 12 days of snacks (1 cup per serving). Two cups provide approximately 10-12 grams of protein along with substantial fiber and complex carbohydrates—enough to satisfy most people until mid-morning without feeling overly full or heavy.
For freezer storage, I recommend the parchment-and-bag method that creates maximum flexibility: freeze cups individually on a baking sheet until solid (about 1 hour), then place all cups in a large freezer-safe zip-top bag with as much air removed as possible. This prevents freezer burn while allowing you to remove exactly the number of cups you need without thawing the entire batch. Gallon-size freezer bags accommodate a full dozen comfortably.
For families or those wanting maximum organization, consider portioning into breakfast servings before freezing. Place 2 cups together in sandwich-size bags, then place all portions in a large freezer bag. This creates grab-and-go breakfast portions—just pull one bag, reheat both cups, and eat without counting or decision-making in the morning when you’re barely conscious.
If you’re keeping some cups for immediate use (refrigerator storage for the week ahead) and freezing the rest for later, use an airtight container for refrigerated cups. Stack with parchment paper between layers if needed, though these are sturdy enough that gentle stacking usually doesn’t damage them. Glass or plastic containers both work fine—choose based on your refrigerator space and preferences.
For portion control and dietary tracking, weigh individual cups if you’re tracking nutrition carefully. Scooping batter by eye creates slight size variations that might matter if you’re following specific macronutrient targets. Using a 1/3-cup scoop or ice cream scoop creates remarkably uniform portions that ensure consistent nutrition across all twelve cups.
─────────
Storage, Reheating, and Shelf Life Tips
- Refrigerator storage: Store in airtight containers for 5-6 days. These actually improve slightly over the first 24 hours as flavors meld and texture firms up.
- Room temperature storage: These can sit at room temperature for 2-3 days in airtight containers, making them excellent for travel or keeping in desk drawers.
- Freezer storage: Freeze for up to 3 months with excellent quality retention. Proper wrapping (parchment between layers, airtight freezer bags with air removed) prevents freezer burn.
- Reheating from frozen – microwave: Place 1 cup on a microwave-safe plate and heat for 30-45 seconds until warmed through. Two cups need 60-75 seconds. The cups warm beautifully without becoming rubbery.
- Reheating from frozen – toaster oven: Toast at 325°F for 8-10 minutes. This creates slightly crispier edges that some people prefer to the softer microwave texture.
- Reheating from refrigerated: Microwave for 15-20 seconds per cup, just until warm. Over-heating makes them tough, so start with less time.
- No reheating necessary: These are also delicious at room temperature or even cold, making them perfect for eating on the go when you don’t have access to a microwave.
- Serving suggestions: Top with additional peanut butter, sliced banana, a drizzle of honey, or Greek yogurt. Pair with fresh fruit for a more complete breakfast.
- Quality indicators: Fresh cups smell sweetly of banana and peanut butter. Any moldy smell or visible mold indicates spoilage (extremely rare within recommended timeframes with proper storage).
- Texture expectations: These maintain their tender, slightly dense texture throughout storage. They may firm up slightly in the freezer but soften perfectly when reheated. They’re more substantial than traditional muffins but not heavy or dry.
- Portable breakfast hack: Wrap individual frozen cups in paper towels and pack in your bag—they’ll thaw during your commute and be ready to eat when you arrive at work, no reheating required.
─────────
Why This Recipe Deserves a Spot in Your Meal Prep Rotation
As someone who’s made thousands of elaborate desserts professionally, I can tell you that the most valuable recipes aren’t the ones that impress with complexity—they’re the ones you’ll actually make repeatedly because they solve real problems without demanding perfection. These oat cups solve multiple problems simultaneously: they provide genuinely nutritious breakfast, they taste good enough that you actually want to eat them, they’re simple enough to make even when you’re tired, and they store so well that one baking session can cover weeks of breakfasts. That’s remarkable value from twenty minutes of effort and a handful of pantry staples.
The nutritional benefits extend beyond just “avoiding bad ingredients” into actively providing good ones. The oats contribute soluble fiber that supports cardiovascular health and stable blood sugar. The bananas provide potassium, vitamin B6, and prebiotic fiber that feeds beneficial gut bacteria. The peanut butter delivers protein, healthy fats, and vitamin E. These aren’t empty calories you’re tolerating for convenience—they’re nutrient-dense food that actively supports your wellbeing while tasting like you’re treating yourself.
From a practical meal prep perspective, the freezer-friendly nature of these cups creates unprecedented flexibility. Make a double or triple batch—takes maybe an hour total including baking time—and suddenly you have 24-36 breakfasts in your freezer. That’s an entire month of mornings where breakfast is handled, where you don’t have to think or decide or worry, you just grab, reheat, and eat. That kind of food security—knowing you have good options waiting no matter what chaos hits—provides psychological relief that extends far beyond just having breakfast available.
But what I value most is how these cups prove that meal prep doesn’t require sacrificing pleasure. For too long, healthy eating has been framed as something you endure for results—the bland chicken breast, the sad salad, the protein shake you force down. These cups taste like banana bread. They taste like peanut butter cookies. They taste like something you’d bake on a lazy weekend because you wanted to, not because you were being virtuous. When your meal prep includes things that genuinely delight you—that make you excited to eat breakfast rather than just accepting it as necessary fuel—you create sustainable habits rather than temporary compliance that fades when motivation wanes.
─────────
Meal Prep Pairing Suggestions
These peanut butter banana oat cups work beautifully within a comprehensive breakfast strategy that provides variety while maintaining convenience. Pair them with Cottage Cheese Scrambled Eggs or Egg & Veggie Muffin Cups for a week of diverse breakfast options—sweet cups when you’re craving something dessert-adjacent, savory eggs when you want traditional breakfast. Having both sweet and savory options prepped means you can choose based on mood, hunger level, or simply what sounds appealing when you open the freezer.
For those who want lighter breakfast or cold options, these cups complement Greek Yogurt Parfaits or Overnight Oats perfectly. Keep the hearty baked cups for substantial breakfast mornings or post-workout refueling, and use parfaits or oats for days when you want something lighter or more refreshing. This variety ensures you always have appropriate options regardless of your schedule or appetite on any given day.
These cups also function wonderfully beyond traditional breakfast. They make excellent afternoon snacks—the combination of complex carbs, protein, and natural sugars provides sustained energy without the crash that comes from typical snack foods. They work as pre-workout fuel when eaten 30-45 minutes before training. Some people even use them as healthy dessert, warming them and topping with vanilla Greek yogurt for a sweet ending that still aligns with wellness goals.
For a complete meal prep strategy covering all eating occasions, combine these oat cups (breakfast/snacks) with various lunch options like Mason Jar Salads, Greek Chicken Wraps, or Lemon Herb Salmon Bowls (lunch variety), Sheet Pan Chicken with Vegetables or Black Bean Farro Bowls (dinner options), and Dark Chocolate Energy Bites or Caprese Skewers (additional snacks). This comprehensive system means Sunday preparation covers every meal and snack Monday through Friday—no morning panic, no skipped meals, no desperate vending machine visits.
The beauty of having multiple freezer-friendly breakfast options (these oat cups, Baked Oatmeal Cups, Sweet Potato Pancakes, Breakfast Burritos, Egg Muffin Cups) in your regular rotation is the flexibility it creates. You can dedicate one Sunday afternoon to baking multiple breakfast recipes, freezing everything, and suddenly having two months of varied breakfasts ready. This abundance mindset—having plenty of good options always available—removes the scarcity thinking that often leads to poor food choices. When you know you have a freezer full of delicious, nutritious breakfast that takes 30 seconds to reheat, you’re never tempted by drive-through breakfast sandwiches or skipping meals entirely because you lack better options.
This final recipe exemplifies the philosophy that’s been woven throughout this entire meal prep collection: food should support your life, not complicate it. Meal prep should make eating well easier, not turn it into another stressful obligation. And most importantly, healthy food should taste good enough that you genuinely want to eat it, not just tolerate it for results. These peanut butter banana oat cups—simple, delicious, nutritious, and freezer-friendly—prove that all of those goals can coexist beautifully in a single recipe. When meal prep feels this effortless and rewarding, it stops being something you force yourself to do and becomes simply how you take care of yourself. And that shift, from discipline to preference, is what transforms temporary healthy eating experiments into permanent patterns that last lifetimes.
Peanut Butter Banana Oat Cups
This peanut butter banana oat cups recipe transforms simple pantry staples into naturally sweetened, portable breakfast that freezes beautifully and reheats in seconds for grab-and-go mornings.
12
servings10
minutes20
minutes180
kcal30
minutesIngredients
2 cups rolled oats
1 cup ripe banana, mashed
1 cup peanut butter
0.5 cup honey
1 teaspoon vanilla extract
0.5 teaspoon baking powder
0.25 teaspoon salt
0.5 cup chocolate chips
Directions
- Preheat the oven to 350°F (175°C). Grease a muffin tin or line with silicone muffin liners.
- In a large bowl, combine rolled oats, baking powder, and salt.
- In a separate bowl, whisk together mashed banana, peanut butter, honey, and vanilla extract until smooth.
- Pour the wet ingredients into the dry ingredients and stir until just combined.
- Fold in the chocolate chips.
- Spoon the mixture evenly into the prepared muffin tin.
- Bake for 18-20 minutes or until the tops are golden brown and firm to touch.
- Remove from oven and let cool in the pan for 10 minutes before transferring to a wire rack to cool completely.
Nutrition Facts
- Total number of serves: 4
- Calories: 180kcal
- Cholesterol: 0mg
- Sodium: 620mg
- Potassium: 400mg
- Sugar: 8g
- Protein: 6g
- Calcium: 60mg
- Iron: 2mg
About This Author

Aurora Wright
Pastry Chef & Dessert Editor
Aurora is the sweet side of Daily Dish. A trained pastry chef and dessert stylist, she’s responsible for our mouth-watering cakes, cookies, and confections. She brings precision, artistry, and a touch of whimsy to every recipe she creates — and taste-tests more chocolate than she’ll admit.
Favorite dish: Flourless dark chocolate torte.
Kitchen motto: “Life’s too short to skip dessert.”


