

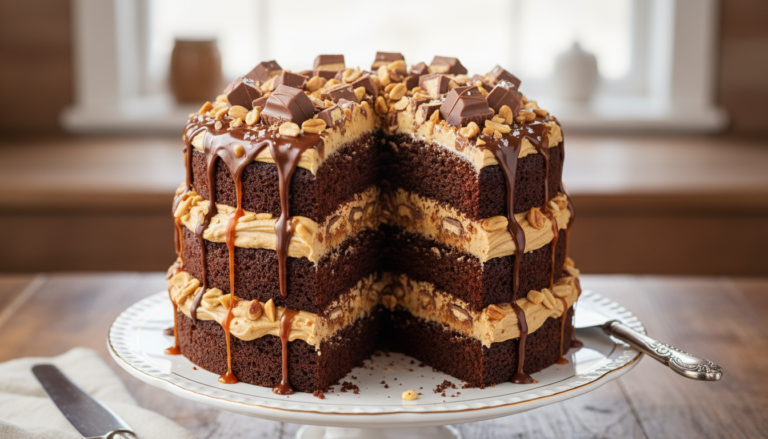
Let’s be honest: sometimes you need a cake that makes people gasp when you bring it to the table. The Snickers Layer Cake is that cake. I developed this recipe after realizing that the Snickers bar—with its perfect balance of chocolate, caramel, peanuts, and nougat-like texture—is basically a blueprint for dessert perfection. Why not translate those iconic flavors into a towering layer cake that feeds a crowd and creates the kind of dessert moment people talk about for weeks?
What makes this cake so irresistible is the textural contrast in every single bite. You’ve got the tender, deeply chocolatey cake layers that practically melt on your tongue. Then you hit the gooey caramel that oozes between the layers, followed by the satisfying crunch of roasted peanuts, and finally that cloud of lightly sweetened whipped cream that brings everything together. It’s a symphony of textures and flavors, and each element plays its part perfectly.
I’ll admit, this isn’t an everyday cake—it’s a special occasion showstopper. But here’s the secret: it’s not nearly as difficult as it looks. The chocolate cake is straightforward (and incredibly moist thanks to the boiling water trick), the whipped cream comes together in minutes, and the assembly is just layers of deliciousness stacked high. The hardest part is waiting for it to chill before slicing, but trust me, the anticipation is worth it. This cake delivers drama, indulgence, and pure joy in every forkful.
─────────
The Inspiration Behind This Recipe
I’ve always been fascinated by how candy bars achieve such perfect flavor balance. The Snickers bar in particular is a masterclass in contrasts: sweet and salty, soft and crunchy, rich and satisfying. I started thinking about how to capture that magic in cake form—not just as a gimmick, but as a legitimate, crave-worthy dessert that could stand on its own.
The inspiration crystallized when I was working on a birthday cake for a client who specifically requested “something with chocolate, caramel, and peanuts—like a Snickers, but make it fancy.” Challenge accepted. I knew I needed a chocolate cake base that was moist enough to hold up to all those toppings without becoming soggy, a caramel layer that stayed gooey but didn’t make the cake slide apart, and enough peanuts to provide crunch without overwhelming the other flavors.
After several test batches (my kitchen smelled amazing for weeks), I landed on this version. The whipped cream was a deliberate choice over traditional buttercream—I wanted something lighter that wouldn’t compete with the richness of the caramel and chocolate. The result exceeded my expectations. This cake captures everything that makes a Snickers bar addictive, but elevated into something worthy of your most important celebrations.
─────────
A Brief History of Layer Cakes & Candy Bar Desserts
Layer cakes as we know them became popular in the mid-19th century when chemical leaveners like baking powder and baking soda became widely available, allowing bakers to create lighter, taller cakes. The tradition of stacking multiple cake layers with filling between them originated in Europe but was enthusiastically adopted and adapted by American bakers, who saw the potential for creating dramatic, impressive desserts.
The Snickers bar itself was introduced in 1930 by the Mars family and named after their favorite horse. It quickly became one of the most popular candy bars in the world, beloved for its satisfying combination of peanuts, caramel, and milk chocolate. The “candy bar cake” trend emerged in the late 20th century as home bakers began translating their favorite candy flavors into cake form—Reese’s cakes, Milky Way cakes, and of course, Snickers cakes.
What makes candy-inspired cakes so appealing is the element of surprise and nostalgia. Adults who grew up enjoying these candy bars get to experience those familiar flavors in a new, elevated context. It’s comfort food meets celebration, and that combination is irresistible. This Snickers Layer Cake honors that tradition while delivering professional-bakery quality in your home kitchen.
─────────
Why This Baking Method Works
The chocolate cake formula is specifically designed for moisture and structure. Using both baking powder and baking soda creates the perfect rise and crumb texture. The combination of milk and oil (rather than just butter) ensures the cake stays incredibly moist—oil doesn’t solidify when cold like butter does, which keeps the texture tender even after refrigeration.
The boiling water addition is the secret weapon. Adding boiling water to chocolate cake batter might seem strange—the batter becomes quite thin—but this technique “blooms” the cocoa powder, intensifying the chocolate flavor dramatically. It also creates an incredibly tender, almost pudding-like texture in the finished cake. The thin batter bakes up into a cake that’s structured enough to stack but soft enough to melt in your mouth.
Whipped cream instead of buttercream is a strategic choice. Traditional buttercream can be heavy and overly sweet, especially when combined with caramel and chocolate. Lightly sweetened whipped cream provides richness and moisture without overwhelming the palate. It also has a lighter, more delicate texture that allows the caramel and peanuts to shine.
Layering the fillings creates textural interest. By spreading caramel on each cake layer, then adding peanuts, then the next cake layer, you create distinct zones of flavor and texture. Each bite includes all the elements, but they maintain their individual characteristics rather than blending into mush. The caramel acts as “glue” that helps the peanuts adhere and adds moisture, while the peanuts provide essential crunch.
Chilling before serving is crucial. This allows the caramel to set slightly, the whipped cream to firm up, and all the flavors to meld together. It also makes the cake infinitely easier to slice cleanly—warm cake with gooey caramel is delicious but messy.
─────────
Flavor Profile: What to Expect
Deep, rich chocolate forms the foundation—this isn’t a subtle chocolate flavor. The cake is intensely cocoa-forward with a slightly bittersweet edge that balances the sweetness of the other components. It’s moist and tender with a fine, velvety crumb that practically dissolves on your tongue.
Gooey, buttery caramel provides sweetness and that signature Snickers stickiness. The caramel soaks slightly into the cake layers where they touch, creating pockets of concentrated sweetness. It’s rich and indulgent with that characteristic burnt-sugar complexity that makes caramel so addictive.
Crunchy, salty peanuts add essential textural contrast and a savory element that prevents the cake from being one-dimensionally sweet. The roasted peanut flavor is nutty, slightly earthy, and provides those satisfying crunchy moments that make each bite interesting. The salt in the peanuts amplifies all the other flavors—it’s the secret ingredient that makes everything taste more intense.
Light, airy whipped cream acts as the neutral mediator between all these bold flavors. It’s subtly sweet with pure dairy richness, and its cloud-like texture provides cooling contrast to the dense cake and sticky caramel. The whipped cream also adds visual drama—that white topping covered with dripping caramel looks absolutely stunning.
The overall experience is indulgent and complex. Each bite delivers multiple textures (soft, gooey, crunchy, creamy) and a perfect balance of sweet and salty. It tastes exactly like a Snickers bar but somehow more sophisticated—grown-up candy bar nostalgia in the best possible way.
─────────
Tips for Making the Best Snickers Layer Cake
For Perfect Chocolate Cake Layers:
- Measure flour correctly by spooning it into your measuring cup and leveling off. Scooping directly from the bag compacts the flour and can result in dry, dense cake.
- Use Dutch-process cocoa if possible for deeper chocolate flavor and darker color, though natural cocoa works too.
- Don’t skip the boiling water. Yes, the batter will be very thin—this is intentional and creates the signature moist texture.
- Grease AND flour your pans thoroughly, or line with parchment circles on the bottom. Chocolate cake tends to stick more than other cakes.
- Don’t overbake. Start checking at 30 minutes—the cake is done when a toothpick inserted in the center comes out with just a few moist crumbs. Overbaking creates dry cake that won’t absorb the caramel properly.
- Cool completely before assembly. Warm cake will melt your whipped cream and make everything slide apart.
Caramel Considerations:
- Use quality store-bought caramel sauce for easiest results. Look for brands like Ghirardelli or Torani in the ice cream aisle.
- Warm the caramel slightly before spreading for easier application—30 seconds in the microwave makes it more pourable.
- Don’t be shy with the caramel. You want enough that it soaks slightly into the cake and creates that gooey center, but not so much that the layers slide around.
- Save some caramel for the dramatic drizzle on top—presentation matters!
Peanut Preparation:
- Use roasted, salted peanuts for best flavor. Raw peanuts lack that essential roasted depth and the salt is crucial for balancing sweetness.
- Chop peanuts coarsely or use whole depending on your preference. I like a mix of sizes—some larger pieces for dramatic crunch, some smaller for distribution.
- Toast peanuts briefly in a 350°F oven for 5-7 minutes if they seem stale—this revives their flavor and makes them extra crunchy.
Whipped Cream Success:
- Chill everything: Bowl, beaters, and cream should all be very cold. This helps the cream whip faster and achieve better volume.
- Use heavy whipping cream (36-40% fat) for best stability. Light cream won’t whip properly.
- Whip to stiff peaks for this cake since it needs to support the weight of the top layer and hold up during slicing.
- Don’t overwhip or you’ll make butter. Stop when peaks stand straight up but the cream still looks smooth and glossy.
- Add confectioners’ sugar gradually while whipping—this sweetens and helps stabilize the cream.
Assembly Strategy:
- Level your cake layers by slicing off any domed tops for even stacking. Save the scraps for snacking!
- Use a cake board or sturdy plate as your base—this cake gets heavy.
- Apply gentle pressure when stacking layers to ensure good contact with the caramel, but not so much that filling oozes out the sides.
- “Crumb coat” first if you want bakery-perfect results: spread a thin layer of whipped cream over the entire cake, chill for 30 minutes, then apply the final smooth layer.
- Drizzle caramel artistically for the final touch—let it drip down the sides for that dramatic, professional look.
─────────
Serving Suggestions and Presentation Ideas
Birthday Party Showstopper: Present the whole cake on a cake stand or elevated platter with extra caramel sauce and chopped peanuts scattered around the base. Add birthday candles arranged in a circle on top. The height and drama of this cake make it perfect as a centerpiece. Serve generous slices with vanilla ice cream melting down the sides.
Elegant Plated Dessert: Cut neat slices and place on individual dessert plates. Drizzle caramel sauce in an artistic pattern on the plate first, then place the slice on top. Add a small quenelle of whipped cream on the side and a few whole roasted peanuts for garnish. Finish with a light dusting of cocoa powder around the plate rim for restaurant-quality presentation.
Casual Celebration: Serve directly from a serving platter with a cake server and dessert plates stacked nearby. Keep extra caramel sauce in a small pitcher for those who want extra drizzle. This cake is impressive enough that it doesn’t need fancy presentation—the layers speak for themselves. Pair with cold milk or coffee for a satisfying, nostalgic combination.
Picnic or Potluck Style: If transporting, keep the cake chilled until serving and bring extra whipped cream and caramel in separate containers for touch-ups. The peanuts on top may get slightly soft, so have fresh peanuts available to sprinkle just before serving for optimal crunch.
Over-the-Top Indulgence: For chocolate and candy lovers, serve slices topped with chocolate ice cream, additional hot fudge sauce, more whipped cream, and crushed Snickers bar pieces on top. It’s excessive, it’s indulgent, and it’s exactly what some celebrations call for.
─────────
Storage, Reheating, and Make-Ahead Tips
Storage:
- Refrigerator: Store covered loosely with plastic wrap or in a cake carrier in the refrigerator for up to 4 days. The whipped cream requires refrigeration, so this cake cannot be left at room temperature.
- Freezer: You can freeze individual slices wrapped tightly in plastic wrap, then foil, for up to 2 months. Thaw overnight in the refrigerator. The texture of the whipped cream may change slightly after freezing, but it’s still delicious.
- Cake Layers Only: Bake cake layers ahead and freeze wrapped tightly for up to 3 months. Thaw completely, then assemble fresh with caramel, peanuts, and whipped cream on serving day.
Make-Ahead Strategy: This cake is excellent for make-ahead entertaining with proper planning:
- Bake cake layers 1-2 days ahead, wrap well, and store at room temperature
- Assemble the cake the day before serving—the overnight chill actually improves flavor and texture
- Add final caramel drizzle and peanut garnish just before serving for the freshest presentation
- Whip cream the day you assemble for best stability (whipped cream deflates over time)
For maximum advance prep, you can bake layers up to a week ahead and refrigerate them (wrapped tightly), or freeze them for up to 3 months.
Serving from Refrigerator: This cake is best served cold from the refrigerator—the chilled temperature keeps the whipped cream stable and the caramel at the perfect gooey consistency. However, if you prefer, you can let slices sit at room temperature for 10-15 minutes before eating to soften the texture slightly. Don’t let the whole cake sit out for more than 30 minutes or the whipped cream will begin to weep and soften.
Slice with Confidence: Use a long, sharp knife dipped in hot water and wiped dry between each cut for the cleanest slices. The caramel and peanuts can make cutting tricky, but the hot knife glides right through. Wipe the knife clean after each slice to maintain beautiful presentation.
─────────
Why This Recipe Deserves a Spot in Your Rotation
Snickers Layer Cake is the definition of a celebration dessert—it’s big, it’s bold, it’s unapologetically indulgent, and it makes people genuinely excited. This isn’t the cake you make for a quiet Tuesday dinner. This is the cake you make when you want to create a moment, when you want people to remember your party, when you want to hear actual gasps of delight when you walk in carrying it.
What I love most is how this cake democratizes fancy dessert-making. Yes, it looks impressive and professional, but the techniques are all straightforward. If you can make a basic chocolate cake and whip cream, you can make this showstopper. The assembly is forgiving—layers don’t have to be perfectly level, caramel drips are charming rather than problematic, and whipped cream is naturally beautiful even if you’re not a professional cake decorator.
The flavor combination is universally appealing. I’ve served this cake to children, teenagers, adults, and grandparents—everyone loves it. The Snickers bar is so iconic that people immediately understand what they’re getting, which creates excitement even before they taste it. And then they taste it, and it exceeds expectations every time. The balance of flavors is just right—not too sweet despite the caramel, not too heavy despite the richness, not overwhelming despite having so many components.
This cake also has staying power. Unlike some desserts that are delicious on day one but decline rapidly, this cake actually improves after a day in the refrigerator. The flavors meld, the caramel soaks into the cake just enough to create incredible moisture, and everything settles into perfect harmony. Leftovers (if there are any) are even better than the first slice.
If you’re looking for a dessert that creates genuine excitement, that makes people reach for their phones to take pictures, that starts conversations and becomes the highlight of the meal—this is it. Snickers Layer Cake isn’t just dessert; it’s an experience. And in a world where we could all use a little more joy and celebration, that’s exactly what we need.
─────────
Recommended Drink Pairing
Coffee – Bold Dark Roast or Espresso: A strong, bold coffee or espresso is the classic choice with this rich chocolate cake. The bitter notes cut through the sweetness and caramel while enhancing the chocolate flavor. An Americano or cappuccino provides similar balance with a bit more body. This pairing feels sophisticated and helps cleanse the palate between bites.
Milk – Cold Whole Milk: Sometimes the best pairings are the simplest. Cold whole milk is nostalgic and perfect with this candy-inspired cake—it’s what you’d drink with an actual Snickers bar, and it works just as beautifully here. The creamy richness cools your palate and balances the sweet-salty flavors. This pairing feels comforting and approachable, perfect for family celebrations.
Stout Beer – Chocolate or Coffee Stout: For adults, a chocolate stout or coffee stout creates a sophisticated pairing that echoes the cake’s flavors. The roasted malt notes complement the chocolate, the slight bitterness balances the caramel, and the creamy texture matches the whipped cream. Try beers like Young’s Double Chocolate Stout or Left Hand Milk Stout for excellent results.
Dessert Wine – Tawny Port: A Tawny Port with its caramel and nutty notes creates a harmonious pairing that feels indulgent and elegant. The wine’s sweetness matches the cake’s richness, while its complexity adds depth to each bite. This pairing elevates the dessert experience and works beautifully for special dinner parties or anniversary celebrations.
Hot Chocolate – Rich and Dark: Double down on chocolate with rich, dark hot chocolate made with real cocoa (not the powdered mix). The warmth provides lovely contrast to the chilled cake, and the pure chocolate flavor enhances every element. Top with whipped cream and a drizzle of caramel for an over-the-top chocolate experience.
Snickers Layer Cake
Snickers Layer Cake delivers everything you love about the iconic candy bar in towering cake form—rich chocolate layers, gooey caramel, crunchy peanuts, and billowy whipped cream for the ultimate indulgent dessert.
12
servings1
hour45
minutes650
kcal1
hour45
minutesIngredients
2 cups all-purpose flour
1.5 cups granulated sugar
1 cup unsweetened cocoa powder
1.5 teaspoons baking powder
1.5 teaspoons baking soda
1 teaspoon salt
2 large eggs
1 cup milk
0.5 cup vegetable oil
2 teaspoons vanilla extract
1 cup boiling water
1.5 cups caramel sauce
2 cups peanuts
2 cups heavy whipping cream
3 tablespoons confectioners’ sugar
Directions
- Preheat the oven to 350 degrees Fahrenheit. Grease and flour two 9-inch round cake pans for even baking.
- In a large bowl, combine flour, sugar, cocoa powder, baking powder, baking soda, and salt. Mix until well combined.
- Add eggs, milk, oil, and vanilla to the dry ingredients. Beat on medium speed for 2 minutes until smooth.
- Stir in the boiling water by hand, mixing until the batter is thin and fully combined.
- Divide the batter evenly between the prepared pans and bake for 30-35 minutes, or until a toothpick inserted comes out clean.
- Cool the cakes in pans for 10 minutes, then remove from pans and transfer to wire racks to cool completely.
- For the filling and topping, whip the cream with confectioners’ sugar until stiff peaks form and set aside.
- Once cakes are cooled, place one layer on a serving plate. Spread a generous layer of caramel sauce over it.
- Sprinkle a cup of peanuts over the caramel for added texture and crunch.
- Place the second cake layer on top and repeat the caramel and peanut layer.
- Cover the entire cake with whipped cream for a smooth finish.
- Drizzle additional caramel sauce over the whipped cream and garnish with remaining peanuts.
Nutrition Facts
- Total number of serves: 4
- Calories: 650kcal
- Cholesterol: 0mg
- Sodium: 620mg
- Potassium: 400mg
- Sugar: 8g
- Protein: 6g
- Calcium: 60mg
- Iron: 2mg
About This Author

Aurora Wright
Pastry Chef & Dessert Editor
Aurora is the sweet side of Daily Dish. A trained pastry chef and dessert stylist, she’s responsible for our mouth-watering cakes, cookies, and confections. She brings precision, artistry, and a touch of whimsy to every recipe she creates — and taste-tests more chocolate than she’ll admit.
Favorite dish: Flourless dark chocolate torte.
Kitchen motto: “Life’s too short to skip dessert.”


