Daily Dish

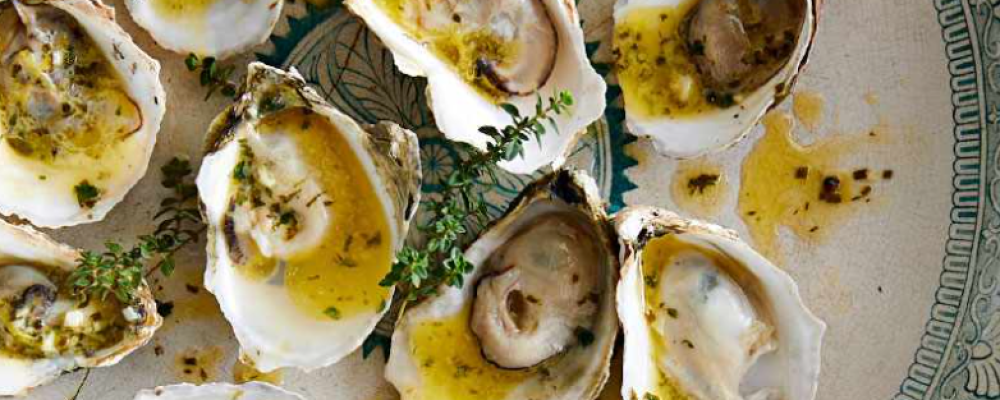
Smoky Grilled Oysters with Garlic Herb Butter

Healthy Fact of the Day

Oysters are not only a delicacy but also a sustainable seafood choice. They help filter and clean the water in which they grow, with a single oyster capable of filtering up to 50 gallons of water per day, promoting a healthier ecosystem for other marine life.

Ingredients


  • 24 fresh oysters, shucked
  • 1/2 cup unsalted butter, softened
  • 4 garlic cloves, minced
  • 2 tbsp fresh parsley, finely chopped
  • 1 tbsp fresh thyme leaves
  • 1 tbsp fresh lemon juice
  • 1/2 tsp smoked paprika
  • 1/4 tsp salt
  • 1/4 tsp black pepper
  • Lemon wedges for serving
  • Hot sauce (optional)


Instructions

  1. Preheat your grill to medium-high heat (about 400°F or 200°C).
  2. In a small bowl, mix the softened butter, minced garlic, chopped parsley, thyme leaves, lemon juice, smoked paprika, salt, and black pepper until well combined.
  3. Arrange the shucked oysters on a baking sheet or tray, keeping them as level as possible to prevent the juices from spilling.
  4. Place a small dollop (about 1 teaspoon) of the garlic herb butter mixture on top of each oyster.
  5. Carefully transfer the oysters to the preheated grill, using tongs or a spatula to keep them level. Close the grill lid and cook for 4-6 minutes, or until the oysters are slightly plump and the butter is melted and bubbly.
  6. Using tongs, carefully remove the grilled oysters from the grill and transfer them to a serving platter.
  7. Serve the smoky grilled oysters immediately with lemon wedges and hot sauce (if desired) on the side.


Indulge in the briny, buttery goodness of these smoky grilled oysters, where the delicate flavors of the sea mingle with the rich, aromatic garlic herb butter, creating a mouthwatering delicacy that’ll transport your senses to the rugged coastlines and salty sea breezes of your favorite seaside retreat!


Recent Recipes

Stuffed Italian Meatloaf

  • August 27, 2026
  • 6 min read

Why You’re Supposed to Let Meat Rest

  • August 27, 2026
  • 4 min read

French Onion Steak Pinwheels

  • August 27, 2026
  • 13 min read

Slow Cooker Chicken Shawarma

  • August 27, 2026
  • 6 min read

Most Olive Oil Labels Are Telling You

  • August 27, 2026
  • 4 min read

Air Fryer Coconut Shrimp Tacos

  • August 27, 2026
  • 11 min read

One Pot Beef & Noodles

  • August 27, 2026
  • 5 min read

The Dish You Make When You Don’t

  • August 27, 2026
  • 4 min read

Loaded Taco Deviled Eggs

  • August 27, 2026
  • 13 min read

Baked Queso Chicken

  • August 27, 2026
  • 6 min read

Tip of the Day

“Always let your meat rest before slicing.”

Whether you're roasting a chicken, grilling steak, or baking pork tenderloin, letting cooked meat rest for 5–10 minutes before slicing allows the juices to redistribute evenly. This simple step keeps your meat juicy and tender, ensuring every bite is flavorful and moist. Bonus: It gives you a moment to plate your sides or garnish for a perfect presentation!

Our Latest Recipes

Entrees
Benjamin Brown

Stuffed Italian Meatloaf

Spinach adds iron, fiber, and vitamins to this dish, sneaking in extra nutrition without changing the comforting, cheesy flavor everyone loves.

Read More »
Blog
Daily Disher

Why You’re Supposed to Let Meat Rest (And What Happens If You Don’t)

Letting meat rest before slicing helps retain more of its natural juices, which also means retaining more of the B vitamins and minerals like iron and zinc that would otherwise be lost onto the cutting board — and resting meat away from direct heat also reduces the formation of certain compounds linked to prolonged high-heat exposure.

Read More »
Entrees
Amelia Grace

French Onion Steak Pinwheels

Flank steak is a naturally lean cut rich in protein, iron, and zinc—caramelized onions develop deep sweetness without any added sugar, making this an indulgent-tasting dish that’s more nutritious than it appears.

Read More »

Get your daily dose of delicious!

Skip to content












