Daily Dish

Homemade Pita Bread

Healthy Fact of the Day

Pita bread is a good source of complex carbohydrates, providing energy and dietary fiber. It also contains various vitamins and minerals, making it a nutritious option for sandwiches, dips, or accompaniments to meals.

Ingredients


  • 1 cup warm water (105-115°F)
  • 1 teaspoon active dry yeast
  • 1 teaspoon sugar
  • 1 teaspoon salt
  • 2 1/2 cups all-purpose flour, plus more for dusting
  • 1 tablespoon olive oil


Instructions

  1. In a large bowl, combine the warm water, yeast, and sugar. Stir and let the mixture rest for 5-10 minutes until it becomes frothy, indicating that the yeast is active.

  2. Add the salt, olive oil, and 2 cups of the flour to the yeast mixture. Using a wooden spoon or your hands, mix everything together until a shaggy dough forms.

  3. Turn the dough out onto a lightly floured surface and knead for about 5 minutes, gradually adding the remaining 1/2 cup of flour as needed, until the dough becomes smooth and elastic.

  4. Place the dough in a lightly greased bowl, cover with a damp cloth or plastic wrap, and let it rise in a warm place for 1 hour, or until doubled in size.

  5. Once the dough has risen, punch it down to release the air bubbles.

  6. On a lightly floured surface, divide the dough into 8 equal pieces.

  7. Using a rolling pin, roll each piece into a circle, about 6-8 inches in diameter and 1/4 inch thick.

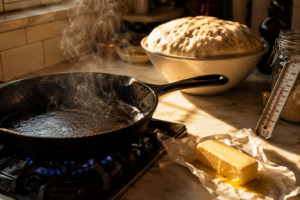
  8. Preheat a cast-iron skillet or griddle over medium-high heat.

  9. Cook the pita breads one at a time for 2-3 minutes per side, or until lightly puffed and speckled with brown spots.

  10. Transfer the cooked pita breads to a plate and cover with a clean kitchen towel to keep them warm and soft until ready to serve.

Enjoy these homemade pita breads, perfect for stuffing with your favorite fillings or serving alongside dips and spreads for a delicious and versatile addition to your meals.

Recent Recipes

Southwest Egg Rolls

  • February 5, 2026
  • 7 min read

Slow Cooker Apple Butter Glazed Pork Tenderloin

  • February 4, 2026
  • 6 min read

Tuscan Mac & Cheese

  • February 4, 2026
  • 1 min read

Instant Pot Mexican Beef Barbacoa Tacos

  • February 3, 2026
  • 1 min read

Roasted Garlic White Chicken Pizza

  • February 3, 2026
  • 1 min read

Oatmeal Banana Bars

  • February 2, 2026
  • 1 min read

Chicken Sausage and Broccoli Orzo

  • February 2, 2026
  • 1 min read

Bananas Foster Cobbler

  • February 1, 2026
  • 1 min read

Mexican Style Street Potatoes

  • February 1, 2026
  • 1 min read

Chocolate Croissant Breakfast Bake

  • January 31, 2026
  • 1 min read

Tip of the Day

“Always let your meat rest before slicing.”

Whether you're roasting a chicken, grilling steak, or baking pork tenderloin, letting cooked meat rest for 5–10 minutes before slicing allows the juices to redistribute evenly. This simple step keeps your meat juicy and tender, ensuring every bite is flavorful and moist. Bonus: It gives you a moment to plate your sides or garnish for a perfect presentation!

Our Latest Recipes

Appetizers
Daily Disher

Southwest Egg Rolls

Black beans provide protein and fiber that help keep you satisfied. Baking these egg rolls instead of frying can reduce oil intake while still achieving a crispy texture.

Read More »
Entrees
Daily Disher

Slow Cooker Apple Butter Glazed Pork Tenderloin

Adding spinach increases iron, vitamins A and K, and fiber while sun-dried tomatoes provide concentrated lycopene and intense flavor. This makes traditional mac and cheese more nutritious without sacrificing comfort.

Read More »
Entrees
Daily Disher

Tuscan Mac & Cheese

Adding spinach increases iron, vitamins A and K, and fiber while sun-dried tomatoes provide concentrated lycopene and intense flavor. This makes traditional mac and cheese more nutritious without sacrificing comfort.

Read More »

Get your daily dose of delicious!

Skip to content