

As a pastry chef, I’m always fascinated by desserts that use chemistry instead of heat to achieve their magic, and key lime pie is one of the most elegant examples. The way acidic lime juice interacts with the proteins in sweetened condensed milk to create a perfectly set, silky filling without any baking is genuinely brilliant. It’s science you can eat, and it happens to taste like sunshine and vacation all rolled into one perfect bite.
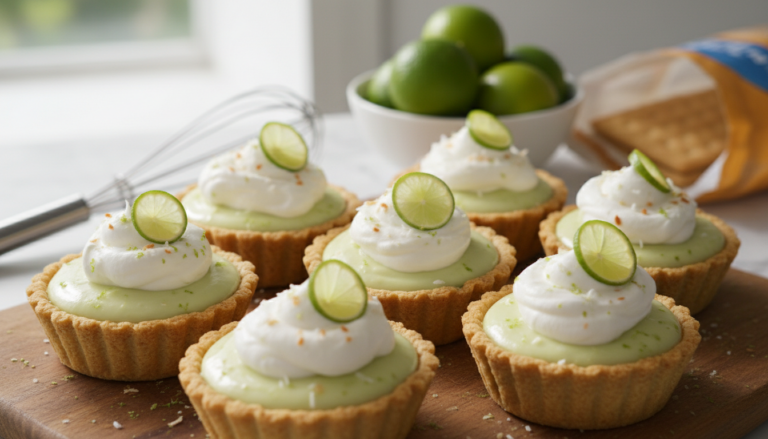
What I love most about these No-Bake Mini Key Lime Pies is how they take a classic Florida dessert and make it even more charming through miniaturization. Individual desserts always feel more special—there’s something delightful about having your own personal pie rather than a slice of a larger one. Plus, from a pastry perspective, the mini format solves several technical challenges: easier portion control, no risk of a soggy center from cutting through a large pie, and better ratio of crust to filling in every bite.
The flavor profile here is exactly what key lime pie should be: aggressively tart lime balanced by sweet condensed milk, with that buttery graham cracker crust providing textural contrast and the whipped cream adding a cooling, creamy finish. The lime has to be bold enough to cut through all that richness, and fresh juice is absolutely non-negotiable—bottled juice simply doesn’t have the bright, aromatic quality that makes this dessert sing. When you get that balance right, you create something that’s simultaneously rich and refreshing, indulgent and palate-cleansing. That’s the kind of complexity I live for in desserts.
─────────
The Inspiration Behind This Recipe
I developed this recipe after becoming obsessed with the chemistry of no-bake pies during my pastry training. Key lime pie is one of those desserts where understanding the science makes you a better baker. The acid in lime juice denatures the proteins in condensed milk, causing them to unwind and bond together in a network that traps liquid and creates that characteristic silky, set texture. It’s the same principle behind ceviche or cheesemaking—acid changing protein structure to create something entirely new.
What fascinated me was how different ratios of lime juice to condensed milk produced dramatically different results. Too little lime and the filling doesn’t set properly; too much and it becomes grainy or separated. The sweet spot is roughly 1/2 cup of lime juice to one 14-ounce can of condensed milk, which creates the perfect balance of flavor and texture. I tested this ratio extensively in mini format to ensure it worked just as reliably in small portions as in traditional full-size pies.
The mini format came from my observation that key lime pie is often so intensely flavored that a full slice can feel overwhelming. Individual portions allow people to enjoy that bold lime flavor in a more manageable serving. From a presentation standpoint, mini desserts are also inherently more elegant—they show attention to detail and care in portioning. And practically speaking, they’re much easier to serve at parties than slicing and plating a large pie while guests wait.
─────────
A Brief History of Key Lime Pie
Key lime pie is Florida’s official state pie, and its history is a perfect example of how necessity breeds culinary innovation. The dessert likely emerged in the late 1800s in the Florida Keys, where isolation, lack of refrigeration, and limited supply routes meant residents relied heavily on shelf-stable ingredients. Sweetened condensed milk—invented in 1856 by Gail Borden—became a pantry staple because it didn’t require refrigeration and provided a reliable source of dairy in a tropical climate.
Key limes, small and aromatic limes native to the region, grew abundantly in backyards throughout the Keys. Someone—we don’t know exactly who—discovered that the acid in key lime juice reacted with sweetened condensed milk to create a filling that set up on its own without cooking or eggs. This was revolutionary for an era when reliable refrigeration and ovens were scarce. The graham cracker crust came later, as commercially produced graham crackers became available in the early 20th century.
Traditional key lime pie featured meringue topping, which could be quickly browned over an open flame or in a hot oven. However, whipped cream has become equally popular and is arguably more stable and easier for home bakers. Some purists insist on using actual key limes, but even professional pastry chefs often use regular Persian limes, which are easier to juice, more readily available, and produce excellent results.
The dessert gained national fame through mid-20th century tourism and food writing. In 2006, Florida officially designated key lime pie as the state pie, recognizing its cultural significance. Today, it’s beloved far beyond Florida as one of America’s most iconic desserts—a perfect balance of sweet, tart, creamy, and crunchy that represents the best of American regional pastry.
─────────
Why This No-Bake Method Works
The acid-protein reaction creates structure without heat. When acidic lime juice (pH around 2) meets the casein proteins in sweetened condensed milk, the acid causes these proteins to denature—their molecular structure unfolds and then bonds together in a new configuration, creating a gel-like matrix that traps liquid. This process, called acid coagulation, is the same mechanism that creates yogurt, cheese, and ceviche. As the mixture sits and chills, this protein network strengthens, creating a filling that’s firm enough to slice yet still luxuriously creamy.
Sweetened condensed milk is essential, not substitutable. Regular milk lacks the concentrated protein and sugar needed for this reaction to produce the right texture. Condensed milk has had about 60% of its water removed through evaporation, then sugar is added—usually about 40-45% of the final product is sugar. This high sugar concentration serves multiple purposes: it provides sweetness, acts as a preservative, contributes to the smooth mouthfeel, and helps stabilize the protein structure. The thick consistency also means the filling has enough body to set properly rather than remaining liquid.
Fresh lime juice is technically superior. Bottled lime juice is pasteurized, which affects its pH and destroys many of the volatile aromatic compounds that give fresh lime its distinctive flavor. Fresh-squeezed juice has the optimal acidity level (around 2.0-2.4 pH) for the protein coagulation reaction. It also contains essential oils and flavor compounds that create that bright, vibrant lime taste. From a pastry perspective, using fresh juice isn’t just about flavor—it’s about ensuring the chemical reaction proceeds correctly for optimal texture.
Lime zest amplifies flavor through aromatics. The colored part of lime peel contains oil glands packed with limonene and other aromatic compounds. These oils are incredibly potent and provide intense lime flavor without adding liquid or acidity that could affect the texture. Professional pastry chefs always zest citrus for maximum flavor impact—it’s one of the simplest ways to elevate any citrus-based dessert.
The graham cracker crust provides essential contrast. From a textural standpoint, the sandy, crunchy crust is crucial for preventing the dessert from being one-dimensionally smooth and creamy. The butter acts as a binder, coating each crumb and helping them adhere when pressed firmly. No pre-baking is required if you press firmly enough—the butter solidifies when chilled, creating sufficient structure. That said, a 10-minute bake at 350°F creates an even sturdier crust with slightly deeper flavor from toasting the graham crackers.
Chilling time allows the reaction to complete. The acid-protein coagulation happens gradually, not instantly. While the filling begins to thicken within minutes of mixing, it needs at least 2 hours in the refrigerator for the protein network to fully develop and for the filling to reach its optimal firm-yet-creamy consistency. Overnight chilling produces even better results—the texture becomes more stable and sliceable, and the flavors have time to meld and mature.
Individual portions optimize the crust-to-filling ratio. In full-size pies, the center often has too much filling relative to crust. Mini pies ensure every bite includes both elements in perfect proportion. This isn’t just aesthetic—it’s about achieving the ideal balance of textures and flavors in every single forkful.
─────────
Flavor Profile: What to Expect
Assertive, tart lime flavor dominates in exactly the way it should—this is not a subtle dessert. The lime hits your palate immediately with bright, acidic punch that makes you sit up and pay attention. Fresh lime juice has an intensity and complexity that bottled juice can’t match, with layers of flavor beyond just “sour”—there’s floral notes, aromatic depth, and that distinctive lime character that’s slightly different from lemon.
Rich, caramelized sweetness from condensed milk provides essential balance. Sweetened condensed milk has a unique flavor profile—it’s not just sweet, it has almost vanilla-like, caramelized notes from the cooking process used to reduce the milk. This complexity prevents the dessert from tasting like simple “sweet plus sour”—there’s depth and richness that makes it more sophisticated than you might expect from such simple ingredients.
Silky, dense creaminess defines the texture. The filling is substantial—it has weight and richness—but it’s not heavy or cloying. It’s perfectly smooth with no graininess, no iciness, just pure silky texture that coats your tongue. The density is important—this isn’t light and airy like mousse, it’s concentrated and luscious, which is what makes the whipped cream topping such an important textural counterpoint.
Buttery, honey-sweet graham cracker crust grounds everything. Graham crackers have a distinctive flavor—slightly sweet, with honey notes and that characteristic whole wheat character. The butter adds richness and helps create that satisfying crunch. The crust provides not just texture but also a slight saltiness that enhances all the other flavors.
Light, airy whipped cream offers cooling relief. Real whipped cream has pure dairy sweetness and a cloud-like texture that provides a moment of softness before you dive back into the dense filling and crunchy crust. It’s the palate cleanser, the breath of fresh air, the element that makes you ready for another bite.
The overall experience is bold and balanced. These pies are unapologetically tart—if you prefer mild desserts, this might be too intense for you. But for those who love that sweet-tart contrast, who appreciate desserts with backbone and personality, this is perfection. It’s refreshing without being light, rich without being heavy, simple in composition but complex in flavor.
─────────
Tips for Making the Best No-Bake Mini Key Lime Pies
Crust Construction:
- Pulse graham crackers to fine crumbs in a food processor for the most uniform texture—you want the consistency of coarse sand with no large chunks. You need about 1½ cups of crumbs (roughly one sleeve of graham crackers).
- The wet sand test: When properly mixed with butter and sugar, the mixture should hold together when squeezed in your fist but still be crumbly. Too dry and it won’t hold together; too wet and it becomes pasty rather than crispy.
- Press firmly and evenly using the bottom of a small glass or a tart tamper. The goal is to compact the crumbs into a cohesive layer with no gaps or thin spots. Pay special attention to where the bottom meets the sides—this junction can be weak if not pressed properly.
- Pre-chill the crusts for 10-15 minutes before filling to help them set and make them less likely to crumble when you add the filling.
- For extra insurance, pre-bake the crusts at 350°F for 8-10 minutes and cool completely before filling. This creates a sturdier crust with deeper toasted flavor.
Achieving Perfect Filling:
- Room temperature condensed milk mixes more smoothly than cold—let the can sit out for 30 minutes before using.
- Fresh lime juice only, always. You’ll need 6-8 medium Persian limes to yield ½ cup juice. Roll them firmly on the counter before cutting to break down cell walls and release more juice.
- Zest before juicing while limes are whole—it’s infinitely easier. Use a microplane for the finest zest and only take the green outer layer, avoiding the bitter white pith.
- Whisk vigorously for at least 1 minute to fully emulsify the juice and condensed milk. The mixture should be completely smooth and uniform in color—no streaks of unmixed condensed milk.
- The filling appears too thin when first mixed—don’t panic. It will thicken dramatically as it chills and the acid-protein reaction proceeds. Trust the chemistry.
- Fill almost to the top of your mini crusts, leaving just enough room for whipped cream. The filling won’t rise or expand, so you want generous portions.
Setting and Chilling:
- Refrigerate uncovered for the first 30-60 minutes to allow the surface to set without condensation forming, then cover loosely.
- Minimum 2 hours, ideally 4-6 hours or overnight for the firmest texture and best flavor development.
- Don’t rush the process by freezing—this disrupts the protein network and can cause the filling to separate or become icy rather than creamy.
- Arrange pies level on a baking sheet or tray in the refrigerator so the filling sets evenly.
Whipped Cream Excellence:
- Chill your bowl and beaters in the freezer for 10-15 minutes before whipping—cold equipment = better volume and faster whipping.
- Use heavy whipping cream (36-40% fat) for best results. Light cream or half-and-half won’t whip properly.
- Add 1-2 tablespoons powdered sugar and ½ teaspoon vanilla while whipping for lightly sweetened, flavored cream that complements rather than competes with the lime.
- Whip to soft or medium peaks for dolloping on top—you want it to hold its shape but still look soft and inviting, not stiff and overwhipped.
- Top just before serving for the freshest appearance, or up to 2 hours ahead if needed (refrigerate after topping).
Professional Finishing Touches:
- Pipe whipped cream using a star tip for bakery-quality presentation, or simply dollop with a spoon for rustic elegance.
- Garnish with lime zest curls made using a channel knife, or finely grated zest for color and aromatic impact.
- A thin lime wheel (slice lime very thin, then cut a slit and twist into an S-shape) creates stunning visual appeal.
- For contrast, dust with graham cracker crumbs around the whipped cream for textural interest.
─────────
Serving Suggestions and Presentation Ideas
Elegant Minimalism: Serve each mini pie on a white or pale green plate with a perfectly piped rosette of whipped cream on top and a single lime zest curl as garnish. The simplicity allows the vibrant lime filling to be the star. This presentation works beautifully for sophisticated dinner parties where restraint feels elegant.
Tropical Paradise: Top with whipped cream and sprinkle with toasted coconut flakes and crushed macadamia nuts. Add a small lime wedge on the side. The coconut enhances the Florida Keys vibe, and the presentation feels vacation-ready. Serve on turquoise or coral-colored plates for maximum tropical impact.
Deconstructed Artistry: For a modern plating approach, pipe three small dots of sweetened condensed milk on the plate, place the pie slightly off-center, add a quenelle of whipped cream beside it, and finish with graham cracker crumb “soil” and micro lime zest. This technique feels restaurant-contemporary and showcases your pastry skills.
Rustic Mason Jar Style: If you’ve made these in mason jars or clear glasses, serve them directly in the vessel—no unmolding required. The visible layers (crust, filling, cream) create beautiful visual appeal. This casual presentation is perfect for picnics, barbecues, or any gathering where easy, portable desserts are preferred.
Pastel Perfection: For showers or spring celebrations, tint your whipped cream with a drop of yellow food coloring for pale lemon-colored cream that’s softer than pure white. Top with edible flowers (pansies or violas work beautifully) for a garden-party aesthetic that’s Instagram-ready.
Professional Bakery Finish: Create a lime curd drizzle on the plate, place the pie on top, pipe whipped cream in a decorative pattern, and finish with candied lime peel and gold leaf for special occasions. This elevated presentation transforms a simple no-bake pie into something worthy of a fine dining restaurant.
─────────
Storage, Reheating, and Make-Ahead Tips
Storage:
- Refrigerator: Store covered loosely with plastic wrap or in an airtight container for up to 4 days. These pies must remain refrigerated at all times—the filling will not hold at room temperature.
- Freezer: Freeze unfrosted pies (crust and filling only) for up to 2 months. Wrap individually in plastic wrap, then aluminum foil. Thaw overnight in the refrigerator before adding whipped cream and serving. The texture remains excellent after freezing.
- With whipped cream: Once topped, consume within 24 hours for best appearance and texture. Real whipped cream will gradually weep and deflate over time.
Make-Ahead Strategy: These pies are pastry chef-approved for advance preparation—in fact, they improve with time:
- Make crusts 2-3 days ahead and store refrigerated in their molds
- Prepare and assemble pies 1-2 days before serving (without whipped cream)—the filling becomes firmer and the flavors deepen as they sit
- Whip cream and top 1-2 hours before serving for optimal freshness
This timeline allows you to complete almost all the work well in advance, leaving only the quick whipped cream topping for the final moments. For busy pastry professionals or home bakers preparing for events, this advance-prep capability is invaluable.
Serving Temperature: These pies are designed to be served cold from the refrigerator—the chilled temperature is essential to both the texture and the refreshing quality. The filling softens significantly at room temperature, so don’t let them sit out for more than 20-30 minutes. Plan your serving accordingly.
Flavor Development: From a flavor chemistry perspective, these pies peak at 24-48 hours after assembly. Day one is delicious, but days two and three are often even better as the lime oil from the zest fully permeates the condensed milk and the flavors harmonize. Don’t hesitate to make these 1-2 days ahead—you’ll actually get superior results.
Transportation: Mini pies travel exceptionally well:
- Keep in a cooler with ice packs for any transport over 30 minutes
- Use a sturdy container with the pies sitting flat in a single layer (don’t stack)
- Transport whipped cream separately in a piping bag or container and top on-site
- The mini format is inherently more stable than full-size pies for transport—less risk of filling sliding or structural failure
─────────
Why This Recipe Deserves a Spot in Your Rotation
No-Bake Mini Key Lime Pies represent everything I love about smart pastry work: they use chemistry instead of complicated techniques, they deliver maximum impact with minimal effort, and they demonstrate that you don’t need fancy equipment or exotic ingredients to create something genuinely impressive. These are the kind of desserts that make people think you’re a far more accomplished pastry chef than the actual difficulty level would suggest.
From a technical standpoint, this recipe is brilliantly efficient. You’re leveraging acid-protein reactions to do the work that would otherwise require eggs, baking, and precise temperature control. The no-bake method eliminates the risk of overbaking, underbaking, or ending up with a weeping filling—all common pitfalls of traditional baked key lime pies. The mini format eliminates concerns about even baking, soggy centers, or challenging slicing. Every element is designed for success.
The flavor profile is bold and unapologetic—this is dessert with backbone. In a world where so many desserts play it safe with mild, crowd-pleasing flavors, key lime pie stands out by being aggressively tart and proud of it. That sweet-tart balance, when executed properly, is absolutely addictive. It’s the kind of flavor that makes you immediately want another bite even as you’re finishing your current one.
The make-ahead capability is genuinely valuable for anyone who bakes professionally or entertains regularly. Desserts that improve with time rather than declining are rare and precious. The fact that you can make these completely 1-2 days ahead, with only a quick whipped cream topping required at serving time, means you can prepare dessert during a calm moment rather than in the chaos before guests arrive.
These pies also teach foundational pastry skills that translate to countless other applications: understanding acid-protein reactions, working with condensed milk, creating press-in crusts, achieving the right consistency in whipped cream, and thinking about textural contrast in composed desserts. Every time you make these, you’re reinforcing techniques that will make you a better, more confident baker.
If you’re looking for a dessert that’s refreshing, impressive, foolproof, and genuinely delicious—this is it. No-Bake Mini Key Lime Pies prove that sometimes the smartest pastry decisions are the ones that let chemistry do the work while you take the credit. And honestly? That’s the kind of recipe wisdom that makes life as a pastry chef infinitely more enjoyable.
─────────
Recommended Drink Pairing
Sparkling Water – Lime or Plain: Lime sparkling water creates a flavor echo that amplifies the citrus without adding sweetness, while plain sparkling water provides effervescence that cleanses the palate between bites. The bubbles cut through the richness of the condensed milk beautifully. From a pastry perspective, this pairing allows the dessert’s flavors to remain the focus.
White Wine – Moscato d’Asti or Riesling: A slightly sweet Moscato d’Asti with its gentle bubbles and honeyed notes complements the lime’s acidity while matching the pie’s sweetness level. Off-dry Riesling offers similar balance with more complexity—look for German Kabinett or Spätlese bottlings. The wine’s acidity harmonizes with the citrus, creating a cohesive tasting experience. This pairing feels elegant for dinner parties.
Iced Tea – Green Tea with Mint: Cold green tea with fresh mint provides gentle tannins and refreshing herbal notes that complement the lime without competing. The slight astringency cuts through the creamy richness while the mint enhances the cooling, refreshing quality. This pairing works beautifully for afternoon service or warm-weather gatherings.
Tropical Cocktail – Mojito or Margarita: For adults, a classic mojito (rum, lime, mint, soda) creates a flavor echo that lime enthusiasts will adore—it’s basically key lime pie in cocktail form. A frozen margarita offers similar citrus intensity with tequila’s agave sweetness. Both options feel vacation-ready and turn dessert into a full tropical experience.
Espresso or Macchiato: A shot of espresso or espresso macchiato provides bitter contrast that balances the sweet-tart pie beautifully. The intensity of espresso can stand up to the bold lime flavor without being overwhelmed. This pairing feels sophisticated and works particularly well for after-dinner service when you want both dessert and coffee in one course.
No-Bake Mini Key Lime Pies
No-Bake Mini Key Lime Pies deliver all the bright, tangy flavor of the classic Florida dessert in adorable individual portions—buttery graham cracker crust, silky lime filling, and a cloud of whipped cream, ready in minutes with no baking required.
4
servings30
minutes40
minutes300
kcal1
hour10
minutesIngredients
1.5 cups graham cracker crumbs
0.25 cups granulated sugar
0.5 cups unsalted butter, melted
0.75 cups sweetened condensed milk
0.5 cups freshly squeezed key lime juice
1 tablespoon lime zest
1 cup whipped cream
Directions
- In a bowl, mix graham cracker crumbs, sugar, and melted butter until combined.
- Press the mixture into the bottoms of mini pie molds to form crusts.
- In another bowl, whisk together condensed milk, lime juice, and lime zest.
- Pour the lime mixture over the crust in each mold.
- Refrigerate the mini pies for at least 2 hours to set.
- Before serving, top each pie with a dollop of whipped cream.
Nutrition Facts
- Total number of serves: 4
- Calories: 220kcal
- Cholesterol: 0mg
- Sodium: 620mg
- Potassium: 400mg
- Sugar: 8g
- Protein: 6g
- Calcium: 60mg
- Iron: 2mg
About This Author

Aurora Wright
Pastry Chef & Dessert Editor
Aurora is the sweet side of Daily Dish. A trained pastry chef and dessert stylist, she’s responsible for our mouth-watering cakes, cookies, and confections. She brings precision, artistry, and a touch of whimsy to every recipe she creates — and taste-tests more chocolate than she’ll admit.
Favorite dish: Flourless dark chocolate torte.
Kitchen motto: “Life’s too short to skip dessert.”


